Painting an Antique Wash Stand

I have amassed quite a collection of “project” furniture and objects waiting for a future date with my creative magic sessions. I worry that some of this behavior is bordering on packratness (I don’t think that is a word, at least my spell check says it isn’t. But, you get my drift, right?!) So, when a Wagner rep contacted me about trying one of their paint sprayers, I couldn’t reply “YES!” fast enough. I had visions of setting up all those projects and spraying them down in a line-up fashion. But, I reined in my “glass half-overflowing” mentality and decided to tackle one project at a time. Good thing too, because although the Wagner Power Painter Plus with EZ Tilt (affiliate link) did spray at lightning fast speed, there were a few drawbacks.
But, I don’t want to get ahead of myself. I still want to give you a bonafide tutorial on how to fix, prep, paint and finish a wobbly yard sale find for yourself.

(I’ve included affiliate links for your convenience. I earn a small percentage from a purchase using these links. There is no additional cost to you. You can read more about affiliate links here.)
- Sanding Blocks – 60, 100 and 220 grit
- Gorilla Glue
- Clamps or rope to secure glued joints*
- Finish Nails (or brads)
- Baby Wipe or wet rags
- Paint Brush
- Primer (I used KILZ Clean Start)
- Acrylic Paint (semi-gloss or gloss preferred)
- Paint Sprayer*
- Power sander
- Wipe on polyurethane
*These items are purely optional. You don’t NEED them, but they help.
This wash stand had a $5 price tag on it. But, my neighbor gave it to me for $3. Is that robbery to talk someone into less than $5 for this antique?! In self defense, the stand was in pretty poor shape. It was VERY wobbly and had some big scratches on it. Can you forgive me?
Here is what you do when you find yourself as the new owner of a “this really should be trashed” purchase. Take it apart and rebuild it from the ground up. Having done this before with Daisy the Discarded Chair, I was prepared to tear this wash stand down to the ground. But, luckily it had some better joints than I had anticipated. So, I basically pulled apart anything that was not tightly joined.
The shelf over the drawer came off super easy.

As did a few joints.

I wiped the whole wash stand down with a wet rag.
Then, the side of the stand got some new glue and a few finish nails.

The joints got some Gorilla Glue and were set back together. And, I added a thin bead of glue and some finish nails to re-secure the shelf.

Next I sanded down the whole piece of furniture with these two 3M sanding blocks. I like to call them Tweedle Dee and Tweedle Dum because they are super easy to use. Even an idiot can’t screw up.

They work great for around spindly legs because they can bend and flex (I wish I could bend and flex like that!)

After wiping off all the sawdust, my wash stand looked like this:

Almost too pretty to paint, but it had some serious gouges, so I took a picture and said goodbye to the beautiful wood.
Here is where the race began. I decided to time myself painting on the primer with a brush. Then time myself using the sprayer for the first coat of paint.
Start your engine….paint brush and KILZ Clean Start Primer…GO!


After 30 minutes I had primed the entire stand from top to bottom.

After the primer dried, I gave the stand a quick, light sanding with a 220 grit sanding block and wiped it down with a damp rag.

I set up the sprayer, read all the directions (very important!) Then I filled the quart size reservoir and attached it to the sprayer. The Wagner Power Painter Plus doesn’t require a compressor, just a good old fashioned extension cord plugged into your household outlet.

Start your engine…Wagner Power Painter Plus…GO!

VROOOOOOM! The sprayer let out the loudest and most obnoxious noise I had ever heard (Note to self to wear ear protection next time.) I thought the sprayer was going to self destruct, so I let go of the trigger. Then I pulled it again and the noise returned, only to abate after a few seconds once the paint started to come through the nozzle. Phew, that scared me.
I breezed through painting the entire wash stand from top to bottom. I started with it upside down and quickly flipped it while it was still wet (I left a finger print underneath, but no one will know about that unless you squeal.)

And I was done. Then I looked at my timer and WHAT?!!! 5 MINUTES! Holy Cannoli! I had no idea a sprayer could shave that much time off a paint job.

I left the wash stand outside, while I took apart the paint sprayer.

To avoid emptying the paint canister, I covered the container with saran wrap and a rubber band.

Then I took apart the ENTIRE sprayer and cleaned out all the parts. It is soooo important to clean the sprayer thoroughly or you risk paint drying in your machine and ruining it. This is a look at the sprayer disassembled.

It is paramount to clean the tiny dual spray tips on the machine. They are small slits that can clog easily if the paint is allowed to dry in them.

After the wash stand had dried. I put the sprayer back together and screwed the paint container back onto the gun.
I was all pumped and excited to be done in 5 minutes! With dusk still 30 minutes away, I had no fear. BIG MISTAKE!
What was to ensue was a stressful 45 minutes of paint globbing, paint sputtering, my cursing, and frantic cleaning of the sprayer again. I finished spraying, but I had to use a different top coat color because I ran out of the first paint color. (Which ended up being one of those happy mistakes. You’ll see.)
I wiped off the big globs of paint and decided to give those areas a little “extra” distress in the morning.

After stepping back from the project, doing some research and having a twitter conversation with Shaunna (the furniture painting guru), here is what I concluded from my disasterouos 2nd attempt:
- The paint sprayer MUST have a full paint cup in order to work properly. When the reservoir gets down to less than 1/4 full any air that gets into the paint suction tube will cause the sprayer to sputter and discharge big globs of paint, instead of a nice even spray.
- The sprayer dispenses an INSANE amount of paint in 5 minutes and when it runs low #1 happens. I used a half gallon of paint on the first coat of paint on this small wash stand. Whereas, I normally would have used maybe half a quart to brush on two coats total. The drop cloth was so heavy with paint when I cleaned up, that I realized the majority of the paint was wasted in overspray.
- The Plus does not have a low paint level indicator. Therefore, it is very difficult to determine when you are getting low on paint until the sprayer starts to sputter and shoot out globs of paint onto your project.
- In the same vein, the paint canister only holds a quart of paint, and 1/4 of that isn’t useable unless you like Jackson Pollock style painting.
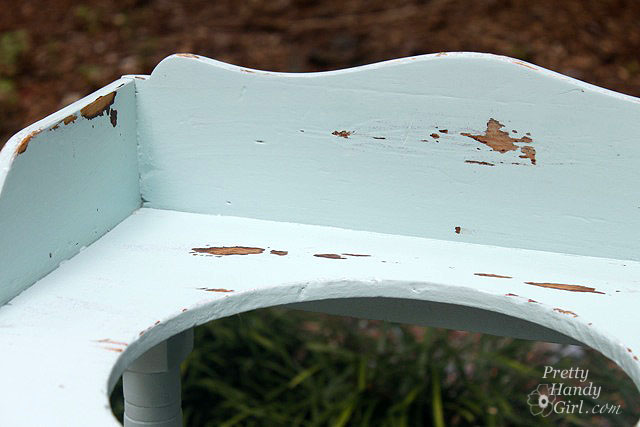
The next morning, I took out my power sander and gave the sink some character by distressing it.

This is where the happy accident occured. Because I had to use an aqua blue as the top coat on my sink, you could see the blue gray color peeking out! Which I think makes it look sweet, shabby and old.
Once I was happy with the amount of distressing, I sanded any chipping paint and rough spots with the 220 grit sanding block. Then, I cleaned off the wash stand with a damp rag. To protect the sink, I used Minwax wipe-on Polyurethane. I like the wipe-on Poly for speed. But, it doesn’t leave as thick a coat as the traditionally brush on kind. So, if you really want to protect a piece of furniture, use the brush on kind instead.

I added a cute little crystal cheap acrylic knob to the drawer.

And my new/old dry sink looks right at home in the corner of my porch! Although, it needed something…hmmmm….

…how about a plant! I dropped in a plastic pot with NO holes in the bottom. I filled the bottom 1/4 with rocks for drainage. And my pothos plant. I used to have a chippy pedestal that sat there, but sadly I had to get rid of it. I’ll fill you in on the details next week. It is a sad story ;-(.
Here is my summary of working with the Wagner Power Painter Plus model:
- Pros – Saves time. $100 price tag. No compressor needed.
- Cons – Small Paint Cup, No Flow Speed Selector, No Low Paint Level Indicator, Lots of overspray and wasted paint.
I will definitely try the sprayer again. When I do I might add Floetrol to my paint, which is supposed to help your paint even out and give you a smoother finish. (Especially if it globs on you.)
- Wagner Power Painter Max has a two speed selector AND a paint level indicator. This model runs under $100. Have a great weekend and see you next week with some more DIY goodies.


Children of divorce, because of the anxiety and stress prevailing at their homes, are
unable to concentrate on their studies because they suffer from a short attention span. The last step is approaching the
company for in-store financing. However, very often we come across circumstances where
marital responsibilities become so overbearing that they deprive a person of his or her
basic rights and liberties.
Hi Brittany =)
First time visiting and leaving a message on your site…. I LOVE all your projects and great tutorials.
I had to leave a comment on this particular post. Just this past weekend I returned my “used” Wagner Power Sprayer back to Home Depot. After trying the Wagner several times, each and every time it spit, splotched and made a huge mess. I’m now in search for a replacement. Thanks for sharing. It might give others a heads up when choosing a spray gun.
Cheers
This was a great tutorial and product review! Thanks for giving such honest opinions!! I think I would paint my daughter’s corner desk (which I have yet to build).
Would love the paint sprayer, I have oodles of pieces that I want to redo. I’ve been considering purchasing one for quite a while, so to win this would be awesome!!
I just wanted to take a minute to tell you that you have a great site! Keep up the good work.
Brittany!!!
I rec’d my Wagner Power Paint Sprayer & the Deck Mate that I won from you today! Thank you so much!! I am so excited to use it and I will definitely blog about it when I use it! Expect to see a link back to you in my blog! Thank you, sweetie!!
Your blog is so inspiring!!
~~~rhonda~~~
I have a dresser that I want to “shabby chic” and use for my dining room linens and silverware. I would give the deck stainer to my Mom. She has a huge back deck and likes to stain it herself. This would be so much easier for her to use.
I would LOVE to win! Have always wanted to try a sprayer
I love the job you did on your washstand…FANTASTIC. I can only imagine the amazing Jobs that can be done, I have a old 1970s dresser that i love, just not the brown speckled finish. I have been wanting to paint it for some time, but with all the decorative scrolling I didnt want to use a brush. This would be PERFECT for painting the dresser!!! Love your site and thanks for all the inspiration!
I really love you use new items and show us the cons and pros of said item. It’s better than reading reviews on sites like homedepot or amazon. I think having a paint sprayer will definitely leave a better finish and cut down on the time. I would love to get one but sometimes you just don’t know what is a good sprayer and was is not. Especially if you are spending alot of money on one and only to get disappointed.
The plant stand looks awesome!!! I’m a huge fan and always look forward to see updates on your site.
I enjoy reading about your projects! I came across your featured article in Handyman magazine…a 2010 issue about the closet transformation and here you are! I would love to win the Wagner Paint sprayer to help me with a closet transformation for my “tween”. I just moved her little sis into her own space, so I would use it for her room as well! Another inspiration I saw with your son’s woodland themed room. Thanks for the inspiration! We have been in our house for 10 years, and just now, I am beginning to try little projects that will give us a new feel for an old space.
Great shabby chic. I always looking for a better way to make things look vintage.
What a great giveaway! I have been wanting to do a make over of an old dresser for my son, and this would sure be handy! Actually, I want to do our dresser too… Thanks!
I would really like to win the Wagner….I would name it that! I enjoy your blog and have it on my list that I read often. You do such a great job at explaining all of your steps. Thanks for the opportunity!
Fellow DIY-er here and of course I’m following you! I had an issue with painting a dresser a few weeks ago that this sprayer would’ve totally fixed; want. one. badly. Thanks for the honest review and FYI tips if we do get one 🙂
Hi – I read your blog often and was really interested in the power sprayer because I’ve noticed many of the “professionals” seem to use them. I think they’d be great for eliminating paint brush marks and ensuring a smooth coat. Would LOVE LOVE to have one. We’re moving into a new home next friday and have tons of painting to accomplish!
Mudroom bench. No doubt about it.
I’ve got two dressers in the garage waiting for some TLC and a new coat of paint! Bring on the Wagner!
I would take the sprayer and spray allllll of the furniture in my garage waiting to be painted. All one color, all at the same time. You are not the only one with a packrattedness problem. 🙂
Great giveaway, love the way all your projects turn out! I have several projects (dining chairs, end table) to repaint, would love to try this out! AND my deck desperately needs to be refinished!
GREAT Blog, great redo! I love everything you do, just wish I had more time. This giveaway would make it possible for my chair, & deck to become a completed project. PICK ME!!!!!
I would love to use a paint sprayer to refinish my son’s convertible crib headboard and dresser!
I bought a “new to us” patio table and chair set at our church yard sale. It really needs a new coat of paint as does my patio furniture. It would be great to use the sprayer and have it all the same color!
Great giveaway. I am already a follower of your blog and on Facebook! Love all your posts and you do great tutorials. I would use the sprayer to paint my bedroom furniture set.
Oh, how I would love to win this. I have a chair and a coffee table that I need to paint. But I also need that deck stainer for some major repair work on our deck. Thanks for the chance to win.
I have been building furniture, ala Ana White, but I have not been able to hone my painting skills just yet. I’d love to have a sprayer to see if I could maybe get it right! 🙂
We are closing on our first home on September 23rd. I have a mountain of projects to get completed, so I’d say I would use the sprayer on just about EVERYTHING!!! =)
I currently have a garage of furniture I have been purchasing off of CraigsList that ALL needs to be repainted and stained…ahh It’s going to be a long process to get everything completed!!
Would love to win this sprayer!! I would paint EVERYTHING!!
I have been dreaming of one of these for months now!!! I’m a graduate student (too poor to buy) going into occupational therapy who loves to DIY and spruce up flea market finds! I’ve got some things laying around that could use just this!!
With fingers crossed!
Erin
I’m just starting to redo chairs, so this would be PERFECT! Also-our deck is an eye-sore! The previous owners painted it, and now it’s all flaking off. We’ve sanded it, but I think a stain would be the best thing, rather than ripping out the whole thing!!!!
Thanks!
Jen
I’d love to try one of these. I have just started going to flea markets and getting all kinds of stuff to be creative with. I am painting frames, old porch posts, tables, shutters, basically anything and trying to and re-purpose things to use around the house and sell at a craft fair. Love your ideas, thanks for sharing!
Thank you for sharing your talent with us! i’ve always had a passion for DIY projects but never knew how to get started or what to do.
This would be so perfect to give to my dad for his birthday! He is a big time handy man. He is wanting to stain our back deck and this would help him out so much!
I would love to have one of these! ann
I love your blog! I’ve always wanted to “shabby chic” my bedroom furniture, but was afraid of the time commitment trying to paint it with a brush. This spray painter would do the trick in no time! Thanks for the information and the great review.
Thanks for this great review of the paint sprayer….I’d like to have one for painting outdoor furniture. Although the cleanup of the parts and the wasted paint, sound like they make the process equal in the amount of work they require. Even so, it’d be fun to try out the sprayer on a big project… Thanks so much!
I absolutely love your refinished washstand……whether by design or serendipity it is lovely with that finish!!! Great job!
Thank you so much for the instructive tutorial for the Wagner Power Painter Plus. I have wanted to try a sprayer for quite some time and bought a new Wagner Control Spray “Double Duty” Sprayer two days ago because it is ETL rated for indoor use. I’m redoing cabinets in our kitchen and bath and with this one I can paint the inside of the cabinets in the room and the doors outside. I’ve been working on the hinges and screws so I haven’t used it yet, now I’m contemplating returning it to exchange for one like yours. Is yours rated for use indoors?
Of course I’d rather win one so I’ll hold off on using or exchanging it!! Thanks again for the best review and instruction. Take care, VBg
Thanks for the great review! With the sprayer I’d want to try my hand at re-finishing furniture. I don’t have the time to hand paint stuff but reg spray paint is full of nasty chemicals. I love that I can use whatever kind of paint I want with this thing.
Thank you for the opportunity to win! I am itching to repaint my bedroom furniture, and my deck needs some serious attention! The Wagner tools would save me some serious hair-pulling 🙂
Would love to use it to spray paint the lattice trellis we have been putting off painting. Thanks!
My deck is in desperate need of new stain, so the Deck Mate would make the job a piece of cake. I’ve been wanted to paint my ugly. dark 70’s kitchen cabinets cashmere white for ages and the Wagner Power Plus could get it done in no time
Wahoo!! I hope to win and I’m glad that I am a new follower! I have an arsenal of things I need to repaint…ie hopefully hide the ugliness of my husbands stuff that we have to keep! :p
This tutorial is WONDERFUL! Thank you for doing it : )
If I won this sprayer, I would FINALLY finish up some projects I’ve been putting off for a very long time now. The first one being paint a kitchen table I bought for 5 dollars at a yard sale!!
Oh my, this would be excellent to win because during the 5 1/2 years we’ve been in this house we haven’t touched up the deck’s stain or the front porch’s paint — this would remove a huge obstacle for us in getting this done.
Thanks for the tutorial! I have several furniture pieces I am looking to spiff up including a large dresser and a china cabinet.
This was really interesting. Thanks for the info.
If I won your giveaway, I’d use it to paint the outdoor kitty shelter I want to build for our neighborhood strays.
Despite the hiccups, your wash stand came out pretty!
I have a curio cabinet that I have wanted to paint for quite a while and this would be great! I bet that deck mate would come in handy, too!
I’ve been putting off restaining my deck but I’m now motivated and think this product would make the job much easier therefore I would love to win it!
Brittany — Your blog is one of 5 I follow religiously (even though you don’t need to be a follower — just wanted to give you a thumbs up)!
I am really wanting to change the colors of my shutters and front door on my house by painting them a darker color. I think that the previous owners did a quick, uneven job of it to sell the house…and they just kind of blend in with the siding.
I have a bench out in our back yard that I bought paint for and want to strip and repaint it. THis would make that so much eaiser!
Your little project turned out great… I was a little nervous for ya but like always you pull through! I have a couple of things that are needing a bit of TLC (two end tables and a coffee table). Winning this sprayer just might help me out! Thanks for your honestly and for sharing your real life experiences. AJ – queenofmynest(at)gmail(dot)com
My daughter & I are just starting to redo old furniture and we’re loving every minute of it! This tutorial was super helpful & informative! I would love to win this awesome sprayer & use it to paint the furniture pieces with lots of detail in the wood. Seems like this would be the perfect solution 😉
Thanks so much for your honest assessment of the sprayer. I’m looking to buy a house really soon so both of these products would come in handy for all the projects I’m sure I’ll be doing. I would like to paint my bedroom furniture & I’m not looking forward to brushing an almost 8ft armoire lol.
I love how your plant stand turned out! I also love your blog (I tell you that all the time) 🙂 When it comes to giving tutorials you don’t skimp. For a newbie like me that is soooo important! I also like how you tell it like it is – you’re not a sell out. In saying all that, man o man, would I ever love to win one (esp the deck painter) ours needs it so bad! And yes, with all my new “knowledge” I can see the beauty in old beat up pieces *thanks to you* and would love to refurbish them – Still in that learning curve. My hubby says I am turning into a hoarder! 🙂
I was definitely already thinking I needed a tool like that! I have tons of projects at home, including painting my new chicken coop 😉
The paint sprayer truly does save time…5 minutes!! Wow!! I have a “Handy Girl” must have tools list and these two would help immensely! We recently tore off our back deck and will be installing a new one in the upcoming weeks. Pretty Handy Girl and Wagner Tools…You Rock!
Oh my! I could really use one of those spray painters! I have several pieces of furniture I need to paint as well as my back door needs some freshening up. You little table is so cute, it turned out great! Thank you for the inspiration!
Excellent review. I have heard things here and there, but never as detailed as you. Thanks a ton. I’m wondering if it would do better with larger pieces of furniture, as far as wasted paint goes? I would love to find out, I have a whole bedroom set I have been avoiding because it would take a ton of spray paint to get all the intricate details that a brush would be a pain to reach!
Hey! I would love to get my hands on a paint sprayer! I am starting my own business soon (very small business) refinishing and building furniture. This would make my job much easier! I’ve been following you for awhile now and I REALLY appreciate the tutorials! I couldn’t be where I am at right now if it weren’t for people like you, so thanks!
Blessings
I would still love to give the sprayer a try. I have a fence that really needs some coverage…and a kids bed that needs some help…and about 10 other projects I hope to do now that I have 3 kids in school at least 3 mornings a week 😉
I’ve always wondered about using a sprayer. Do you think there would be less overspray if something more substantial (with less openings) such as a chest or buffet was painted? I’m looking forward to reading about your next spray painting project. Thanks for the giveaway!
my daughter and i have just got a booth at our local flea market. we want to incorporate some painted furniture pieces. since she teaches full time, i am the hands on. what great amounts of time this would same me and we are just getting started so don’t have much capital to work with. thanks
that deckmate is a winner, to redo the deck is a killer. Your review of the wagner sprayer was so honest, really appreciate that.
From another furniture pack pat, I have tried this paint sprayer and had the problem of paint globbing. But, I might have to try again after seeing this tutorial.
I’d love to win the sprayer. I’d use it on the deck I just built. I’m waiting for the building inspector to sign off on the project, then I can stain the deck and paint the railings.
Love this project and love the Wagner painter.
Great damage control on your sink! I’d love to try the sprayer…probably on this shelf project that I’d like to start.
Great, informational tutorial…we are trying to decide a paint sprayer is the way to go or not and I already forwarded your blog to my husband! We would love to use the sprayer to save time as we’re repainting all our living room furniture!
Wow, what a great tutorial. I have been toying with the idea of getting a spayer for a while now. I would love to win this and give it a try!
Pick me, pick me! I would love to have this for a project I have been putting off for a LONG time. I want to repaint an antique bed my grandmother gave me, but don’t want to spend the hours of time doing it, this would certainly help!
I laughed at the mention of your stockpile of projects waiting to be painted. I have a similar problem. I would love to win this sprayer! The first items I would paint are two vintage wood chairs that have been sitting in my basement WAY too long. 🙂
Oh my gosh! I would love this! I have furniture AND a deck that all need redone!
Plus, really love your site Pretty Handy Girl. I’m a daily reader. 🙂
First thing I’d do is make over my daughter’s tall boy. It NEEEDS a makeover!!
I have so many salvaged pieces of furniture in my basement that are longing for a second life. I think i’d start there. Or maybe i’d start by removing all of the doors in our 1920s house to paint all at once… Or maybe I’d start with our shutters. Hmmm…so many projects I could use the Wagner paint sprayer for!
First – I LOVE your site (no, I’m not trying to butter you up)! You really inspire me to try things that I might not otherwise – power tools scare me but I’m getting better! I appreciate your honesty about how things work for you. I have several projects that I would love to tackle with a power painter. My deck is in line for a new coat of stain, my antique – aka old and beat-up – dining room table is crying for a coat of black paint along with my china cabinet. I also have the beat-up furniture packrat gene. Other projects include a VERY rough hoosier cabinet, the base of an old treadle sewing machine that needs a top, and some other pieces that I have hopes will eventually be beautiful! Thanks for the encouragement!
Brittany, Love the giveaway!
I have a dresser and a vanity that needs to get finished, this would help alot!
Seriously what project? You need to make that plural for sure! I think two of my major ones would be painting our new deck – it was just replaced because the hail storm we had in April destroyed the old one (along with 50,000.00 worth of other stuff on our house but thats another story). And then our kitchen cabinets. We closed on this house the day after the storm so I’m killing myself with projects and have been dreading hand painting all of those bad boys!
Oh yeah LOVE your blog you keep my creative mind churning!
How funny, I am just taking a break from priming my cabinet doors that I have decided to paint and I have been debating purchasing a spray paint gun all morning! If I were to win, I would definately use the sprayer to paint all of the cabinets in my entire house! They are all that ugly grained oak. I started with a small bank of cabinets in the upstairs hallway and I just don’t know if I have it in me to do roughly 52 doors (crazy, no?) but with this sprayer, queue the heavens parting music… and the deck sprayer would be the icing on the cake. My deck is a sad deck and this would make it (and me) so happy! : )
I, too, have a garage quickly filling up with curbside finds just waiting to be painted. I do not have a sprayer, and have never used one, but would love to give it a try! And, I love following your blog through facebook!
Love your honest review! I would love to win the sprayer #1 because I would like to win something…lol but also #2 because I think this would work great on big projects like the closet organizer I am going to build in my new house and the built in bookshelves that are my next project.
Our deck desperately needs to be restained and I would love to try it out on the storage system I’m building for our bonus room!:)
I would TOTALLY use this to paint my 3 daughter’s playhouse! I am ready to use it next week! Pick me!
It turned out great! Thanks for walking us through the paint gun process! I have always been curious! 🙂
Is this open to Canadians? If so I’m in.
I love your blog, I started following.
I have 3 dressers and a picnic table I’m going to redo, so this would come in handy.
I really appreciate your honest review of this paint sprayer. And I also appreciate your solutions for when things go wrong.
I have a huge wooden deck that needs help and I dread the woman hours it will take to hand paint it. I also have a fence that has a few scorch marks on it, that needs to be repainted. Long story! LOL!
And an older bedroom suite that needs updating.
Thanks for this great giveaway
My back porch really needs a good painting! I really appreciate your honesty in reporting..thanks!!
Ohhh this might help us! We are routering and making all the trim for our 3400 sq ft home ourselves. We also have 5 kids ages 6 and under, so anything that saves time is a HUGE help. I enjoyed reading your review.
Love it!My storage is full, I need this spay gun to get busy and do something great! 😉
I would secretly paint our garage when the hubby is at work, to surprise him that I completed a project all by myself!! 🙂
I’ve had my eye on this sprayer for quite some time. I have a dresser, headboard, and mirror all ready to spray if I was lucky enough to win this fabulous prize.
Your piece looks great!
I am going to be building a pantry shelving system and a closet organizer unit in my house. I’m thinking a spray gun like this may help finishing it in a timely manner.
I’d use it on our screened in porch floor. It needs stained horribly, and I’ve just been way to lazy to accomplish it =)
i would use it for my kitchen it needs to be totally redone and i know painting it will do the trick i mean walls cabinets door all of it….
dollhousecreation(at)gmail(dot)com
I would love to winner a sprayer. I’m trying to refinish some furniture for my son’s room and having a sprayer would be a big help.
On a blog that I follow I saw an adorable painted chest of drawers decorated with a painted owl. I thought that was so cute and would love to give that a try.
Great job, I LOVE it and not just because it’s my color 😉
I would use the sprayer to complete every half done project I have going!
I just recently found your blog! My husband and I are starting to turn into patracks too–we keep finding great things we know we can spruce up! I’d love to win this!
Certainly, I would love to win the sprayer…I am in the middle of a total house redo, including painting a wholebunchafurniture…HOWEVER, more importantly, your invitation to comment on what I like about your blog is timely…what I like? I like (alot) your authentic voice when you write – down-to-earth, not fussy – and the way in which you explain the how-tos. While a picture is supposed to be worth a thousand words, your words (and experience) are priceless. You inspire me, but more importantly, you build my confidence – and I expect you do that for countless others. Thanks so much for what you do!
Thank you for the honest and fair review. I really enjoyed reading it. I’d love to try out the sprayer. I have an old desk that my husband had since he was very young. It’s been calling to me “paint me, paint me”. ;D
Brittany Great information! I really appreciate you showing the MinWax product. Following through w/ a protective coat is an area we need to improve on & it helps knowing what you use. We would definitely put the sprayer to good use – now that the weather is finally cooling off, let the DIY-ing begin!
We use Annie Sloan Chalk Paint for our projects. This cuts down on some of the steps you had to take. The reapir steps were great. So glad to have discovered your blog. ASCP can be sparyed on but we have yet to invest in a sprayer. This would be amazing score for us!
actually, I dropped by to tell you I featured your CSI lampshade today, but hey – I’ll take a Power Painter! I’m torn between a Wagner and an el cheapo that needs a compressor. Already have the compressor, but if I win I could use both!
Yes, Floetrol will help. Even if you brush on paint, Floetrol helps.
Thanks so much for all the tips and your honest review. Hope people keep sending you stuff so you keep reviewing. Either that, or you need a job on QVC 😉
I really like the little wash stand. Thanks for a fair review!
Love your wash stand! I can think of a zillion projects to do with the sprayer, but I would start with my mom’s bedroom furniture. She wants to paint it and it is a HUGE project…this sprayer sure would come in handy!
This is a FABULOUS tutorial!! Thanks! I would love to spray paint a hutch and table I have! The deck sprayer I would do my mom’s deck for her! Thanks for the great giveaway!
Oh wow! What a giveaway! I would love to win this and thank you for the honest review!
I have projects going all the time so I could really use this. I appreciate your honest review and I already follow you! 🙂
Brittany – Love this tutorial! It confirms that I’ve been doing the right stuff so far on my first couple of paint projects (ever!). I have all of a sudden become a yard sale/Craigslist junky and I now have TONS of furniture to refinish. Its not being a packet – its planning in advance! 😉 What could I do with a paint sprayer???? Hmmm… a buffet, 3 chest of drawers, a dresser, a desk, a vintage vanity… Shall I go on? LOL! And I’m wondering if the deck stainer could be used on old wide planked hardwood floors to stain them? Betcha I’d find out! 🙂
That was supposed to be pack rat… Darn auto-correct! LOL!!!!
I have some old furniture that seriously needs a paint job, and a white fence around my veggie garden. and I could keep going
thanks to you and wagner for the give away
Oh my goodness I have this old dresser that I have wanted to paint for years (not even kidding) but I’ve kept putting it off because of the work. This would get me going, going.. done!
Brittany-the washer stand looks awesome!! And from just the time you saved on painting, the Wagner Power Painter looks awesome. I could definitely find a use for it–I’m planning on re-doing my kitchen table, and I have a shelf that will need painted soon.
Hope you’re having a great day!
We bought a Wagner paint sprayer about 8 years ago when we were painting our house. My husband was sure that it was better than a brush, but the paint didn’t last more than a year. Since then we have brush painted and had much better results. I have to say also that it is a pain to clean if you aren’t doing a larger project. That said if we had one I would love to get to work on our kitchen cabinets with it. I think it would give them a smoother look than a foam roller, but only if I win one. I don’t think I’ll ever buy one again.
Brittany, this is the BEST tutorial I have ever read! You did an amazing job explaining how you did this project. I must say, I really liked how you used your phone to show the amount of time each step took. You have inspired me to get to work on several pieces of furniture that I have that needs to be painted! I am headed to prowl around your blog now! Your entire blog is amazing! I am your newest follower…I am a fairly new blogger. I hope you will come visit me sometime!
~~~rhonda~~~
http://www.ABlissfulSpirit.blogspot.com/
Thanks for your thorough and fair review of the paint sprayer. I would really love to win your giveaway. I have great plans for some old furniture and a wicker hamper that’s been calling out for a good paint. Fingers crossed!! (PS- I do follow your blog and like it too)