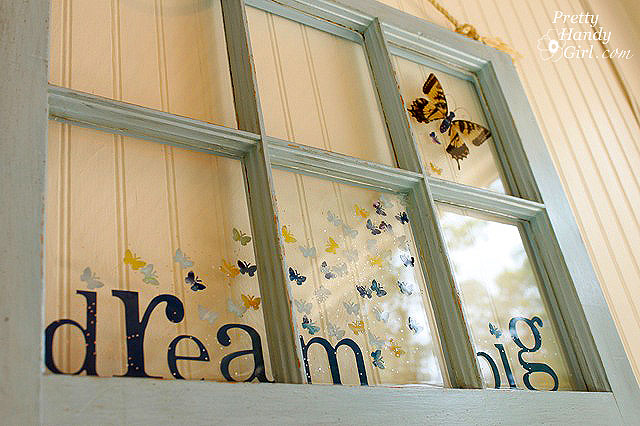
Dream Big Butterfly Window – Resin Craft
Phew, what a week. I’ve been working on about 5 different projects simultaneously. The biggest accomplishment this week was my screened porch makeover. I have been itching to make it an outdoor living and relaxing room for about 4 years now. Well, it is about 95% done. And to celebrate, Pretty Handsome Guy and I slept outside on the porch last night.
One of the projects I completed for the porch was an old curbside window that I turned into a unique piece of art using a product that ETI sent me. The product is called EnviroTex Lite and it is a high gloss resin polymer compound used for sealing and protecting arts, crafts, jewelry, countertops and more!
I am thrilled with my art project and it looks fabulous hanging up in our porch.

I have to admit, I was a little scared of the EnviroTex Lite. Especially when I read the part in the instructions about using a propane torch! I had visions of having to rent a welder’s helmet and lighting a big propane torch. YIKES!
Well, my fears were unfounded, and I ended up using a bic lighter like this one:  The utility lighter was more within my comfort level. And the prep and pouring steps were easier than I had envisioned. Won’t you come along to see how I made it?
My beautiful butterfly window started out looking like this:

Someone was throwing away these old windows. So, as usual, I slammed on the brakes (as my kids expressed their disgust at me) and saved them from the landfill. It took a lot of scraping, cleaning and painting to get them in a presentable state, but I’ll show you those steps in another tutorial. Let’s just fast forward to a clean shabby chic painted window for times sake.
Creating the Art:

Big Butterfly Window Materials:
(I’ve included affiliate links for your convenience. I earn a small percentage from a purchase using these links. There is no additional cost to you. You can read more about affiliate links here.)
- Cardstock weight scrapbook paper
- Cardstock letter paper
- Butterfly hole punch
- Real Butterfly Wings (found in my yard from a cat’s discarded hunt remains)
- Glitter
- Mod podge
- Small cup (to pour mod podge into)
- Scissors
- Paintbrush
- Eye bolts for hanging
- Rope for hanging
Start by cutting out paper letters and punching out butterflies until your thumbs are sore. Then lay out the design on the window panes.

When you are happy with the design, anchor everything onto the window using mod podge. Paint a thin layer of mod podge on the back of each letter and paper butterfly. Then pressed them down onto the window panes. This step is important as it keeps everything in place while pouring the resin.

Use extreme caution with the butterfly wings so as not to break them or brush too much of the color off.

Gently press the wings onto the window. You may need to replace the butterfly’s body with a paper one so it doesn’t stick up above the resin. (My poor butterfly was bodiless. I think the cat ate it. I just hope my winged friend didn’t suffer.)

Before the mod podge can dry completely, carefully wipe any excess off the window. If you leave some mod podge exposed on the window, it will be immortalized in the resin forever!
Rub on transfers work perfectly for the butterfly’s missing antennae.

Pouring the Resin:

Big Butterfly Window Materials:
Included in the EnviroTex Lite kit:
- Bottle of Resin
- Bottle of Hardener
- 2 Mixing Cups
- Stir Sticks
- Rubber gloves
- Disposable brush
Not included in the kit:
- Utility lighter
- Glitter
- Protective plastic to cover work surface
- Exhaust fan (set up in a window to pull fumes away and out of the room)
- Dust mask
- Eye goggles
- Level
Set the window on the protective plastic. Set the level on top of the window. Check both directions and prop up your piece using shims under the window or under the table legs until the window is completely level. Skipping this step will result in the resin puddling in the corners of each pane and leaving an inconsistent depth.

Put on your protective gloves, dust mask and eye goggles. And don’t forget to turn on the exhaust fan. No need to fry your brain during this project.
Pour equal amounts of each bottle into the first cup.

Stir the resin and hardener mixture thoroughly with the wooden stick. Be sure to scrape the sides of the cup. Then pour the mixture into the second cup. And thoroughly mix the mixture again. Failure to follow these directions could result in a BAD CRAFT-FAIL! So, just follow those directions. Okay?

After your mixture is thoroughly mixed, begin by pouring small amounts into the center of each pane. (I only poured the resin into the four panes that had objects pasted on them.)

Use the brush to gently spread the resin mixture to the edges of each pane. The resin will level itself as it dries.

After the resin is spread evenly, sprinkle some glitter around the letters and butterflies.

After a few minutes little bubbles will rise to the top of the resin. Use the lighter several inches above the project to pop the air bubbles. (I think I had more fun popping bubbles than any other step!)

Check back after about 5-10 minutes and pop any newly formed bubbles. Let the resin dry overnight (at least 4-5 hours. Times may vary depending on temperature and humidity.)
When the resin is completely hardened, use a drill bit to drill holes in the top of the window.

Then insert eye bolts on each side.

Thread some rope through the eye bolts and hang your new piece of art!


I just love how the beauty of the butterfly is preserved in the resin forever!

This project was a lot of fun, and the results truly exceeded my expectations. I did not pour any resin in the top two window panes. The panes that do have the resin are completely transparent and look exactly as clear as the naked panes.
What do you think? Would you try a resin art project yourself?

Disclaimer: ETI sent me EnviroTex Lite to try out. I was not paid or compensated for this post. My opinions and critique of the product are honest, truthful and my own.
You won’t believe all that you can do with this product. Envirotex Lite was created by Environmental Technologies Inc. (ETI), which is the home for many resin and mold making products.
The use of resin in jewelry making, mixed media and paper arts continues to grow in popularity. Today, artists are using ETI’s products in many crafty ways and they will be showcasing these works of art on their new blog “Resin Crafts”.
Check out ETI on:
Resin Crafts Blog | ETI on Facebook | ETI on Twitter
Where did you get the stencil used for the Dream Big ? Is there a name for that font?
It was a pre-cut scrapbook paper.
How were you able to pour resin over the butterfly wings without them turning clear? I’ve read many crafter’s experiences where they attempted to cast in resin, and the wings became clear and colorless.
The wings did slightly discolor and become a little transparent, but it still looked good. I did coat the wings with ModPodge before pouring the resin.
What did you use to actually hang it from the wall?
Just a nail (bigger than a tiny picture nail, but smaller than a framing nail.)
Did the resin seep through the window panes? Or was there a way you seed the seams where the glass meets the frame? Thank you!
No, the resin is thick and the glazing on the window stopped it from seeping through.
I have been trying to find tutorials on how to do this type of project for about an hour. Yours is the only one I found that has actual easy step by step information! Thanks for sharing : )
Would it hold up to bring outside?
Could one use sea glass or marbles with a project like this?
Linda, Absolutely! I bet that would be beautiful. I’d probably stick to flat glass beads since the marbles may not get enough coverage of envirotek to hold them.
Lovely project …. I would like to try it but I’m rather visual person and like to watch before I attempt. Is it possible to post a video using the same method please. Making a small frame in video will help. thanks !!
Sorry, I don’t have a video tutorial of this project.
What Size Eye bolt did you use?
Amy, I’m not exactly sure. About a 2″ eye bolt? I’d look at your hardware store and buy one that is strong enough to hold your window.
what size eye bolt did you use to hang the window frame?
So, I’m not sure if this is another site of yours somehow, but I wanted to let you know, I found this:
http://dochaoaoteto.blogspot.com/2011_07_14_archive.html
It’s this exact tutorial but in Portuguese. IDK what you can do about it I just thought you should be aware.
I saw this awesome window in DIY magazine. Until I got to the end of this post, I didn’t even see the glitter. That must look beautiful when the sun glints off it.
Love your blog and your writing style. “Cutting out paper letters and punching out butterflies until your thumbs are sore” lol. Been there; done that.
I’ve been looking for a quick easy way to do this type of project and your instructions fit the bill!! Can’t wait to do my french door like this! Thanks. Beautiful windowpane BTW!!
How did you pour resin over the butterfly wings without ruining them?? I always thought the scales would lose their color with resin (according to crafters). The wings still look great, even though they got a bit darker.
I too have used old windows I create with. I want to pour Envirotex Lite to preserve them and make sure my glass pieces stay on. However, I have read that it yellows from sun and can also soften. I would like them to be hung in windows so would that be a problem? Also any suggestions on gluing glass to glass? I’ve tried many different glues and none seem to work if they get cold. I need a lot at a time so the little tubes of epoxy would not work. Thanks.
Terri, mine has yellowed slightly but it’s not in direct sunlight. The EnvirotexLite hasn’t hardened. But, there is a big air bubble that formed in one of the panes. It might be from exposure to cold and heat as it is outside on our porch the whole year. Have you tried E-6000? That’s the best glue I’ve found for gluing onto glass. But, then again, it would be expensive since you need so much.
Yay! I’m so happy I found this post! I have several gorgeous faux stained glass pieces that I’ve bought in galleries, and now I’m ready to put my craftiness to the test and make something myself. Will this technique work with cut glass, or marbles, as well as, paper? I think your project is just gorgeous. You’re very talented! 🙂
Sherri, I don’t see why it wouldn’t work for glass. The flat marbles would probably work, but not the round ones (you’d need a lot of thickness to hold it.)
Can this project be completed without the resin step?
Shannon, sure, you can handle it anyway you like. However, it won’t weather or last as long if you don’t have a protective coating over the art. Especially the butterfly wings.
Thanks for such a helpful post! I used it for reference when I painted my bathroom counters – http://mrsbomb.com/1254/painting-the-counter-faux-granite/#.UhezThvvs_0
Thanks again!
Are you able to pour the resin over photos without ruining them?
Tiffany, yes, but you need to seal the photos with a coating of Mod Podge first.
Holey Smoke!!!!! I absolutely love this…I’ve been looking for something to do with the window frame I purchased years ago…I had something in mind and of course after all these years I forgot what it was….but what you have done here is just beautiful…I love it…thanks for sharing
I’ve been trying to rack my brain for a cool piece of interesting art above the quest bed. I think this is just the thing, even the saying is a winner. So glad I stumbled onto your site. I’m thinking a mirror behind and some type of soft hidden lighting source for illumination….. hmmm. Will be a lot of fun to play with and will match the french door design. Wow your brilliant. Thanks!
I love this! I was just given a large window and was trying to decide what to make with it. I have a few questions: Will the elements of your design fade? Does the resin prevent that from happening? I attempted to use pressed clovers on a project and even though they were already dried, they turned brown and look gross before I could finish and I ended up sanding them off. My other question: Can the resin be removed later if you decide to change the design (or the design fades!)? 🙂 Thanks!
Lisa, it will fade if it has been in direct sunlight. But, mine hasn’t faded yet. And, no, you won’t be able to remove the resin without a blow torch (I’m guessing now.) That stuff is permanent!
Hey I’m trying to recreate this but I’m having trouble finding the supplies. Where did you get the card stock letters and that cool card stock paper? Also any ideas on what to do if you cant find a real butterfly to use? I’ve been looking into butterfly stickers and decals but haven’t had much luck…
Stu, I bought the cardstock letters in the scrapbook section at Michaels or ACMoore. They are all on one sheet and had to be cut apart. I bet you could print out a Google Image of a butterfly and use it on your window. As long as you aren’t re-selling it I think you’d be okay.
I agree that resin is great for all of its uses; however, keep in mind that it is in no way good for the environment. Resin does not degrade, and cannot be recycled. For that reason alone, I try not to use it when I can find an alternative (perhaps sandwiching the glitter/words between two layers of glass?).
This is so cool! I love it! I’m your newest follower and I have pinned your beautiful artwork! I would love for you to link this up at my Link Party! You can find it here:
http://thewellcraftedhome.blogspot.com/2012/05/well-crafted-wednesdays-link-party-4.html
When are you going to post about the perfectly shabby window? I have one that I’m going to make into a dry erase board and put paper behind the glass to make it more interesting. If I wanted white, it would be perfect the way it is, but I want it blue. I experimented with the easy way, and I don’t think I love it. I’m assuming this is going to require sanding, priming and repainting. I’m going to need better weather for sanding, which is why I experimented with the easy way.
Very unique and Beautiful, you did a wonderful job!
This is wonderful. Great tutorial. I did my first tutorial the other day. I have a lot to learn!
Seems like a lot of work, but the result sure is fabulous…so elegant!
My Firefox stopped working saying the server wasn’t found but Internet Explorers still works. I used to use firefox all the time but only recently it stopped working. I already checked the firewall and it allows firefox so i don’t know what’s wrong..
The best thing about this site is I always find unique designs and brand new ideas that how to turn throwing materials into a eye-catching useful material. This was an great example of that. I will definitely try this at my place.
Thank you so much! You replied faster than I thought! I didn’t know how to put pictures on here so I’m emailing them to you now! The ones on my facebook are in an album titled Cottage because we actually made two! They turned out great- no idea how you come up with all these amazing ideas! 🙂
Hey!! We are avid readers of your blog and followers of your Pinterest as well as on facebook. I actually made this butterfly window to hang up at our assisted living facility- there’s a bunch of pictures on my facebook! Anyways, My Fiance’ and I were chosen as finalists on NBC’s Ultimate Honeymoon Contest based on an essay I wrote about this same facility. If you get a chance this week, we would really appreciate it if you could vote for us (Chelsea and Kris) at http://www.NBCMiamiHoneymoon.com. It would be awesome if a DIYer could win this year!!
Chelsea, I’d love to vote and I’d love to see your butterfly window! Looks like voting isn’t open until tomorrow. I’ll check back then.
Hi Brittany I loved his work and I’m putting on my blog with due credit of course, hope you do not mind. Congratulations for the beautiful work.
kisses
Oh wow…My daughter loves this idea so much we are designing her whole room makeover around it! Thanks (I think) 🙂
I have to say before I comment that in the browser the title was abbreviated “Dream Big Butt” and I thought – what the? Hahaha! This is so pretty! I love the glitter and all the dimension. Awesome!
ROTFL! Ha, ha, that’s me. Dream Big Butt! Thanks for your comment and for the laugh this morning.
Brittany
That turned out so beautifully!
This project is great. We love your ability to see something others consider junk and transform it into something beautiful.
Thanks for your comment. I agree, but sometimes Pretty Handsome Guy thinks it is a sickness that I bring home too many curbside finds. Some people rescue animals, I rescue trash?
I LOVED this project and shared it around! I live in the country and tend toward country decor so I will be attempting this project. Thank so much!
*~*~*
Michele Shepherd
owner, http://www.talkfortots.com
I LOVED this project and I shared this post all around! I live in the country and tend toward country decor… I will be attempting this project!
*~*~*
Michele
owner, TalkForTots.com
I love your window! What an amazing design – and nature even provided a real butterfly! I was a little nervous during the blow torch talk but calmed down as I realized we’d be using a lighter 🙂 Where will you hang this treasure – absolutely gorgeous!
Mary, well, I guess nature provided the butterfly by way of our neighbor’s cat. Sadly.
The window has a prominent spot on our screen porch. I’ll give the tour sometime this week.
Seriously, I want this! I shared this fabulous project on my facebook page. http://www.facebook.com/JaseysCrazyDaisy.
I am so interested in your window cleaning up tutorial. Would you let me know when it posts?
Happy Day,
Jasey @ Crazy Daisy
jaseyscrazydaisy.com
[email protected]
Jasey,
Thanks for your comment. I’m not sure when I will post that tutorial. Are there any tips or pointers I can help you with in the meantime?
That is BEAUTIFUL! I think we will be going to the restore today to find a window. Thanks for sharing!
Good luck, hope you find some nice ones at the ReStore. That reminds me, I haven’t been there in a while. Need to make a trip there soon. Just to see what’s in stock.
What a really clever idea & it looks so pretty. i love the new colour, thanks for sharing this tutorial
I’m really excited to try this! Thanks for the awesome post! It looks so fantastic 🙂
Coolest resin project yet! Love it. It’s beautiful. )but of course it is…you made it!) 🙂
Ha, ha. You are too funny. Have you used resin before? It is really cool stuff. You’d like it, oh crafty paper scraps queen.
Your art looks amazing! I love that you preserved the real butterfly wings, and I also love that you guys slept on the porch 🙂 Sounds so fun!
Thank you for sharing your great idea!
Katie, thanks for your comment. It was fun sleeping on the porch, but I’m done with that for a while. Air mattresses are not as comfy as a memory foam ;-(.
It’s fabulous! Great idea – the utility lighter. I wish I’d thought of it. I was too freaked out to pour the resin indoors but it turned out okay, even in cooler temps.
Love the butterflies. Just make me smile 😀
I was freaked about pouring indoors as well, but ultimately had to because of the heat and humidity.
Oh and I was seriously freaked about the propane torch we supposedly needed! ;-D
Brittany
This is beautiful! How fun that you have real butterfly wings. Great idea for the resin!
Fun for me, not for the butterfly. Sometimes I like the neighbor’s cat when he gets moles and voles. But the butterflies and birds always makes me mad at him!
Thanks for your comment.
I love old window projects and yours turned out beautifully! You are very creative! Lesa
I love your butterfly window. Thanks for the tutorial as I’m a bit rusty on that application. I once did a 5 foot (after trimming off bad spots) rattlesnake on a table I made and did a wood burning of the sink hole where my husband found the snake on our property. I have painted a beach scene on a window for my daughter but had never thought of this idea. You are so clever and do such a wonderful job sharing your knowledge and capabilities with those of us that are not as confident in ourselves to take on the task. You inspire many to do it yourself and I just want to know I appreciate your efforts in doing so.
Alice, wow a 5 ft. rattlesnake! Do you have any pictures? I’ve seen several painted scenes on windows. I bet the resin would really protect the painting and add that layer of depth and shine to it.
Thanks for your sweet comment.
So pretty! I LOVE glitter and I’m really into butterflies lately so I just <3 this project!
Yanet, I love glitter that can’t flake off and land on my face when I have to meet a client. This glitter is now permanently sealed in resin. Hooray!
Oh my gosh this is so pretty. I will have to make note of this and see if I can make something similar next year after we have moved back to Norway.
Marianne, thanks for your sweet comment. Best of luck on your move back to Norway. Where are you living now?
AMAZING! Your window turned out beautiful! I really, really, love it! : )
That is so pretty, well done. Great job.
Wow. Just…wow. I had not idea such a product was available! Thanks for all the tips…love the glitter!
Korrie, thanks and isn’t it great when you can find a way to use glitter ;-). So shiny & sparkly!!!
Great project! Now to just find a window. Thanks for sharing.
You and me both. I’m obsessed with windows lately. I can’t wait to share my artist’s memo board! Yeeps, I’m excited!
So what other ideas do you have.. I have gotten 2 little 4 panes, 3 med with 6 panes and a large Oglong single pane with no dividers… I am very interested in do something really neat with them all ,However I’m not sure butterflies will do for me.. It is Beautiful tho… MY brother is into Gnomes and my mom Bassett Hounds, so I had thought about maybe on the long one doing a gnome with a BHound beside him. however I am not sure.. Please send me any ideas >> Thanks…. Actually this could go out to anyone who reads this…. I wanted to do something for her for easter Yeah but here we are 2 days before and nothing but The Pane is here.. LOL Happy Easter…. have a great day .
Tracy, I think you could do anything you want. Let your imagination soar. You can use cut paper, stickers, pressed flowers, leaves or anything that is flat enough to be coated by the resin.
Fabulous project!!! (=
WOW!!! It turned out so great!! I love it! And perfect for the summer time! Great job. Thanks for sharing!!