Toilet Repairs – Part 1 – Replace the Lever

Today, I have Part 1 in a 3 Part Series on Toilet Repairs! Today we’ll learn How To Replace the Lever!
When visiting Scotland, we took a tour of Mary King’s Close we learned about life in Edinburgh before the toilet was invented. It was definitely not a pretty time in the city’s history. People literally dumped their pails of waste into the streets of Edinburgh and the sludge ran down the streets and into the loch (lake). They were only allowed to dump the pails early or late in the day after the street vendors were gone and the streets were less crowded. Then they opened their doors or window and threw out the sludge yelling, “gardyloo” loosely translated as “watch out for the water!” How thoughtful of them. But, people would still slip and fall in the muck coated walkways.
Back then the saying about Edinburgh was that you could smell it before you could see it.
Thank goodness the toilet was invented! Go now and hug your porcelain bowls. Okay, well you don’t have to, but be thankful for your loo.

Did you know that a leaky or malfunctioning toilet can waste as much as 200 gallons of water per day, that is over 70,000 gallons of water in a year! Yikes!
If you have a leaking toilet or one that doesn’t shut off I encourage you to fix it yourself! Yes, you can do this, no need to hire a plumber.
First, for anyone concerned about putting their hands in “crap water”, let me reassure you that all the repairs I am going to show you are in the tank and the tank holds clean water that is then used to flush the toilet. So, no need to worry about contaminated water. That isn’t to say that the tank won’t have mineral deposits or black residue in it. This is a result of the break down of the rubber gasket or hard water deposits, so you may want to don some rubber gloves.

Over the next few days I will show you how to replace everything in your tank. I HIGHLY recommend purchasing an entire tank repair kit and replace all the parts at once. It will save you time and money, because if one part of your tank is going bad, the others are likely to follow close behind.

Complete Toilet Repair Kits cost about $20
Today we will get your feet wet (no pun intended) by replacing the handle also known as the flush lever. Then I will show you how to replace the fill valve and finally how to replace the overflow tube and flapper assembly.

But, before we begin, you will need a few tools (tools shown are for a full repair job.)

- Plumber’s Wrench (must have a wide mouth opening)
- Adjustable Crescent Wrench
- Handsaw (drywall, coping or hack saw will work. Needs to cut through PVC)
- Flat head screwdriver
- Level
- Scissors
- Bucket or basin
- Sponge
- Rags or Towels
- Rubber Gloves
Ready? Well, let’s begin! Start by turning off the water. There should be a water shut off valve in the wall behind your toilet. Gently turn the knob clockwise to shut the valve.

Next, flush your toilet to drain the water from the tank. If your tank re-fills the water is not completely shut off.
Remove the lid to your tank. Set the lid in a safe place where it can’t be dropped or broken.

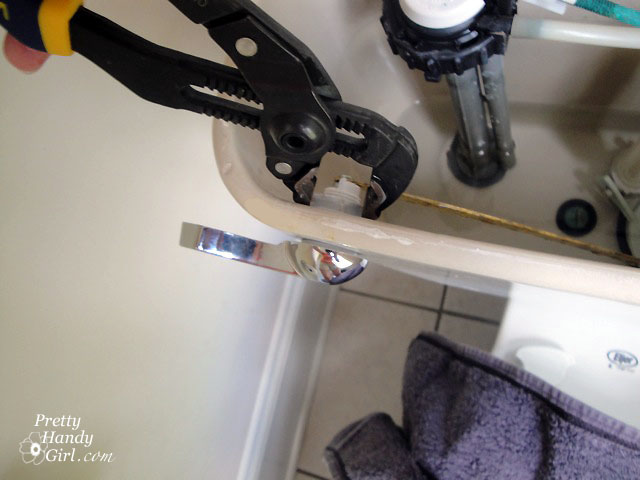
Inside the tank, opposite the lever, is a lock nut that holds the lever in place.

Using your pliers, gently loosen the nut and then remove the lock nut by hand. Just a little note: the nut may turn in the opposite direction than you would expect.
Remove the flapper chain from the end of the rod attached to the lever.

Remove the old flush lever and replace it with the new one.

Thread the lock nut back onto the new lever. Gently tighten the lock nut, but not too much. Over tightening could result in a cracked tank.
Replace the flapper chain on the new lever rod (picture below shows two chains, but you may only have one.) Adjust the chain so there is a slight amount of slack in the chain. Remove any excess chain that could get caught in the flapper (but leave an inch or two on the chain for adjustments).

Turn the water back on and let the tank fill.
Test the lever by depressing it. Replace the tank lid and test it again making sure that the flush lever rod doesn’t hit the top of the tank lid before lifting the flapper. Once it flushes properly, you are done!
That wasn’t hard, was it? Stay tuned as I show you how to replace the fill valve and finally how to replace the overflow tube and flapper assembly!
![]()

Thanks for the info. Fortunately or unfortunately, most of my toilets are ToTo’s, so I would not be able to use this method. I looked under the tank hood (lid) years ago and thought, whew this will be expensive to replace because it appears everything is self contained.
Thank you so much. You just saved me hundreds of dollars I would have spent calling a plumber. The last one I called flashed his butt crack every time he bent down to fix something, so you spared me that horror too. You rock!
Your comment rocks!!! Thanks for making me laugh this morning and so glad I could help.
Nice answer back in return of this matter with
solid arguments and describing the whole thing concerning that.
Maybe a little petty, but I don’t get your math: “200 gallons of water a day and 3,000 gallons of water a year” – wha???
Hey, you are right! Thanks for catching that. I got my stats from the epa website: http://www.epa.gov/WaterSense/pubs/fixleak.html
Now, I can’t find the 3,000 gallons, but they say that leaks can account for up to 10,000 gallons a year. I’ll change it. Thank you!
OK. Thanks. That is a TON of water. . . actually over 300 tons of water. 🙂
I think I found your 3,000 gallons – according to that website “A leaky faucet that drips at the rate of one drip per second can waste more than 3,000 gallons per year.” – that’s under faucets. Or maybe you just left off the 7 (since 200 gallons times 365 days equals 73,000 gallons)!!!
Thanks for the post.