Painting Like a Pro – Step 1. 80% is the Prep Work
After years of painting rooms, I have perfected the process and can tell you that 80% of a professional paint job is in the preparation. Today’s post will be about properly prepping your room before painting. Then I’ll post next week on how to paint your room like a pro.
Start by removing everything from your room that isn’t bolted down to the floor (notice how I said “floor”.) You will be removing anything that is attached to the wall. That includes towel bars, TP holders, pictures, outlet covers and switch plate covers. I will allow you to leave a light fixture if it is a sconce style. But, otherwise, get it out of there, ALL of it! We are doing it we’ve started painting like a pro.

But, how do you remove those toilet paper holders and towel rods if you can’t see the screw?

Here is the top secret, hidden location of those wall mounted accessories. Get down on your hands and knees and look up. Underneath there is a teeny tiny hole.

And inside that hole is usually either a hex screw or a flat head screw. You will need a little hex wrenches or flat head screwdriver to undo the screw. A flashlight may also be helpful. Turn the screw until you can pull the fixture off the mounting bracket.

Once your room has been emptied, bring in the tarps, towels, newspapers or plastic. Cover anything that is left in the room. Painter’s drop cloths work the best, but they can be expensive. I usually use plastic drop cloths, then put a folded towel in the entrance of the room to wipe my feet on should I step in any drips.
Even the neatest painter will drip paint! And if you are a klutz like me, you may even step in the paint tray. (Not a good thing.)

Are you paying attention? This next task is the most important to truly achieve a professional paint job (in my opinion.) Have you assessed the condition of your walls. Do you have any holes or dimples in it?

You will need to patch any and all holes (unless it is a picture hanger and you are going to use the same hanger after painting), HERE is the tutorial for patching all types of holes.
Okay, no holes now, but do you really know how smooth your walls are? Well, turn off the lights to find out!

And don’t forget to bring a flashlight. Aim your flashlight parallel to the walls and let the light beam skim the surface. Suddenly you will see all the imperfections. The bigger ones need to have some spackle or joint compound added to smooth them out. Any hills or bumps need to be sanded down.
Soon your walls will look like this!

Yikes, looks like some kind of pox virus.
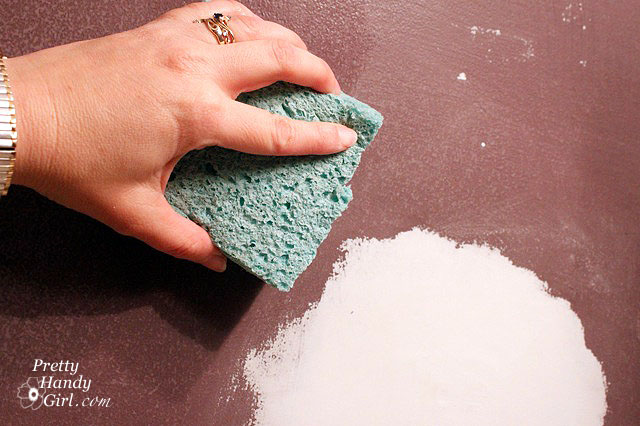
After your spackle or joint compound is dry, be sure to sand it smooth.

Then use a damp sponge and a pail of fresh water to remove any and all dust. You will probably need to rinse out your sponge frequently. (Especially if you patched as much as I did.)
Time to tape! Start by taping any light fixtures or permanent fixtures in the room. If you are re-painting your entire room (ceilings, trim and doors) I’d wait to tape the molding and door or window trim. For our downstair’s bathroom I knew I was going to repaint the trim too, so I left it exposed to be sure I got the wall color all the way down to the trim and even onto it. Tomorrow I’ll show you why I do this.

If you don’t need to paint your trim, you can use a handy dandy tape dispenser like the one below, but honestly, I can tape off the trim just as fast by hand (after years of practice).

Here is another little pro painting secret, if you want to keep the paint from bleeding under the tape, you can seal it with matte medium (available at artist supply stores.)

Simply pour a small amount into a cup and then brush it on the edge of your tape where it meets the surface you are going to paint.

This puts an invisible seal over your tape edge. It won’t work ALL of the time, but it will really cut down on any seepage and therefore any touch ups you have to do later. You’re well on your way to painting like a pro!
Other Steps in this Series:
Step 3. painting your room and finishing touches


Here is my “paint behind the toilet tip:” 1. Remove the lid to the tank. 2. Cover the entire toilet with a large garbage bag. 3. Adhere a tiny painting sponge to a paint stick. The brand I use will actually FIT on the end, but if yours doesn’t, double stick tape is great. 4. Paint with this tool behind the toilet! WORKS GREAT!
I adjusted this tip from a pro painter’s blog I read.
Great tip! Thanks for sharing.
Great tips, Sarah. Of all the tips on painting I’ve read in the last year, yours is the first I’ve seen using a clear coating on the tape line. I do something similar to prevent paint bleeding under the tape, except I use clear satin paint. It’s in the paint department where you buy your regular house paints. If you want truly sharp, professional lines with minimal touch-up, this is the way to go.
Hi, thank you for sharing this lovely helpful post! I have a question, the walls I want to paint are kinda dirty, like around the light switch, and the trim has built up dust. Do you need to make sure your walls are clean when you prep them for paint, should you be scrubbing away all the dirt first? Thank you hope you can help!
Sarah, definitely! Dirt and oil will repel paint. Try spraying the area with Krud Kutter (my new BCF …best cleaning friend.) And if you think the walls are dirty too, maybe a few drops of dish detergent in a bucket of water and a sponge to clean the rest.
Okay great, thank you!
Help I’m about to rip my hair out My husband removed a light from my kitchen ceiling I now have a big spot where the light use to be I’m having a hard time trying to match the color to the rest of my ceiling I have patched the hole’s now I just need to paint the spot Just to add to my problem my ceiling isn’t white It’s more of a light alabaster color I’m so frustrated
great blog that I’m just finding! And great tips! But what I want to know is HOW on earth do you get behind the toilet????????
Nicole, if you want to paint behind the tank, you have three options.
1. Take the tank off the toilet. You can see how to do that in this post: https://prettyhandygirl.com/2011/05/toilet-repairs-part-3-replacing-the-overflow-tube-and-flapper.html
2. If the tank isn’t too close to the wall you can use a skinny roller, trim pad or brush.
3. Paint as far back as you can, and be okay with the wall you can’t see ;-).
For a Popcorn or heavily textured ceiling they have a foam roller that has slits in it made especially for those ceilings. Roll on it once and move to the next spot. If you try to roll over it more than once it will come off on you and create a horrible mess. I have purchased these rollers at Lowes. After I remove everything off the walls before I clean them I take a broom and broom off the walls. This takes the dust webs off easier and I will even take a old oair of panty hose and stick on the end of the broom no dirty marks are left. Love the idea about the sealer that will save my wood floors.
Wow great pictures you got, I loved the information thank you so much
I still have lots of areas to paint/repaint in our house, and lets just say first few rooms I did look a little *rough* – I can’t wait to learn some more of your tricks! I will be trying the matte medium tip – I seem to have so much paint bleeding when I tape. Thanks!
when I as covering the really bad sponge paint job in our master bathroom, I discovered the towel rack bases had been GLUED to the wall as well as screwed on. ARGH! Nothing would move them…. out came the painters tape…….
Sorry to hear that. I guess if you wanted to get rid of the towel rack all together, you could use a pry bar to tear it out then patch you holes.
Okay, I am always perplexed by the spackle and sand step of painting prep tutorials. No one ever seems to mention or address the fact that after you spackle and sand an area that this area now no longer has sand texture and the rest of you walls probably do (at least around here). Then what?
I’ve been avoiding fixing wall imperfections unless they are really small (or really awful) because the missing sand texture bothers me more than the original imperfection. I use a stencil brush to feather on Sherwin Williams sand/paint mix for little ones. However, mine always looks terrible when I roll or brush it on to a larger area. What do you do?
Do you have the “orange peel” textured walls? Or are you talking about the slight texture on a painted wall. If it is the later, when you paint your room with a roller it will even out the texture.
No, it isn’t orange peel.
Maybe it is a regional thing, but in my neck of the woods the original coat of paint that goes up on to new drywall has sand added to the paint. Then, forevermore you have a “bald spot” anytime you make a repair.
It is like the “perlite” one on this page:
http://www.drywallschool.com/textures.htm
Around here I have never seen a home with drywall that didn’t have it, unless the house is really old (plaster) or really new (California knock-down).
Do people in other parts of the country actually have smooth drywall as standard?
Oh, no! I feel for you. Yes, matching a texture can be very tricky. AND it is never perfect. When we had to patch our ceiling (popcorn or cottage cheese texture) across the street, you could always see where it was patched. My understanding is spraying it with a texture spray is your best bet.
We live in North Carolina. I know the majority of the east coast has smooth drywall walls.
Thanks, didn’t mean to be pesky 🙂 I always wondered why none of the books mention repairing the sand texture. It was nice to be able to ask straight out and get a straight answer…”other parts of the country don’t slap sand all over their paint jobs and they are the ones writing the books.” Duh. Why didn’t that occur to me before? Your bathroom looks amazing! I love your work!
Good stuff, girl! You are quite the expert. I have never done the painter’s medium. I used caulk when I did my stripes but it does leave a bit of an edge so I’ll have to try that instead. 🙂
I am the world’s messiest painter. I love to paint and I like to think I do an okay job. I have this thing where I have to hold the paint tray and before I know it, it is at an angle and I’m spilling. I also tape off at the ceiling and at some point I swing the roller around and smack the ceiling. It never fails. LOL
I do everything you do except the medium. I will have to give that a try the next time I paint.
Tricia, I looked everywhere for the photo of my leg covered in paint from when I stepped in the tray and it flipped up and covered my leg. Thank goodness I did proper floor coverage.
Thank you, thank you for posting these great tips and photos. It’s perfect timing for me… newly bought first house in need of a lot of refreshing and very green me wondering where to start. gulp. lol I’m going to put your tutorial to work today. woo hoo
Thank you for all of the tips… I’ve found this so helpful!
Hi Brittany,
Thanks for all these useful tips in preparing for painting.
My problem with painting is always the part that the wall meets the ceiling. I cannot paint a straight line and always ended up with some paint on the ceiling which is not acceptable.
I cannot repaint the entire ceiling because my ceiling is those rough surface with circular patterns, if you know what i mean. I think only pros will know how to paint that kind of ceiling or most likely the pros spray paint on those ceiling. I also cannot just paint over that part of the ceiling where i mess up because I cannot get the same white color as the ceiling.
Please help!!
Thanks.
/jonie
Jonie, I hear your frustration. I assure you that you can paint a textured ceiling, but you need to use a thick nap roller and it is important to paint then move on and don’t roll over that area too much or the texture will come down. We’ve had to paint our fair share of popcorn ceilings.
The other option is to use an edger to get close then cut in with a brush and a painting guard.
The other thing I learned about painting near textured ceilings is if you put up your tape just below the ceiling (like about 1/4″) you can make your line straight and paint up to that point. That way you visually have a straight line just below the texture. Of course, that last 1/4″ has to be the same color as the ceiling.
Thank you so much for your reply.
I will try my best to use what you have taught me in my next painting. Hopefully will be able to achieve some improvement. 🙂
/jonie
I learned a trick for difficult areas as well. Hold a wide flat putty knife in your non-painting hand at the edge of what you are painting (I guess any flat edge with a handle would work) to keep the paint off the area that you don’t want to mess up. Does that make sense?
Hi Sharon
I know what you mean. I did try using one of those metal tools – like you say something like a wide putty knife – but still it bleeds through.
I also used those sponge pad with roller, and still touches the ceiling…haha…I guess it is all because of my lousy painting technique…need more practise…practise….:)
Thanks for your input though.
take care
/jonie
Hi Brittany
I finally know what is the name of my texture ceiling…it is known as “mud swirl”. It also appears on my closet wall.
Thanks to My Boys’ Teacher for posting the drywall link…
/jonie
Hi, I’m a experienced painter and I think your tips are great, especially for those that don’t have a lot of painting experience. I would like to offer up the Pretty Lazy Girl’s 😀 (and pro painters) way of painting a room. First follow all of Pretty Handy Girl’s prep work instructions. Here’s where my tips come in. If you don’t have time to tape everything off and use matte medium, use a 2inch *angled* sash brush to “cut in” your lines of demarcation around your trim and ceiling.If you have a relatively steady hand this will work for you.
1)Start by loading the bottom inch of the brush bristles with paint and wipe one side off as you drag out of the can.
2)Place the point of the brushes angle at the start of your line and *bend* the brush in at it’s angle and drag it toward you in a straight line.
This is a handy technique if your walls aren’t as plum with the trim and ceiling as the once were. It enables you to fake a straight line and fool the eye.
I always start by quickly painting the ceiling first, and trim (it’s usually white so no problem if you get it on the walls). I then cut in around the trim and ceiling every few feet as I roll on the wall color. It’s helpful(but not necessary) if you have a painting partner to roll while you cut in to keep a wet edge on your paint (so that the paint dries with out demarcation lines in it). I have found that unless I’m painting a really deep dark wall color that one coat is usually enough, except for a few spots needing touch up.
Love your blog PHG, keep letting the ladies know that we’re just as capable as the boys when it comes to DIY 🙂
Lisa, these are all great ideas! Thank you for posting your ideas in the comments. I do have a steady hand and can get away with cutting in (as long as I don’t have too much coffee!) But, I do know that it takes some practice.
Thanks! I am about as clutzy as they come. My mother use to say Grace was my middle name. If I am painting there either needs to be some who can run to get me a wet cloth or have a bucket close by.
Ha, yes, making a mental note to mention to keep a wet rag near by when painting ;-).
I like this. Curious if you get wall color on the trim, does the white paint cover it in one shot?
Yes, I do get some wall color on the trim. But, I also always do two coats on the trim, and yes it covers it then. If you are really concerned, you can go ahead and tape off your trim, but then you will need to tape on the wall before painting the trim.