
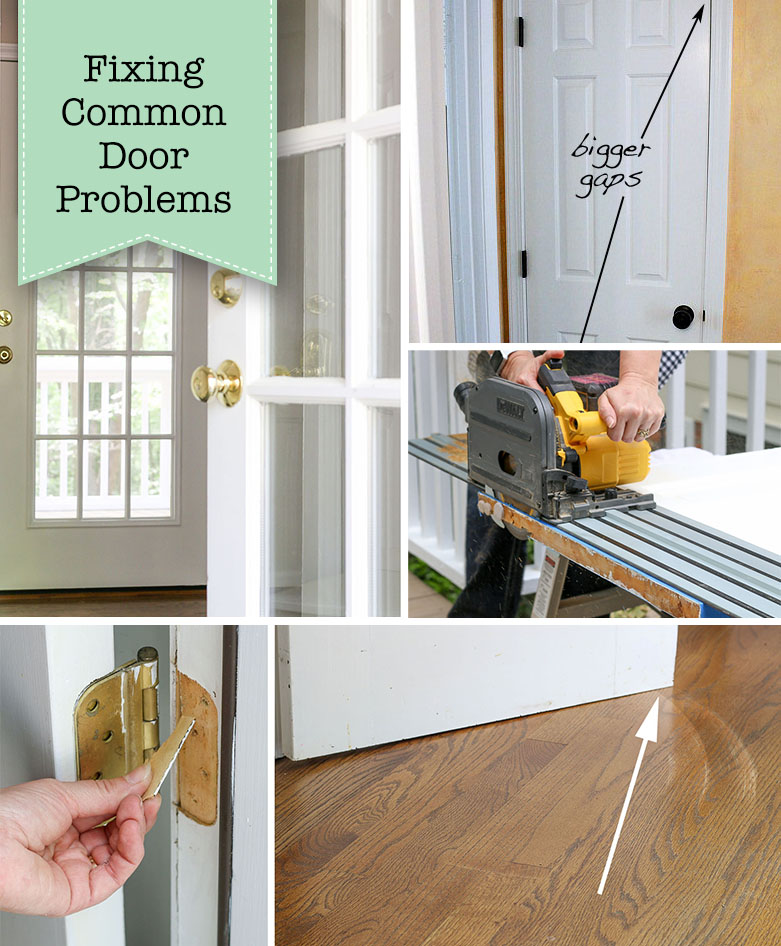
Fixing Common Door Problems
Do you have a door that sticks or doesn’t close properly? You are not alone. Many factors can contribute to this problem. Let’s learn how fixing common door problems can be easy.
Fixing Common Door Problems
Do you have a door that sticks or doesn’t close properly? Or maybe your door rubs, squeaks, or is drafty. Regardless of the problem, I’m going to show you how to fix your most common door problems! But first, a big thank you to Schlage, the 100-year-old leading door hardware company, for sponsoring this article.
If you have common door problems, you are not alone. Many factors can contribute to them: house movement, humidity, dry air, improper installation, slamming doors, or kids swinging on them (true story). Without being able to control many of these factors, it’s important to know how to fix your door problems – as your door is often a main focal point of the room and/or entryway.
(I’ve included affiliate links for your convenience. I earn a small percentage from a purchase using these links. There is no additional cost to you. You can read more about affiliate links here.)
Door Not Latching:
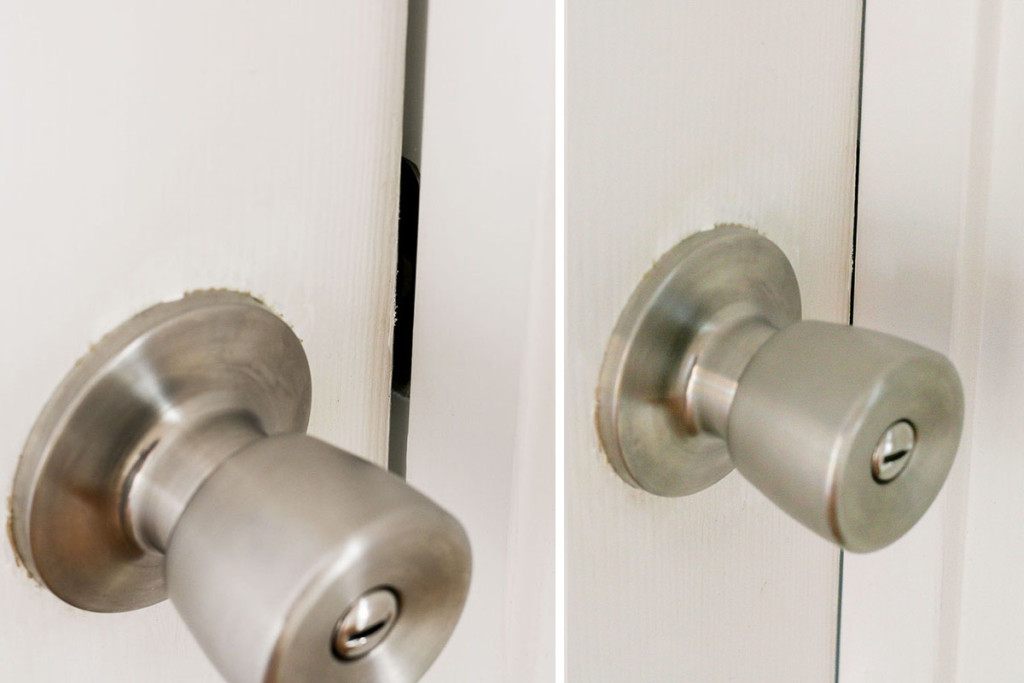
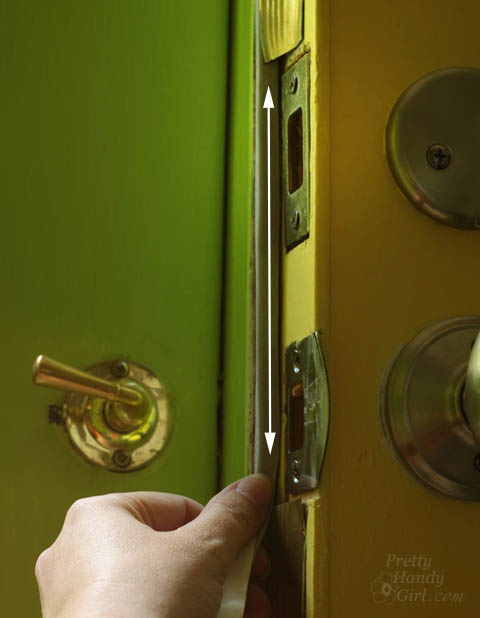
A door that doesn’t latch properly is usually a simple fix. Lean down until you are at eye-level with your doorknob. Look at the gap between the door and the door frame. Is the latch centered on the strike plate?
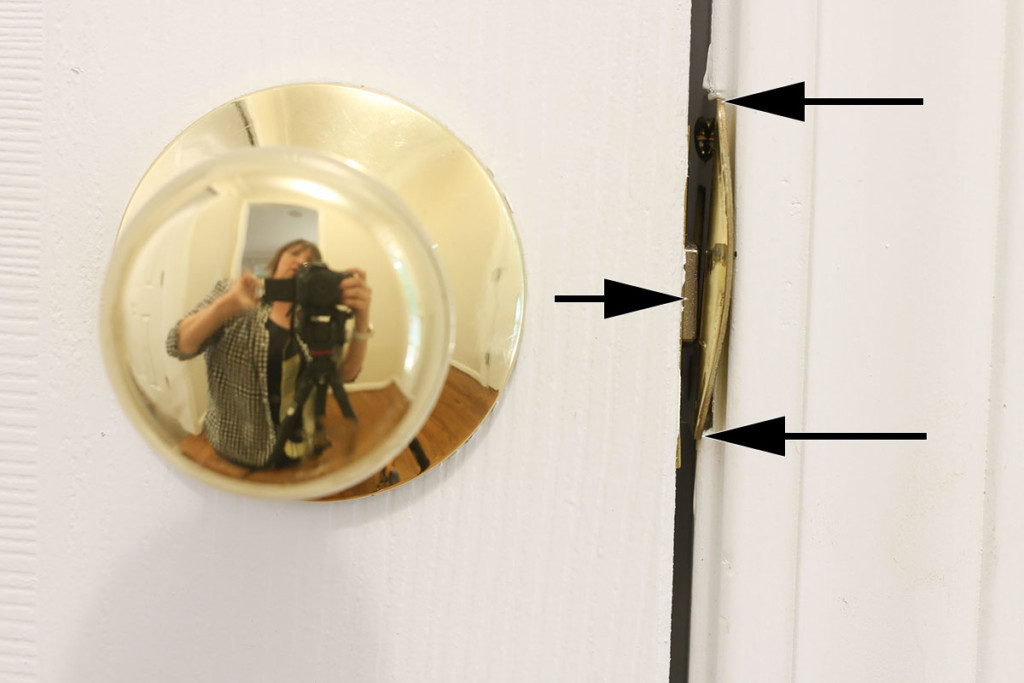
If not, that’s why your door doesn’t latch. Here’s how to fix it. Determine the center of the latch. Remove the strike plate and move it to center on the latch. Mark the new location of the strike plate. Chisel the door frame as needed.
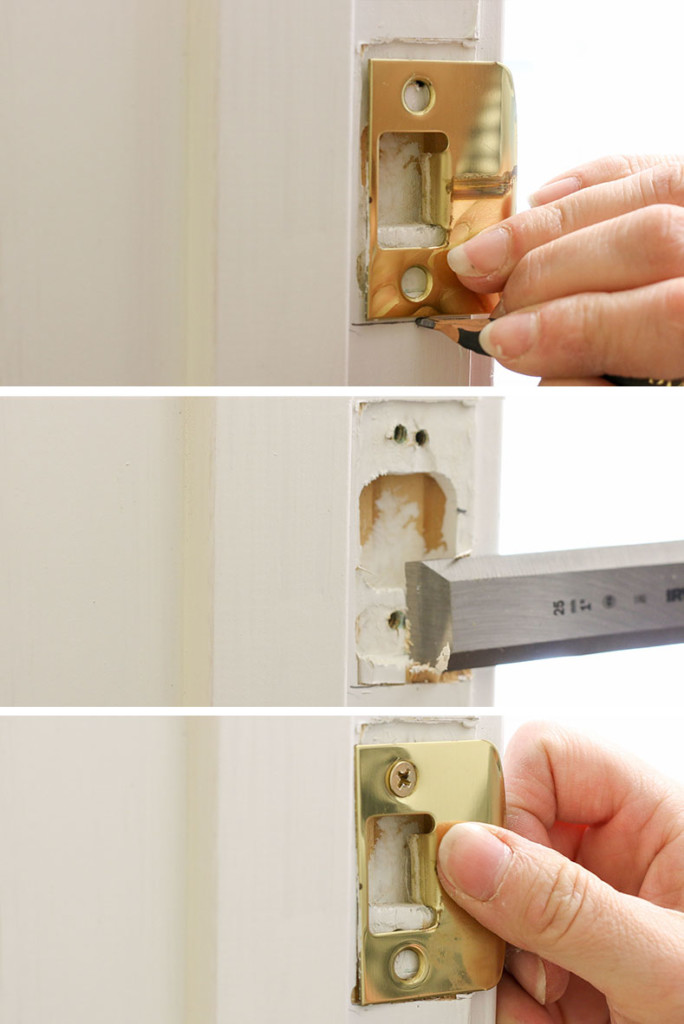
Reattach the strike plate and test the door. You can see in the photo below the latch is now centered with the strike plate and the latch can now slide into the strike plate properly.
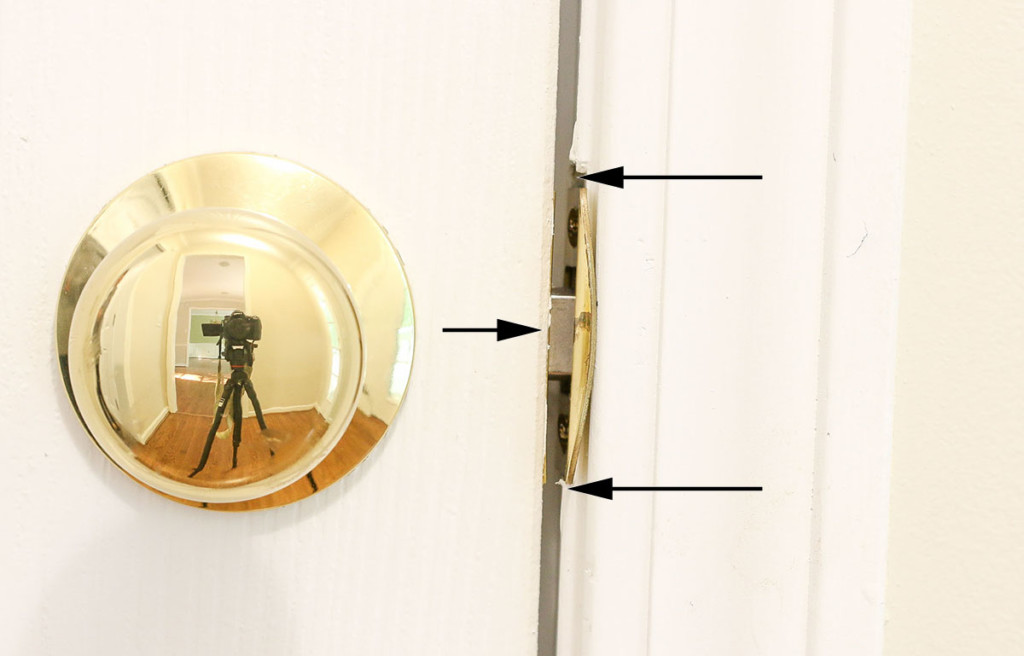
(Like the knob above? It’s a Schlage Plymouth in Bright Brass, but comes in a variety of finishes.)
Door Not Closing Tight Against Stop:
If your door rattles loose in the frame and doesn’t close properly against the stop, it can be as simple as moving the strike plate closer to the stop.
Important: If this problem happens on a door between the garage and the house, it could be a potential safety issue! The door between the garage and the house must protect the residents from carbon monoxide gases potentially leaking in from a car’s exhaust. With this in mind, it’s important to fix this problem immediately!
Luckily, fixing a door that doesn’t close tightly is a simple one to remedy. But, there are two solutions depending on your type of strike plate. (Is your strike plate adjustable or non-adjustable?)
If You Have an Adjustable Strike Plate:
Look closely, does your door strike plate have a small screw holding a sliding tab to the strike plate? If this looks like your strike plate, the solution is simple.

Loosen this screw and adjust the tab closer to the door stop.

Tighten the screw and try closing your door again. Continue to adjust the tab until your door shuts properly and stays closed.
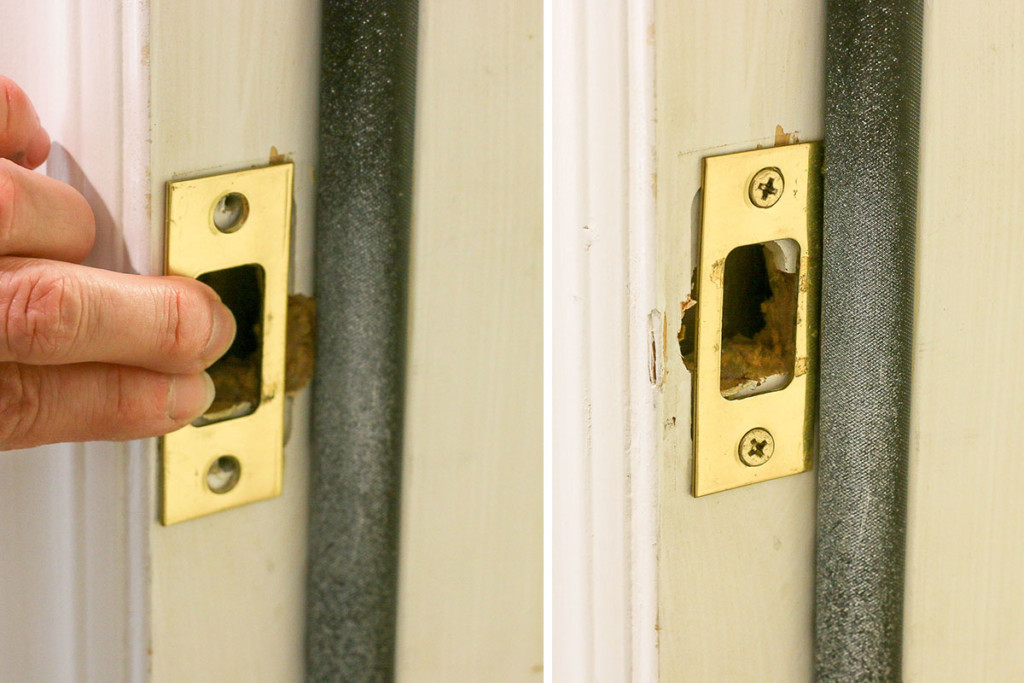
If You Have a Non-Adjustable Strike Plate:
Non-adjustable strike plates don’t have an adjustable tab, but your fix is still easy. Remove the strike plate and reposition it closer to the stop.
Sticking Doors or Doors that Won’t Close
Look at the space around the door. Is there a gap at the top or bottom? Normally, the door will stick at the top corner opposite of the hinges because over time the weight of the door will pull away from top hinges.
To fix a door that sticks or rubs in the frame, you can try one of these fixes:
- Tighten screws
- Add longer screws
- Add a shim behind a lower hinge
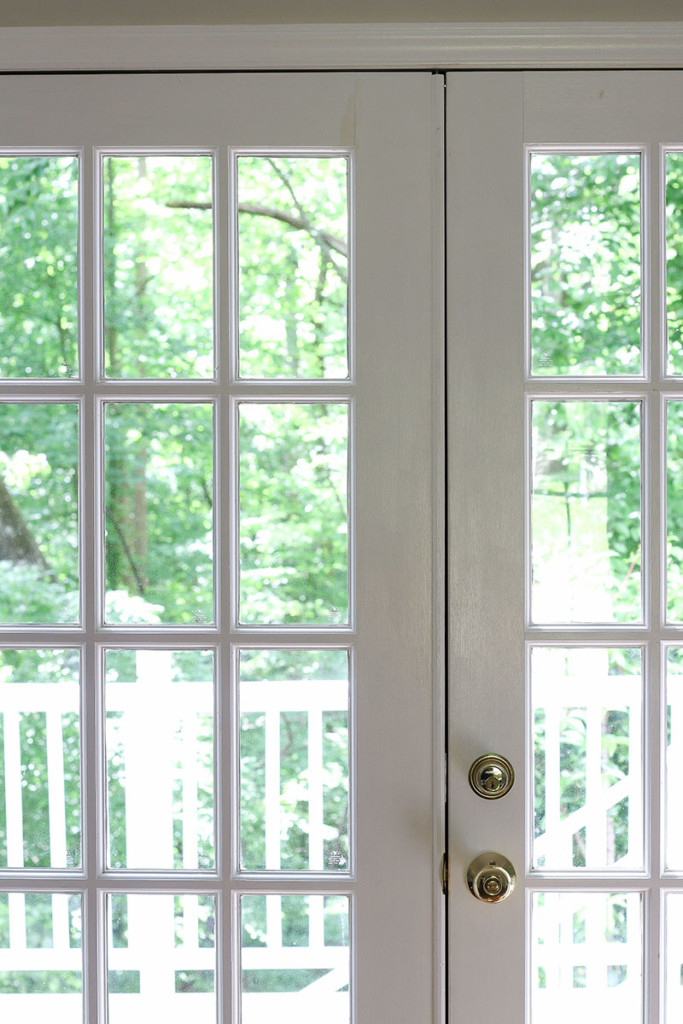
Let’s take a look at this french door. The door rubs at the top when trying to close it.
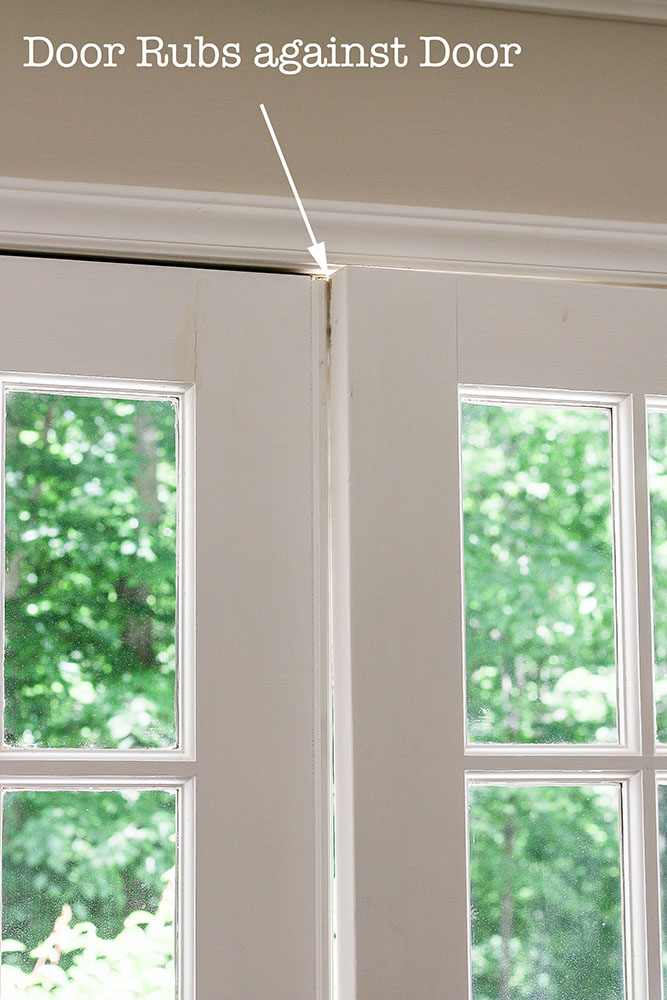
Open the door and look at the hinges. Do any of them need to be tightened? Well look at that! This door is missing a screw.
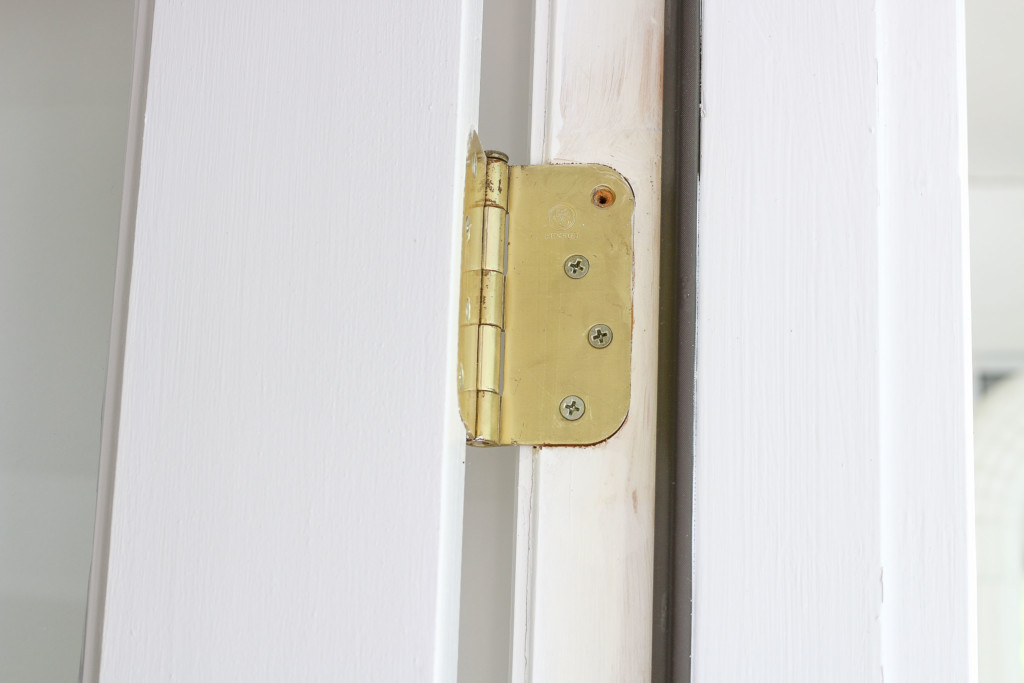
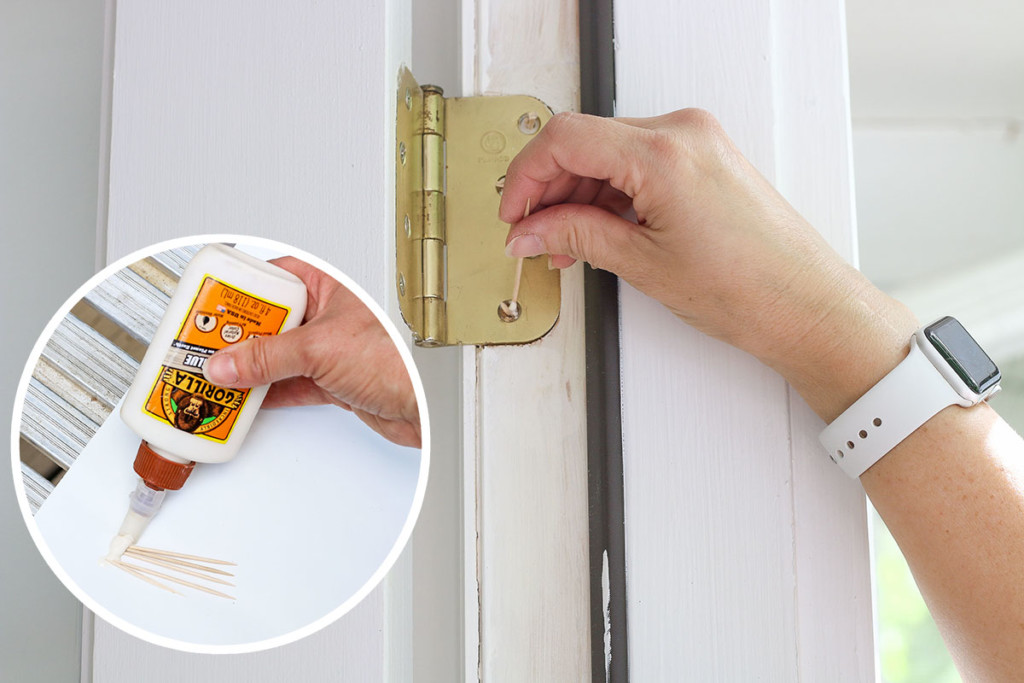
Try to tighten the screws. If they just spin, the wood has been stripped. You can either add longer screws or fill in the holes with toothpicks.
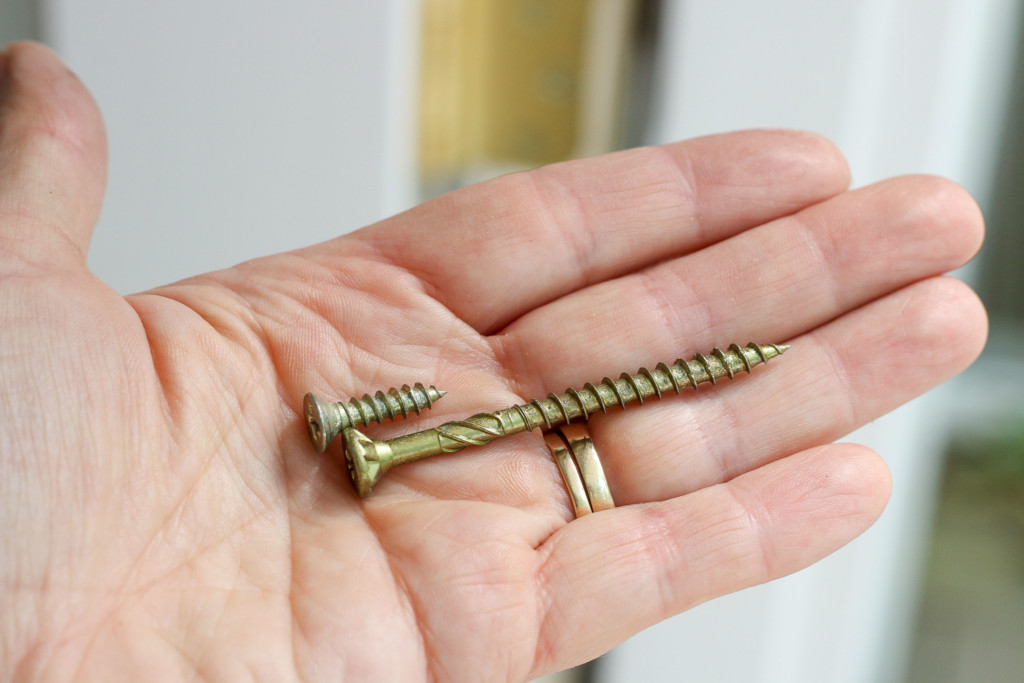
Replace with Longer Screws
Remove the hinge screws and use longer screws that drive through the door jamb and into the framing.
How to Fix Stripped Screw Holes:
Remove the screws from one hinge at a time. Squeeze some wood glue onto several toothpicks. Pack the hole with toothpicks.
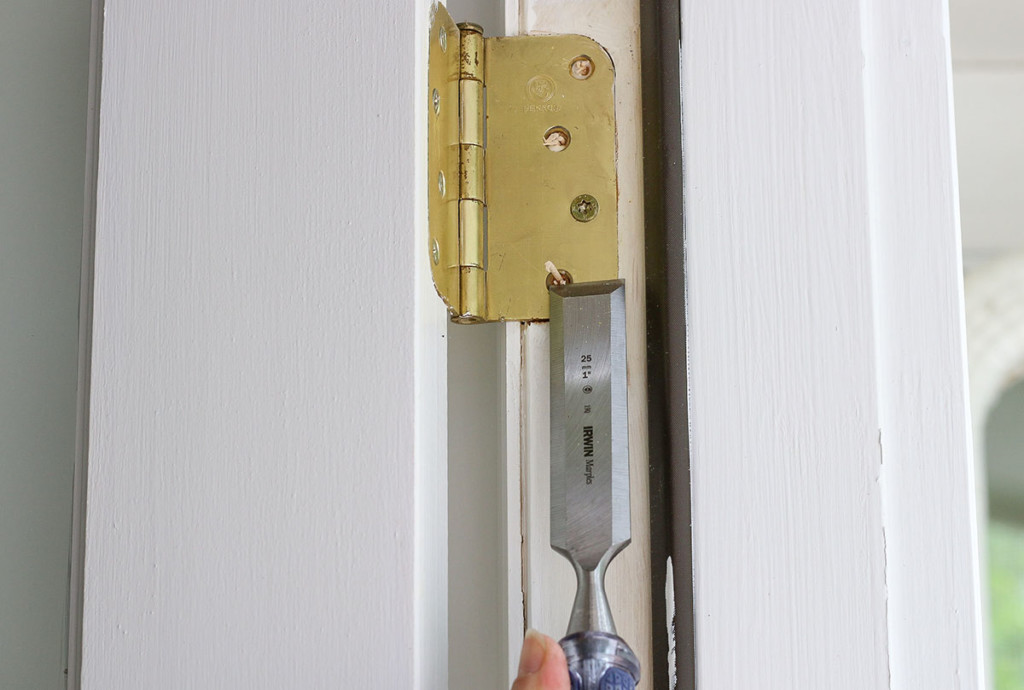
Let the glue dry. Cut off the excess toothpick with a utility knife (or use a chisel if you don’t have your knife with you.)
Drive screws back into the hinges.
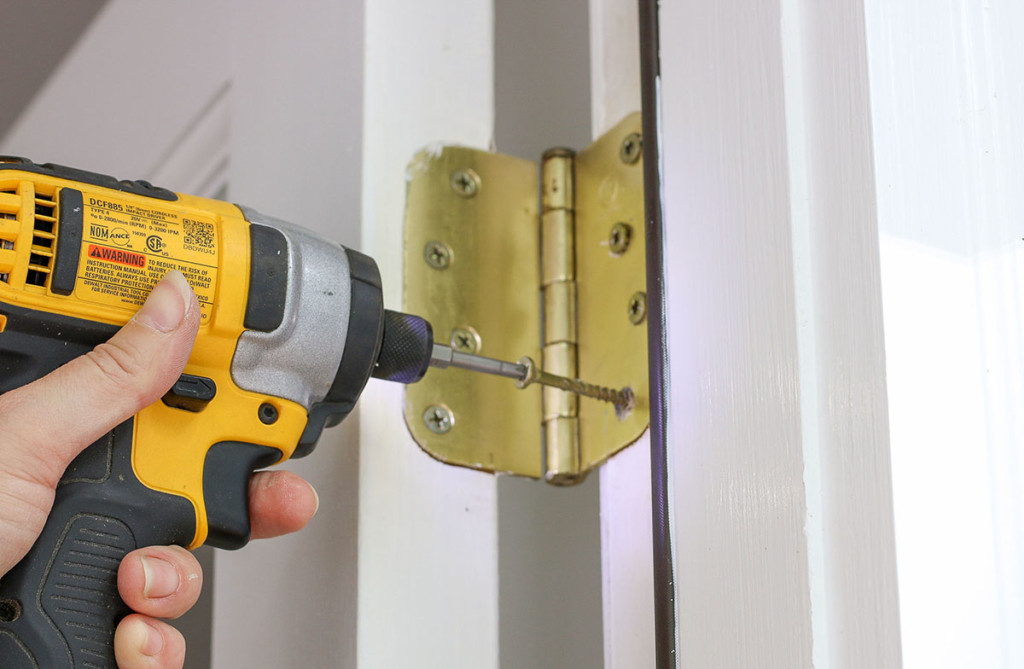
Better yet, replace the screws with longer ones that will grip into the framing behind the door jamb.
Hopefully this will fix your door. You can see below the door shuts and the spacing is even between the french doors.
Is Your Door Out of Alignment?
Door still rubbing? Occasionally a door will get out of alignment. To fix this, first, look at the door and determine where the gaps are bigger.
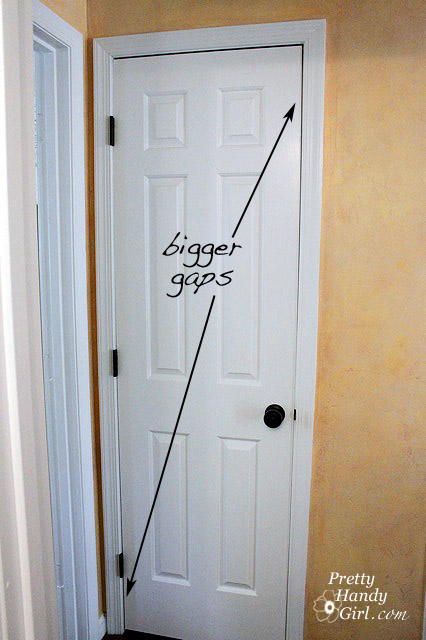
For the door above, try simply loosening the screws from the top hinge 1/4 turn or more. If this doesn’t work, try tightening the screws into the hinges at the bottom. If it’s still not fixed, you’ll need to try shimming the door hinge.
Shimming Door Hinges:
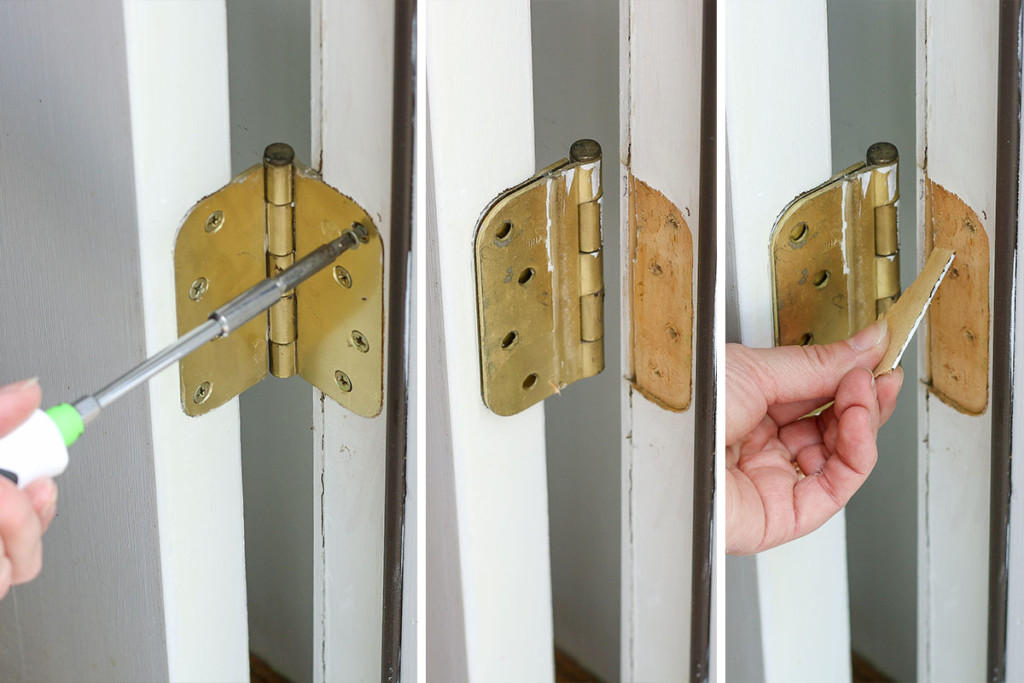
Sometimes a door hinge needs to be shimmed to adjust the door in the frame. If the spacing is tight behind one hinge, you can adjust it slightly to correct uneven spacing around the door.

The door above still shows a tight spot near the top right hinge. To shim it slightly, add a piece of chipboard (cereal box cardboard) behind the hinge.

If you need a thicker shim, you can use the end of a wood shim.
Replace the screws in the hinge and test your door. Is it still rubbing?
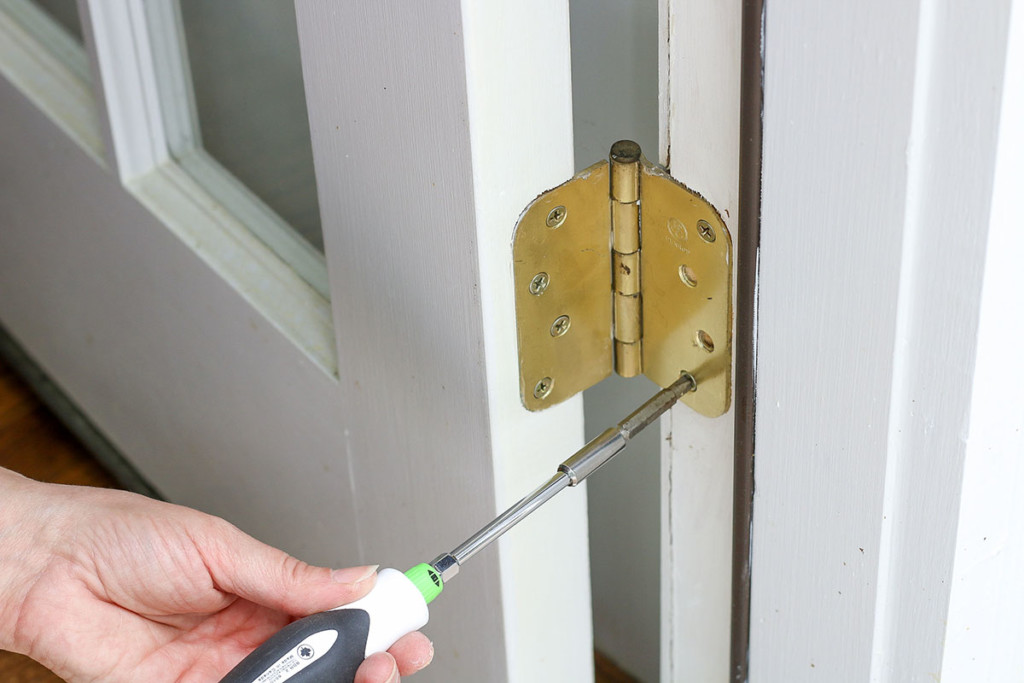
Recessing a Hinge:
Occasionally, you might need to set a hinge deeper into the door or the frame. You can use a chisel to remove a small amount of material from the jamb or the door. If you don’t have a chisel or are worried about taking out too much, use the small sanding bit on a Dremel.

Door Rubbing on Top:
Have a door that swells when the temperature or humidity changes? To fix a door that rubs along the top in different seasons, you’ll want to sand or plane the top. This doesn’t involve buying a ticket or boarding an airplane. Planing is removing material from the edge of wood. You can try using sandpaper with a coarse grit to sand it down, but if that doesn’t work, reach for a hand planer.
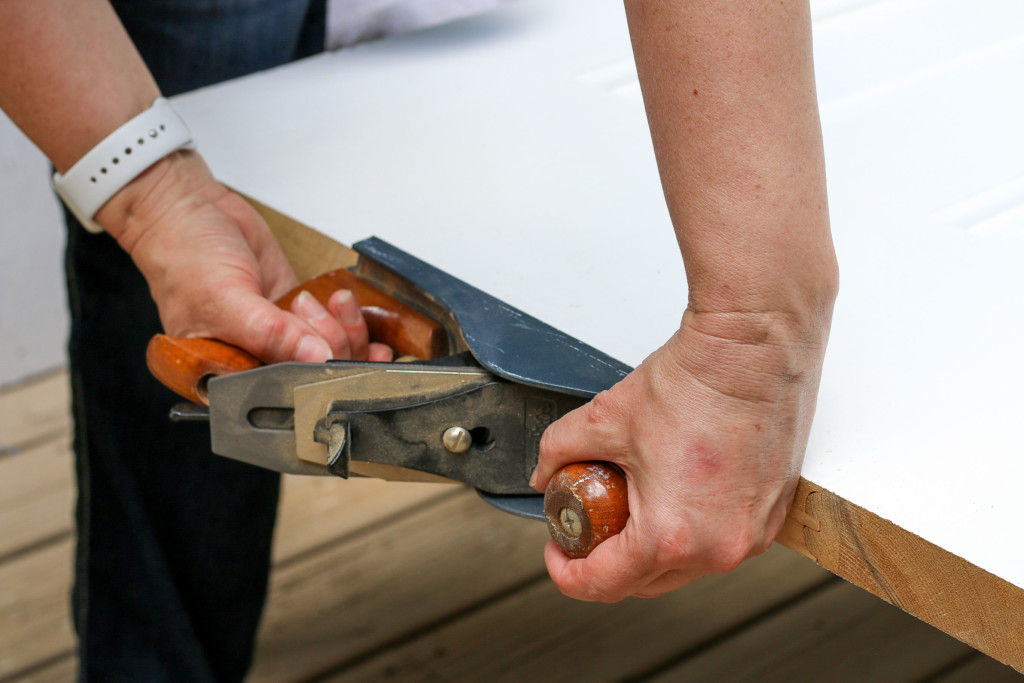
As you run the planer across the top of the door it literally shaves off some of the wood. Simple design, but very effective.
Door Scraping on the Floor:
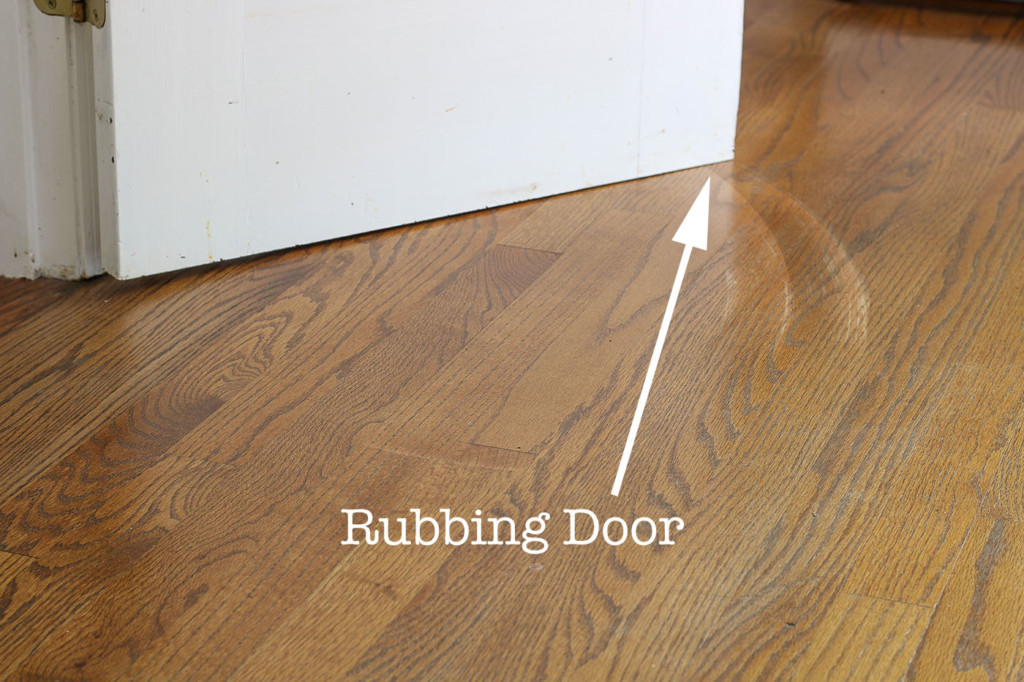
A door that rubs on the floor or carpet is not only annoying, but it can scratch your floors. Time to fix this problem!
Get a helper to assist with removing the door. Close the door completely.
Position a scraper or flat pry bar just under the hinge pin head. Gently tap the end of the pry bar with a hammer to raise the hinge pin. Remove the hinge pin from the top and bottom hinges first.
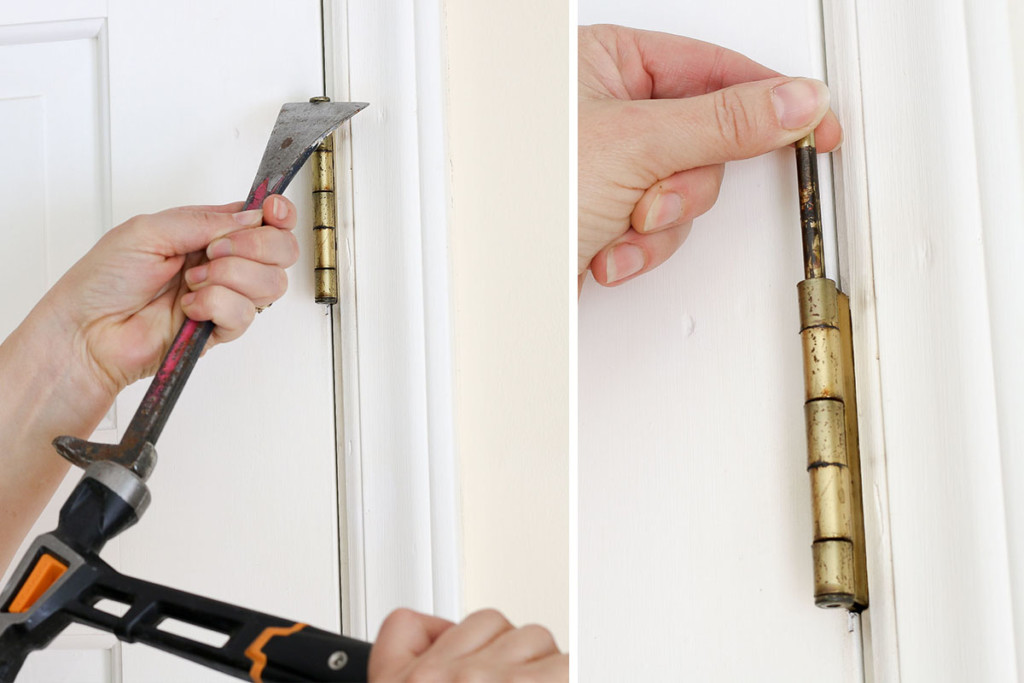
Remove the middle hinge pin last but have your assistant nearby to hold the door in the frame. As the assistant opens the door, be ready to lift it off the hinges.
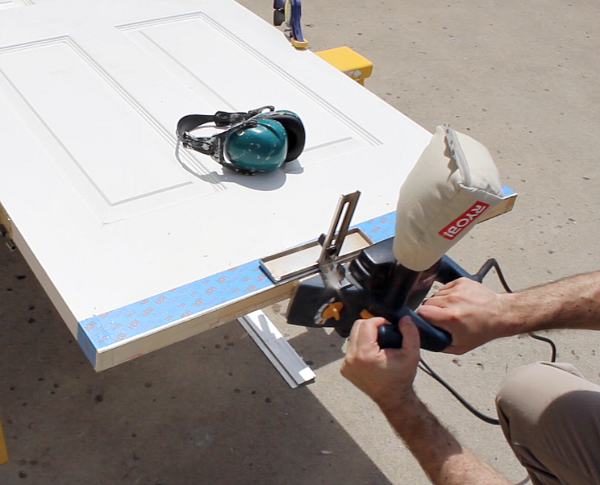
Lay the door on sawhorses. Tape the button of the door with painter’s tape to protect from chipping.
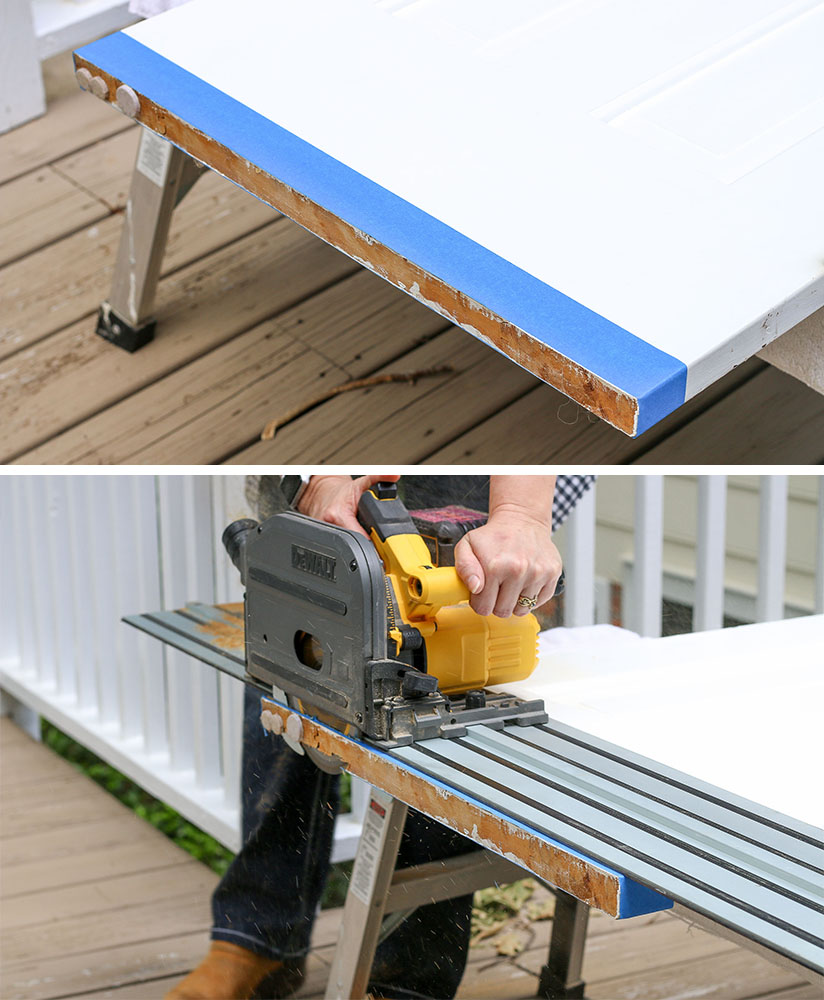
Use a circular saw, track saw, or power planer to remove a portion of the bottom of the door.
Replace the door and check to see if it still rubs.
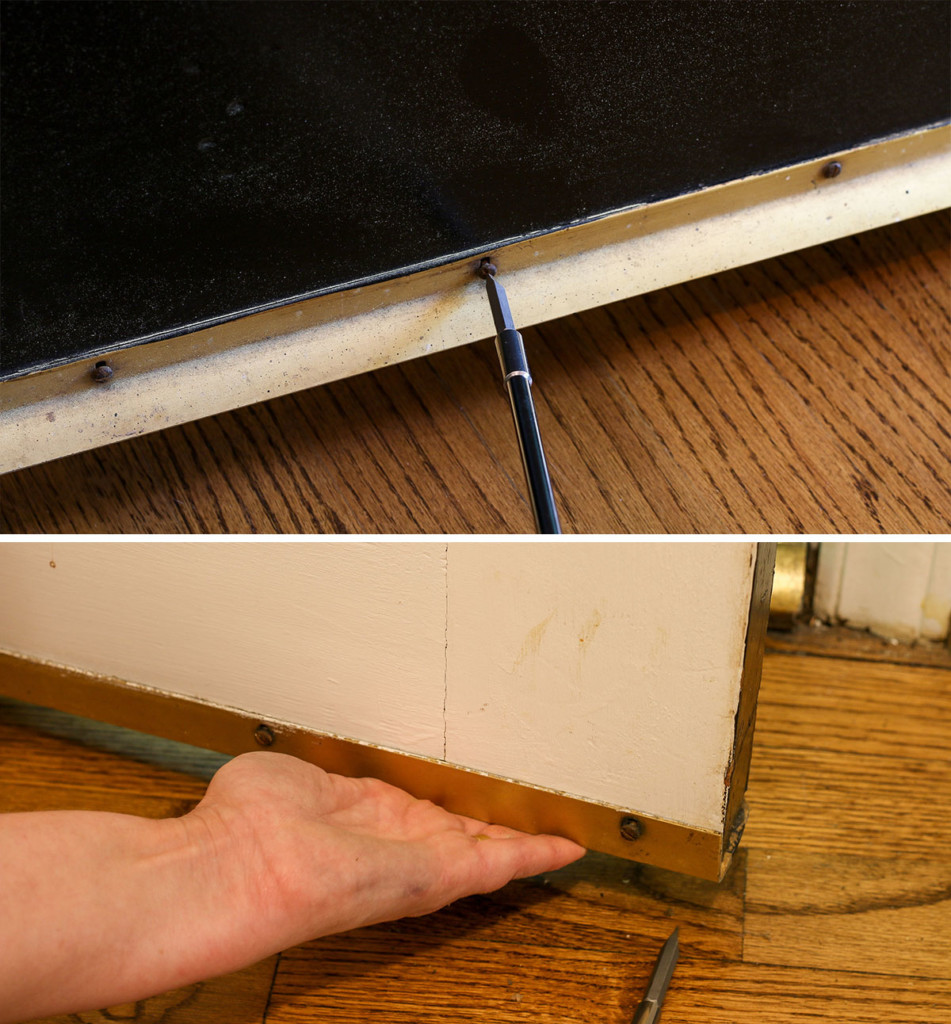
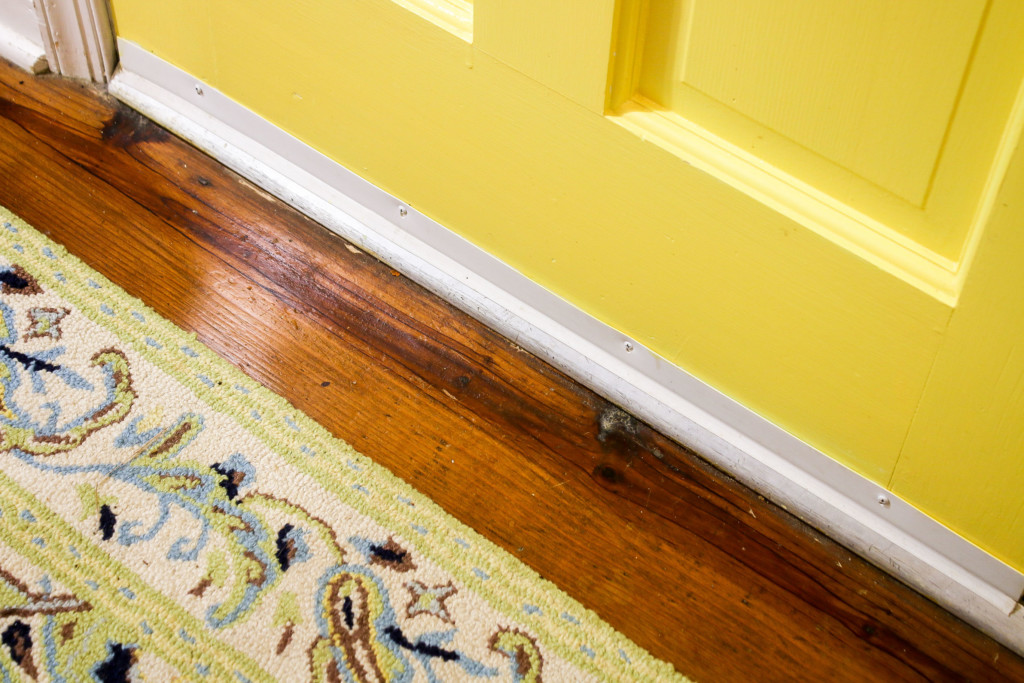
Exterior Door is Hard to Open:
If your exterior door is hard to open, it might be from a loosened threshold piece. You can try to tighten the threshold screws or replace the threshold and sweep at the same time.
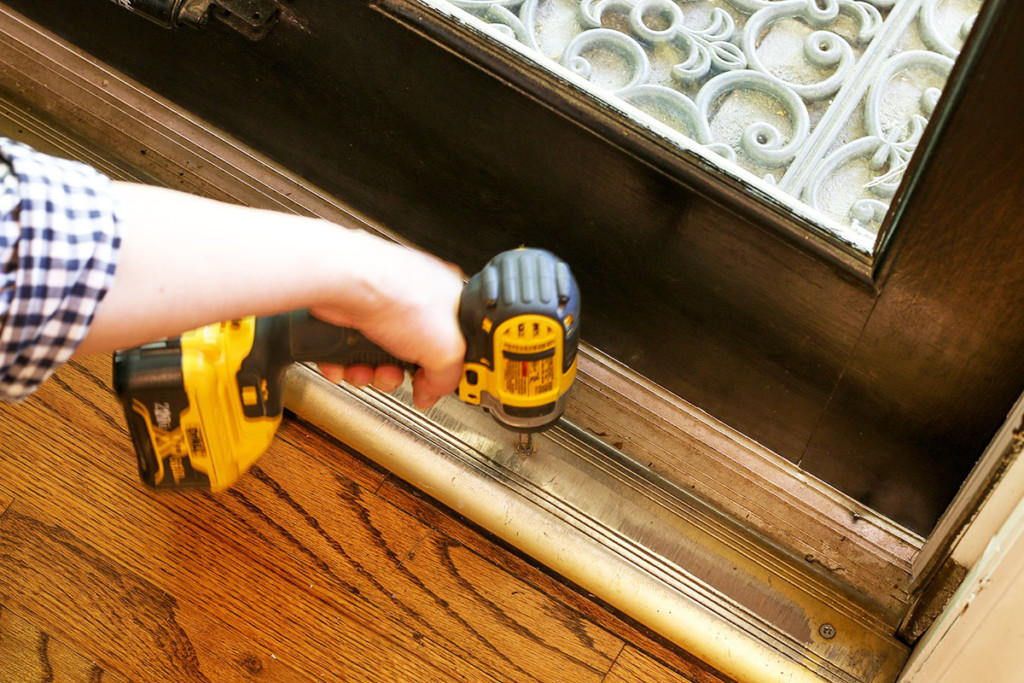
Also check to see if the door sweep has lowered. Unscrew the sweep and raise it on the door. Tighten the screws.
Door Latch Sticks in the Door
If the latch is sticking in the door, you can try one of three fixes:
- Loosen the screws on the doorknob. (Tightening the screws on your doorknob too much can cause the knobs to bind.)
- Remove the knobs, spray a little lubricant onto the latch inside the door. Replace the knobs and turn them to distribute the lubricant.
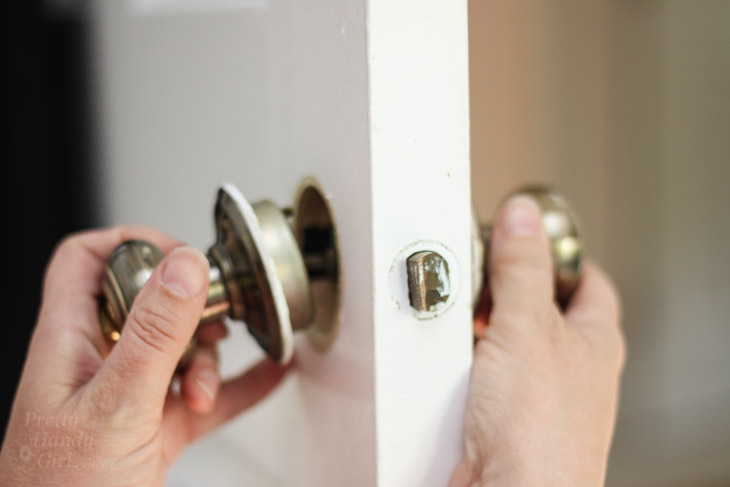
- Finally if all else fails, it might be time to replace the doorknobs. Believe it or not this is a quick fix and can be done in five minutes.
Save yourself the headache of doorknobs that stop working smoothly and purchase Schlage brand door hardware from the start. Schlage has been producing high-quality door hardware in a variety of types, looks, and finishes for more than a century and will continue to do so in the years to come. Whether traditional, modern, or technology, Schlage products offer a limited lifetime mechanical and finish warranty and a three-year limited electronics warranty.
Squeaking Doors
Doors that squeak mean the hinges need lubrication. Simply spray a lubricant like WD-40 just under the top of the hinge pin. Be sure to have a rag handy to catch any drips.
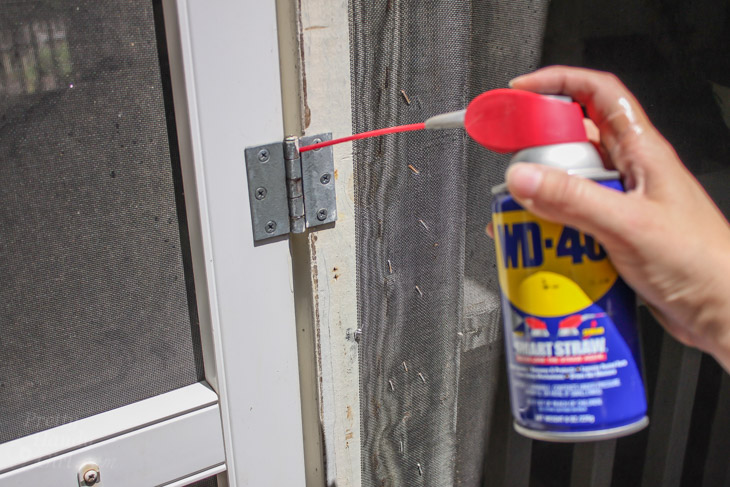
Open and close the door several times to help the lubricant work its way down the hinge. Your door should be squeak free now.
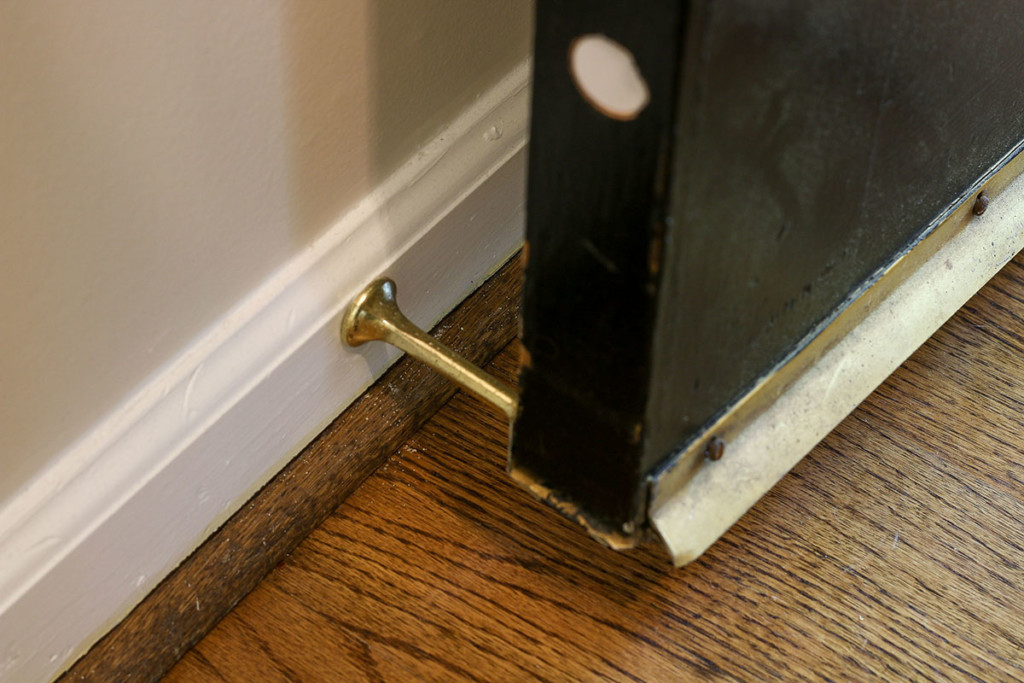
Door Knob Hits the Wall
Door knobs that hit a wall can put dents or holes in the wall if left alone. The solution is quick. Either add a door stop behind the door at the baseboard…
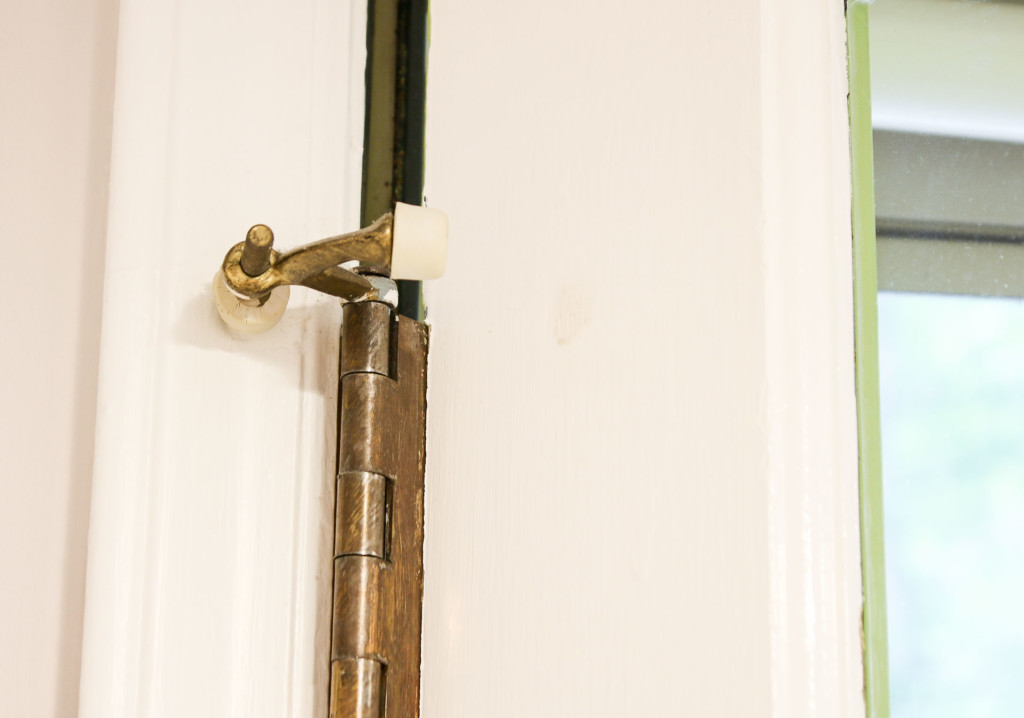
…or add a hinge pin adjustable door stopper to the top door hinge.
Drafty Doors
Cold drafts wafting in around your door? The solution is as simple as installing (or adjusting) the weatherstripping. If you can see light coming in around your door, it’s guaranteed to let drafts in too!
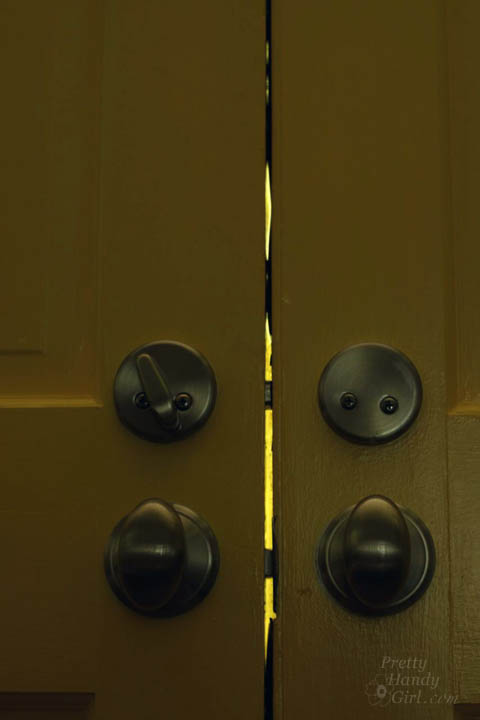
Simply adding adhesive-backed foam weatherstripping around the door will stop those drafts in their tracks.
Look Ma, no more light, no more drafts!
Adding a door sweep to the bottom of the door will keep out drafts from the bottom of the door. In addition, a well-fitted sweep will also keep insects and spiders from making an entrance under your door.
That pretty much sums up fixing common door problems. Next time you have an issue with your door, you can fix it yourself!
![]()
Disclosure: This article has been sponsored by Schlage. If you’ve been around here for a while, you know I’m very particular about the brands I work with. I only recommend products and brands that I use myself. I was compensated for my time, but I was not told what to write. All opinions are my own.
Pin for later!

My pantry door use to close fine until about 2 weeks ago. Now, on the latch side the gap is big enough that if there were no top piece on the frame you could pull the door the opposite way. I don’t even have to turn the handle at this point I can just push the door open. I don’t see any damage to the door or frame. Its like the frame grew or the door shrank..lol. What could cause this? Fixes?
What if I have the exact opposite problem and the gap there’s too wide? Like I’m talking an inch maybe even 2.
You can take the door off and add material to the bottom. But, you’ll have to re-stain or paint the door after.
I keep catching the pocket of my pants on the lip of the strike plate, and it drives me crazy. How can I stop this from happening?
Try gently bending the edge of the strike plate in toward the door frame.
You recommend using wd40 as a lubricant. That is a common misconception. Use a proper lubricant, like graphite instead.
The top of the door is tighter than the bottom of the door, it latches fine but will rattle sometimes because of the difference. How do I fix this?
Oh no, how about a door that won’t stay open?
It’s probably not plumb. You can try bending the hinges a little to see if you can straighten it.
just installed a dutch door. the bottom portion swings down when opened, creating wider gap between it and top. Is this an alignment or hinge problem
Any help for a new door that was installed but the top corner of the door (striking side) doesn’t meet the weather stripping?
Sounds like your door is warped.
My door won’t latch (dry winter with very humid summer) when we close it. It’ll stick in the summer.
How do you adjust it for the dry weather so it will latch and close?
Hi I’ve had some new doors fit and feel they have been planed too much can see a gap of light coming in and around the door any suggestions?
My Back Door has a big gap at the top corner what can I do to fix this.
Hi, a very useful article! I have an front (exterior) door and a metal security door on the same frame. Both doors are catching /scraping on the bottom corner closest to the latch (opposite side to the hinge). I have checked the hinges and they are tight. What would I need to do to lift the bottom latch side corner of the doors? A shim in which hinge?
Thanks for the response! Before I saw it I ended up moving the strike plate slightly and now everything works perfectly. Thank you for the handy resource you have here.
If my front door is pulled close too hard the deadlock/deadlatch plunger engages and then the deadbolt (it’s tapered) can’t insert all the way. Is there a way to adjust the hardware to prevent the deadlock plunger from engaging? I worry that if I move the strike plate too far the door won’t be able to close easily because of the weather sealing.
Craig, it sounds like you might need a new deadbolt. It’s fairly easy to install following my tutorial here: https://prettyhandygirl.com/how-to-replace-door-knobs-deadbolts/
We have a different problem with our garage entry door than the ones described here. It is fairly new-installed maybe 6 months ago. It was a door with already in a frame. It worked fine up until a week or so ago when we noticed it was hard to close. Upon inspection, the bottom side opposite the hinges has practically no space between door and frame now, while the top on that side has a larger gap. But the top, hinge side and bottom all have even spacing still. Any suggestions-hubby wants to “shave off” part of the door frame which I’m not a big fan of if there’s a better solution.
I’d try tightening the hinge screws on the top hinge. Or you can try installing a longer screw that will get more grip into the framing. Sagging in that direction is very common.
Thank you for so many informative answers all in one location!!!!!!!
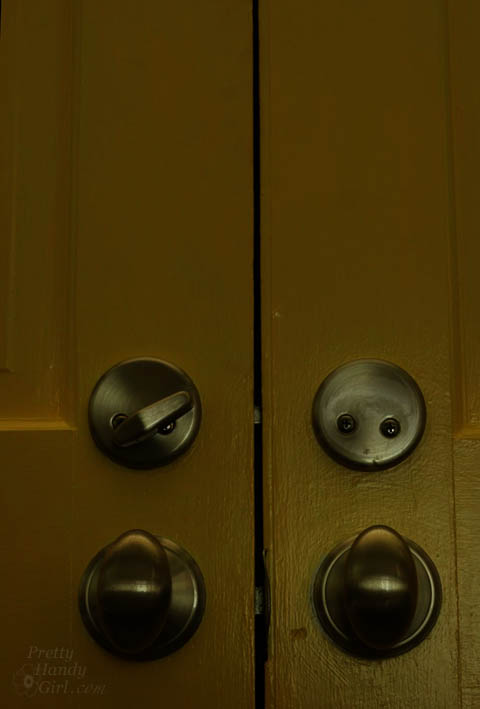
We have double front doors with the left having a drop bolt upper and lower. Twice we have woken up in the morning and that door is open. This is unsettling, any reason for this? Pretty sure both bolts were engaged properly.
Lori
Wow, that would scare me too. I have a similar situation for my front doors and those barrel locks are kind of flimsy. Plus, the locks don’t recess very far into the floor or the upper lock. Maybe look into something with more security. Also, do you have a deadbolt over your door knob? If not, maybe install one.
My bedroom door keeps slowly closing. It won’t stay open.
You’ll need to try bending two of the hinge pieces that hold the pin to create some tension. Or slightly bend the pin. Here’s a tutorial: https://youtu.be/cE8XcWAzxrc
My bathroom door is buckling the top hinge when closing. Just before the door meets the strike plate, the hinge has already pitched close. When forced closed, it is pulling on the screws and bending the hinge. Where does the fix need to go?
Most likely on the hinge side, but it’s hard for me to gauge the fix without seeing it.
Door hinges keep sliding up, how to correct the problem.
Do you mean the hinge pins?
This is very timely! This is so into detail than any other articles I’ve read. I’m also trying to fix a couple of doors in our house. Thanks for sharing your tips with pictures!
Only one request…this is such an awesome site….I’d LOVE to receive it in my email when there is an update. How about a subscription option??
Teri, I’d love to have you as a subscriber. I’ll add you to the list. First you’ll receive the 6 Steps to DIY Anything and then you’ll start receiving my newsletters.
I recently had the front door replaced, and the new one didn’t come with a door knob, but the installer brought a set of Schlage door knobs and locks, so I knew he was one; an experienced door guy and two; this is going to be a very secure front door! They’ve been around forever, so I have felt very confident in a great job of replacing our front door!
Thank you for the post on doors. Do you have suggestions for fixing doors that swing out and won’t stay in place?
When that happens, it means the door is probably not hung plumb (straight up and down.) You might need to remove the casing and try to knock it into plumb, then replace the casing.
Very helpful overview of solutions. Thanks.
Thank you !
My door wouldn’t close properly. Hitting at the bottom. What I did was take a 2X4 and place it across the hinge side of the door, smacked it once and presto, the door closes perfectly once again. Thanks for posting this because I did try your tips first.
Great article! Was annoyed about how rude that girl was to you. My wife blogs and she too gets upset over rude comments made by duel people. These people need to seriously have a look at themselves. Keep up the good work!
Hi My closet door suddenly won’t close on the opposite from the hinged side. It slightly hits the mouldings just at the bottom inch? How did this happen suddenly and how do I fix it?
Lori
Houses move, wood swells and shrinks. Try tightening the screws on the bottom hinge and try loosening the top ones slightly.
Door closing good. But only hitting door stop on 2/3. Is there a easy fix. Is frame crooked. Can I just move door stop ??
Sounds like your door is warped. If it’s hollow core, try to place the bottom between your legs and have a friend or yourself pull the top in the direction you want it to move. If it’s solid, you could try moving the doorstop. Just remember you’ll have to re-caulk and paint.
Door is solid. I just replaced everything ..think I didn’t put back together good. The frame standard 41/2. But I had to rip frame length to 21/2 to fit wall
I’m a fellow handy girl and recently my door stopped latching. I inspected the hinges for loose screws and tried lifting up on the door to make it line up, no luck. It was fine for years so I’m puzzled about the sudden problem.
Anyway, I read several how-to sites before I found your page. All were too basic or too specific (buy xyz type shim…print out template for strike plate [seriously??!!?] ). I *love* your cardboard shim tip…brilliant and simple; I’m going to try it out. Should have searched for another handy girl first! 🙂
Thank you so much , i loosened the hinge screws on the bottom of my bedroom door and it finally closes again…. Great tutorial and advice, i had been looking to fix this for about a year lol (its fine in winter, summer it will not close !!) Really appreciate it !! J, Canada !
a while back my daughter was playing with my bedroom door and now, we have to push in order to close it and it wont open anymore, to open it we need to get some tools and open it because the metal thing that moves in and out when you open it, it doesn’t move and sometimes we’re stuck in there, PLEASE HELP
Bob, sounds like you need to replace your door knobs.
Or you could follow this tutorial on youtube that I just used to fix my door in about 2 minutes. So much easier. https://www.youtube.com/watch?v=AzRqVgkjZaY
Felicity! That’s a great tip! Thanks for sharing. I have another door that’s been sticking, I’ll have to try this trick.
Thanks so much!
You just helped me fix my doors that have been ‘off’ for months since having to take them off the hinges.
Wooohoo!!! And I did it myself! 🙂
Pretty handy girl ‘high five!!’
My dog has separation anxiety and my mom dementia. She has accidently closed him in rooms while I was at work or out mowing the yard and he has promptly dug his way through the door. I bought a replacement door at local store, they took the old damaged door and cut exact “supposedly”. But now I’m finding it doesnt close. I tried your tip of dremel to get the hinges in farther as I could clearly see the gap of about a 3/8ths inch on that side. The hinges are now laying very flat in there, but still there is decent size gap, about half the size as before but the door will not close. I’ll have to plane quite a bit to close it. What I dont under stand is, I have the old door and measuring down, this door is exactly the same size! So its something to do with that side how the gap between hinges. Any thoughts? We did use the old hinges from original door. I have 3 more to replace and am not looking forward to this nightmare on each one.
Margaret, oh goodness. My first thoughts are: Your poor pup! Second thoughts: Poor you! I’m not sure what to tell you other than you probably will need to plane it down. Jeff has a great post on planing your door (although you will need to do the side after removing the latch.) https://prettyhandygirl.com/2013/06/how-to-trim-a-sticking-door-with-a-power-planer.html
My door in this post has swelled over time (or the doorway has swelled) and it won’t close anymore. So, I’ll be right there with you planing it down.
Good luck.
I need to apply your solutions to SEVERAL doors in my house … or, just share your blog post with my husband so HE can do it. 😉
i’m impressed! very nice job!
I always appreciate a useful post like this. I recently jammed roll of socks in the crack of my girls’ door to keep it from slamming shut on little fingers. Now the darn door doesn’t close without some serious shoving. I’m going to inspect it now for cracks and tight spots. Thank you!