Adding Moulding to Your Staircase – Decor Chick Guest Post
Today I want to welcome Emily from DecorChick! Isn’t she gorgeous! But, she’s not just attractive, she is brilliant! (And fun to hang with.)

Why do I think she’s brilliant? Because she has one extra special, creative brain. Just look what she made out of a little lonely drawer!

I love her home and all the changes she’s made to it. Especially her staircase makeover! I’m jealous of her staircase because, I live in a two story home, and I spend A LOT of time going up and down the stairs. Every step I take on the stained carpet stairs with an ugly banister and spindles makes me long to live in Texas in Emily’s home. I have been wanting to give our staircase a makeover since we moved in. Sadly, I haven’t started it yet. But, I know when I do I will be more in love with my home because of it.
Emily has agreed to share her staircase moulding tutorial with you today. So, please give her a big welcoming hug.
Heeeeeeeeeeeres, Emily:
Hi everyone, I’m Emily from Decorchick. I’m so happy to be posting on Brittany’s blog today. I’ve always been a fan of Brittany and her blog, and I was fortunate and got to hang out with her at Blissdom and it was so much fun. Brittany is such a sweetheart, but I know you all know that already. 🙂
I finished a big project (with the help of my Dad) and transformed our staircase wall with lots of moulding. I couldn’t be happier with the results and I will be showing you the makeover today.
So, let’s take a look at the before photos.


And now….the after!


Ahhh, don’t you love wainscoting??
I was actually smart for once and painted the wall white before we added any boxes. I know, can you believe it? I actually followed my own advice. 🙂

When you are trying to do wainscoting up a staircase, you are going to have odd angles and cuts. But this new little gadget my Dad introduced me to is so cool. You just set it on your angle, say for instance our staircase banister, and it tells you exactly what angle it’s sitting at.


Pretty neat right? Oh, and those are my Dad’s hands. I don’t have man-hands and hairy wrists.
The angle of my staircase is 37 degrees, so the cuts were all made to compliment that.
For the moulding, I chose to use the foam stuff again. The pieces I bought were 7ft in length and cost $2.38 for each piece. I ended up buying 27 pieces. So that is $64.26 just for the moulding for the stair boxes.
First thing we did was cut all of the pieces for all 21 boxes.

Then we used this make-shift template so we could glue each piece together at the right angle, and on a flat surface.

We glued 2 pieces at a time with hot glue, and let them cool.
Some pieces cooling…


And then we would glue a box together.

And eventually got all of these.

Then we put up the frames temporarily with double-sided tape to get the spacing correct, nailed them in with a nail gun, and added the chair rail. The rail is not an actual “chair rail” but is window casing trim. It is decorative like a chair rail and has a nice ledge to it.


Then came a LOT of caulking and spackling of all of the boxes and chair rail, more painting, and then done! And please, if you need to cover nail holes, use spackle and not caulking. I already knew this but for some dumb reason I used caulk and ended up redoing it with spackle. Caulk does not sand well and it gets rubbery. With spackle, it sands down nicely and you can’t even see the holes. Just my little tip!
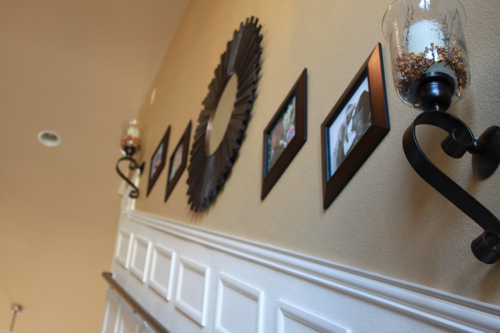
I’ll just show you all more after photos because I know that’s what you really care about. 🙂


And here are a couple of night shots. P.S.- the sconces have flameless candles in them and they are on a timer, so they come on at the same time every day and stay on for 5 hours and turn off.


So what do you think? I think this is one of, if not, my favorite transformation so far. I think I always say that though. 🙂 This wall was always a challenge to decorate, so that’s why it’s been empty for 2 years now. I think having the wall more as an architectural feature was the way to go.
To see how the design of the staircase came about, you can read about that here. To see a more detailed how-to of the moulding boxes you can read that here.
Source list:
- Starburst Mirror – Pier 1 for $69 (was on sale over half off! The original price was $149)
- Candle Sconces – Hobby Lobby $30 each (with half off)
- Flameless candles – Pier 1. I already had these candles but had to buy one more for about $14. Pier 1 flameless candles are my favorite because they glow from the bottom up, instead of just the top like a lot of others do.
Materials – $64.26 for moulding boxes, and approximately $20 for the chair rail.
Wall color – Baguette from Sherwin Williams — (But it’s soon changing to a different color)
I hope you enjoyed my staircase makeover, and thank you so much for having me Brittany!
Thanks Emily! I appreciate that you shared your tutorial with us. What do you guys think? Pretty fab, huh?! Well, you haven’t seen nothin’ yet.
Checkout her fabulous pantry! Seriously, I love her pantry (and her Dad who helped her build the custom carousels for her pantry. DecorChick Dad, can you adopt me please!!!)
See for yourself:
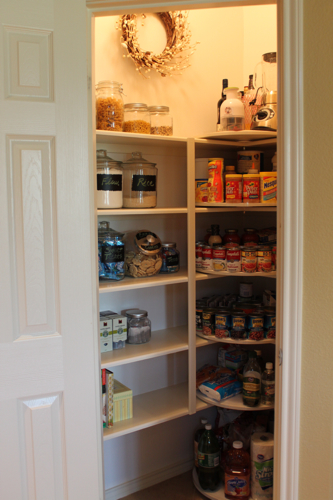 |
| Pantry Makeover HERE. |
I hope you will hop over to her blog and tell her I sent you. Enjoy your visit!
Stay tuned, we have a few more guest posters helping me with “Falling in Love with Your Home” February!


I hope you’re still responding to this post because this is exactly what I am doing and hoping I can get your help! I am currently putting trim up my stairs and having the hardest time with cutting the end of the chair rail…in your very last picture…you show where the end of your chair rail dead ends to your molding for your doorway…you have one cuts there on an angle and one for the piece that dead ends to the molding…how did you figure out that angle? That is driving me crazy right now!!! Your trim is awesome looking BTW!
Beautiful !!!
Hello,i love it your project……… question do you use 37 degree angel as well? how did you cut the all moldings into that angle,,,,,,, thanks for your help,i will really appreciated
Marie, you should check your own staircase angle using the tool that was shown setting on the railing. Then you’ll want to use a miter saw set at that angle to cut your molding.
Wow! Nothing but fabulous! What material did you use for wainscoting? Thank you for sharing. Your blog had inspired me.
I found this from pinterest and am all ready to make over my stairs. Question, on your template for the boxes did you use a 37 degree angle as well? also how did you cut the moldings into that angle?
Thanks!
also do you have the dimensions for the boxes, length and width?
Awwwesome!!! I’m a stalker, I mean, a follower of both of you! You guys inspire me. Thank you. =)
I really appreciate what you’re writing here. Keep posting that way. Take care!
OOHHH I am soooo excited!! This is just what I have been looking for! I have been scouring books at the library to find something to explain how to do the wainscotting upstairs and lo and behold I find her on my favorite blog site! Yeah! I will be going to check out DecorChick’s blog next! Thanks for all your fabulous ideas and information that you pass along Brittnay! I am addicted to your blog!
It looks fabulous!! What a great decorative touch!
Nice job and excellent for adding resale value!!
Wow…I have got to do this to my boring staircase! Gorgeous!
Yeah, your up and running! I love Emily’s staircase re-do!
Thanks everyone, y’all are so sweet! And thanks so much for having me guest post today Brittany!!
That is an amazing transformation! I'm pretty sure it wasn't as easy as she made it look though! Sandi
Wow, that is an awesome transformation. I thought she was going to add a little baseboard molding at first. Wow!
Beautiful! Wainscoting is one of my favorite finishes ever.
Gorgeous!! I LOVE the wall sconces :0) Im on my way over to her blog this minute to check out that pantry….
Wow….what a tranformation! Thanks for sharing!
8>)