DIY Glass Window Shelves

I love african violets! They can be fickle, but once they have the right amount of light, and slightly damp soil, they will happily put on a show for you. My violets used to perch on the kitchen window sill, but occasionally they would take a suicidal nose dive into the sink. To save them from inevitable death one day, I installed two glass shelves over the sink.

Would you like to install your own glass shelves between two kitchen cabinets? It is a relatively easy project, but does require two sets of hands for one step. The directions below will take you through the step-by-step process for installing 2 glass shelves.
DIY Glass Window Shelves Materials:
(I’ve included affiliate links for your convenience. I earn a small percentage from a purchase using these links. There is no additional cost to you. You can read more about affiliate links here.)
3/16 inch tempered glass
quarter round moulding
paint (to match your kitchen cabinets)
medium size paint brush
painters tape
hammer
level
drill w/ bits
finish nails 1.25″ long
nail set
wood putty or caulk
flat toothpick or wood shim
DIY Glass Window Shelves Instructions:
1. First measure your window width and subtracted 0.25″ from the measurement.) Then measure the depth of your kitchen cabinets to the window frame (or tile, whatever sticks out the furthest).
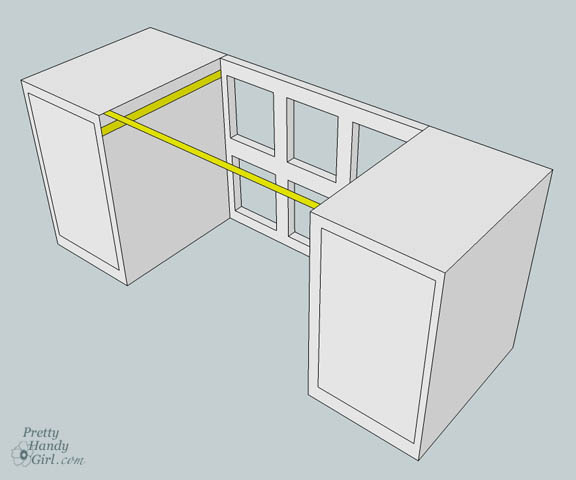
Take those measurements to a glass manufacturer and have them cut two pieces of 3/16″ tempered glass. Make sure that the edges will be smooth. And, definitely ask for the tempered glass. (My shelves never broke, but I banged them occasionally while being overzealous about washing dishes.)
2. Using the measurement you took for the depth of your cabinets, cut 8 lengths of quarter round (four for each glass shelf you are hanging.)
3. Prime and then paint the quarter round to match your cabinets.
4. Determine the height where you want your glass shelves to be. (I put each shelf at the same height as my window grill pieces.) Use a level and draw lines on your cabinet on one side of the window.

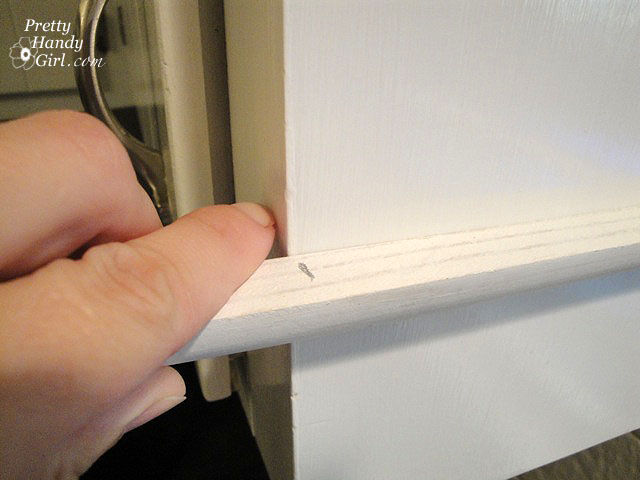
5. Pre-drill three holes (the size of your finish nails) into your quarter round.
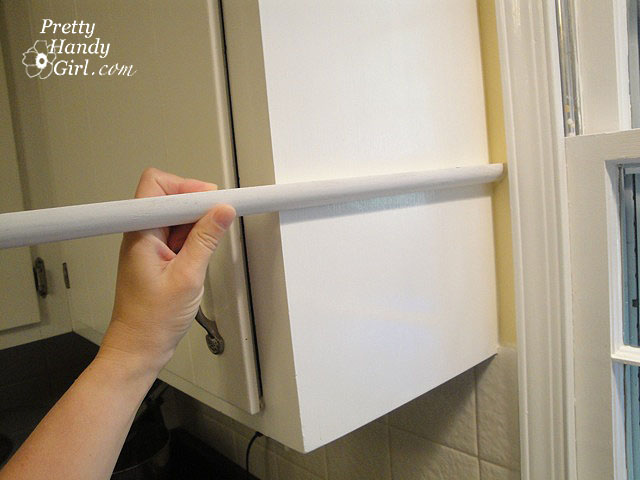
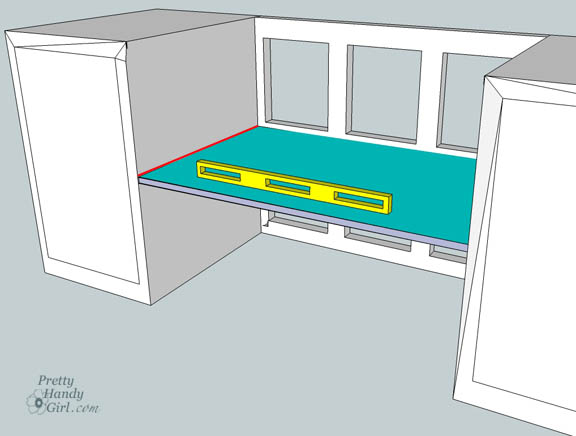
6. Using a piece of painters tape, attach once piece of the quarter round to your cabinet. This is your shelf support piece, so make sure that the flat edge is facing up. Gently nail the finish nails through the predrilled holes and into the cabinet. Repeat this step for your other shelf support (on the same side.)
7. Rest one glass shelf on one piece of the installed quarter round. You will need an assistant to help hold the glass shelf up as you level it.
8. Make a mark on the under side of your glass.

9. Double check that the mark is level (from front to back), and line your next piece of quarter round below the line. Repeat steps 5 & 6 above until you have the four shelf supports installed.
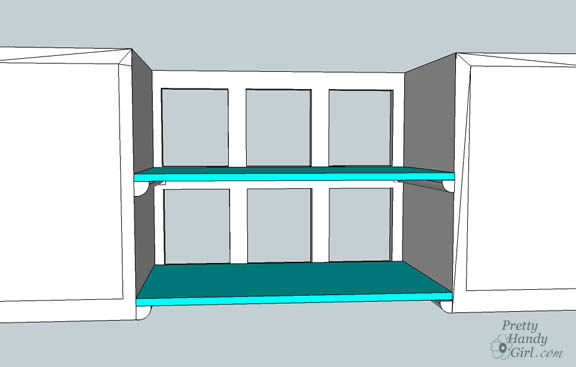
10. Gently rest your glass shelves on the supports.
11. Pre-drill holes in your four remaining quarter round strips.
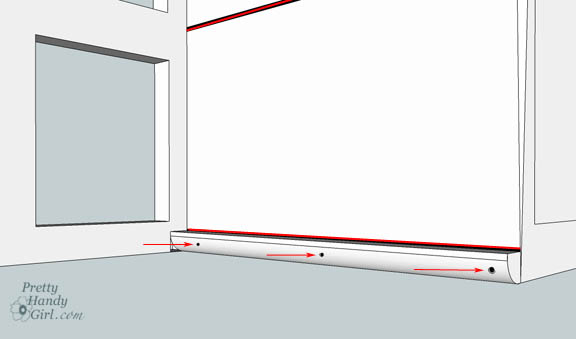
12. Set wood shims (or toothpicks) on top of the glass shelves and up against the cabinets on both ends. Rest your quarter round strips on top of the shims. This should give you a slight space between the glass and the quarter round. Now, tape the quarter round pieces in place and REMOVE BOTH glass shelves and the shims.

13. Nail your quarter round pieces in place. Use a nail set to countersink (set the nail below the wood surface) all your nails. Fill the nail holes with wood putty or caulk and touch it up with your paint.
14. When the paint has dried, slide in your shelves. The shelves should slide in easily and should not be tight.

15. Put some plants or other accessories on your new shelves! And enjoy.


I am getting ready to do this project but wanted to ask if there’s a structural reason why you hammered nails into the cabinets rather than screwing from the inside of the cabinet so there wouldn’t be any holes to cover in the quarter-round?
You can certainly use screws from the inside. It’s a bit trickier holding the molding, applying pressure and driving the screws as opposed to hammering in some trim nails. But, that’s just my opinion, feel free to try it your way.
My smart husband came up with a good fix. He got an L shaped piece of trim and cut it to the length of the shelf. We didn’t want to drill wholes in the tile, so he used clear flex seal waterproof glue and glued one side of the L-trim to the tile to create a ledge for the back of the glass to sit on (Have to let the glue cure for 24 hours). The glass is now holding it’s shape. I would submit pictures, but not sure how.
I love the look and the directions were great and easy for anybody to follow. I was a little disappointed and thought it a valid reason to comment. Per instructions, I purchased the 3/16 tempered glass. I think there should be more specific info as this doesn’t work for all cabinets. The distance between my cabinets is 40-1/4 so I ordered 40″. This distance was too much for the glass. Before I could even begin to mark the lines to put the top half of the quarter round, the glass began to sag in the middle. Either the length of the glass at 3/16 needs to be no more than 24-30″ or a much thicker piece of glass. We are either going to waste $50 on the glass shelf and spend more to get thicker, or use a finished board. Great idea, but there are limits.
Yes, good idea. You need to think about your span and the amount of weight you’ll be putting on it. It’s a good idea to talk to the glass company about your situation. I’m sorry you are in this situation. Thanks for the comment.
This is brilliant…thank you. Been looking for this kind of window treatment and I love plants.
What a great idea!
Any idea how much weight this could hold? Toaster oven??
You should ask the glass manufacturer as it will depend on the glass and the distance your shelf spans.
Where to buy 40x 16 tempered glass shelves
Look for a local glass shop.
This is exactly what i need for the alcove glass shelves I’m having installed in my loo. I was not happy with the idea of battens and wanted something less obvious. Thank you!
Your directions are so clear, I can’t wait to see what may be next. Sandra
Thank you, thank you, thank you for showing a great way to have plants in a window without a window box! I have a window box now and really hate it. The top of the box can open, but we get no air. Also, the window is a single pane and you can forget about efficiency. I have wanted to change it but couldn’t come up with an idea so I could keep my plants. I showed this to my husband and he is totally on board. I can’t wait to do it. He said your diagram was impressive
(and he’s a contractor who reads plans all day).
Vicki, LOL, glad your husband approves. Definitely get safety glass to eliminate the risks if it breaks.
Hi, going to do this. Question please what was the width of your glass, mine is 42″ , what kind of weight will the glass support, I know it’s only some flower pot.
Tom, that width sounds right (it was installed in our previous house.) I think you need to talk to a glass manufacturer and let them make a recommendation.
i was so excited by this idea. Am in a new rental. There is a cabinet on ONE side but not the other — only a 2″ lip between the glass and the perpendicular cabinet of the other row of cabinets! Dang 🙁
Love this idea! ThNks for the instructions! I will be doing this.
Thanks Julie. I know you’ll love them.
Wow, not only do I love what you did, but I love this gorgeous idea. Thank you so much, because I will for sure do this to my kitchen window, because we have the same the of setup. You rocked on this design!
I love in
I adore glass shelves in the right place. They really do look good and following these directions makes it look easy to install them
Do you know where you can purchase glass shelves the width of your window ?
Marie, look for a glass shop in your area. They usually sell to commercial properties, etc. In our area, I go to Binswanger.
what a fabulous idea. I used to have plastic tray shelves hung by 2 hooks and heavy white braided string. The shelves would shift a lot over time because of the design, so I just got rid of them but missed the space for plants.
We have a double window over our sink, so approximately 46″ between the wall cabinets.
I think I can make this work by just putting a shelf bracket on the wood center piece between the 2 windows.
I think I would also use screws counter sunk into the wood rather than finishing nails. A lot sturdier and you can unscrew the shelf anytime without using a hammer to pry off the wood pieces that could damage your cabinets in the process.
Great looking project and instructions, I have been wanting to do this for quite some time!
Show this on Pinterest and love this idea. Looking to do this over my sink. Thanks for the instructions!
These are perfect for what I want. I’ll be showing this to my husband so he can finally get it done! Thank you.
Debbie 🙂
If you occasionally bump the shelf, I’d like to know the distance between your counter top and the underside of the bottom shelf, so I don’t set my own any lower then that.
Ted, the height is 27″ from the counter to the bottom of the shelf.
This is a GREAT idea. And it will work in my large center bay window, as I can nail the quarter-round to the insides of the window molding itself, and then lay the glass shelves on them. Thank you, simple is always best!!
Inspired in New York City
Oh thank you for sharing this!! I have been staring at my kitchen window thinking how lovely it would be to have shelves in front, this is exactly what I needed!!
Fantastic idea! I rent, so I was looking for a way that would not disturb the woodwork too much and this is it. Thank you, Cleverly.
i want to make a beautiful glass window in my kitchen.thanks for your blog.
Oh my, I love this idea! Nice job!
I saw your post for these glass shelves featured on One Pretty Thing and came straight over. This is something I've always loved, and being a clever (ok, lazy) girl, I'm always happy to use someone else's directions. Thanks so much for posting exactly what you did and with such great diagrams!
Still lovin' this idea! Thanks SO much for joining in on Thrilling Thursdays @ Paisley Passions. I love to see the creative talent of other fellow bloggers. Hope you to see you again soon 🙂
~Lori S.
Thrilling Thursdays @Paisley Passions
You ARE a pretty handy girl! Found you on One Pretty Thing. I happen to have some old glass slats from a door and I've been dying to find a way to use them. Thanks for the inspriation and clear directions!
great idea, great tute!
This is such a fun project. It adds so much to the room! Great tutorial. Stopping by from Amanda's link up (:
~Michaela
Great project! Your new shelves will be fun to accessorize with each changing season.
Nice project. Love the shelves above the windows. 🙂 Please add my party button or a link back to me so that I can keep your link up on my list. Thanks.
Congratulations Brittney! You did it again! You made this week's Top 5 Hits. Thanks for all of your terrific ideas…I try not to feature you every week…love your new pix!
What a fantastic tute! You are way cool, I love this idea and how easy you make it.
What a great idea!!! Hopping over from BCD. I host a linky party too. Would love you to link up if you have time 🙂
~Lori @ Paisley Passions
Paisley Passions Linky Party Thrilling Thursdays
I so want these too. . these and the pear. . .so I think you may have me attempt to make these myself instead of waiting for hubby to have some time to do it for me. . . you almost got me there. . .
Wow, those are gorgeous! Thanks so much for the thorough how-to, I'll be linking.
I LOVE THIS!
Thanks for sharing!
Your diagrams are awesome! What a great idea…something I could totally do! Of course, my kitchen sink area is the hottest part of the house and they would probably die, but I could do something like that! Super!!
Beautiful idea, and so well executed! Hopefully those violets will thrive.
Great tutorial! I love that idea too!
What a great idea! I would love to do this over my sink!
These are great! I emailed my husband the picture so we can save it for future reference. Thanks for the detailed instructions!
Genious… any ideas of how to support the middle of a 8' window span? So great though. Love your ideas~
I am sure your African Violets appreciate their new home on that fantastic shelving you made just for them….and others. This is an ingenious idea for wasted spaces.
Those look great! I love the diagrams. I wish I had a window above my sink now 🙂
Okay, Brittany — these are too awesome NOT to share! I linked this up on my FB page — just loving them!!
I love this idea! Thanks for sharing!
What an absolutely fantastic idea! I love that it lets so much light in AND you have a great place to put stuff above the sink. Ingenious, Brittany! 🙂
Those look great. I wish I had a kitchen window. Really, I do. I often miss it.
wow you got me thinking! your tutorial makes me up for the challenge!
How do you make all those great diagrams? They really help make your tutorials easy to understand. I appreciate that. Great shelf!
I love this idea. How easy you make it look too!