Painting Brick Fireplace – From White to Beautiful Brownstone

This is the first in a five part series on renovating our living room:
1. Faux painting brick over a previously painted white brick fireplace (this post)
2. Lightening up a room in 5 steps
3. Painting decorative graphics on a wall
4. Preparing to Install Antique Heart Pine Floors (and living to tell about it!)
5. Installing Heart Pine Floors and the Final Reveal
I know the trend lately is to paint fireplace brick white. Especially if the brick is an ugly bright red or some other ugly color. I’m pretty sure that is why our fireplace was painted in the first place.
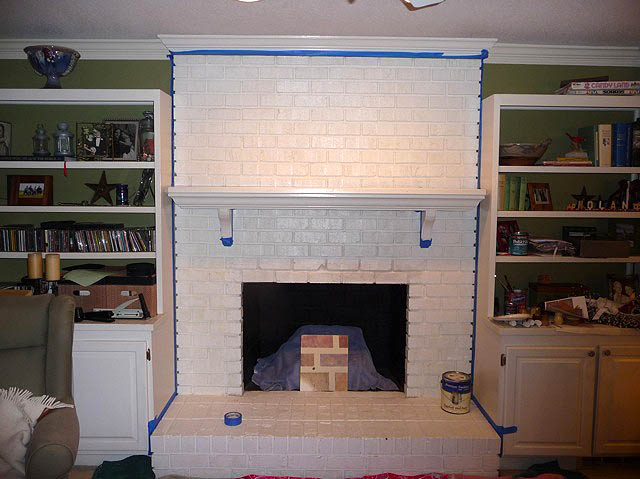
Painting Brick Fireplace
But, the fact that our fireplace, mantle and the built-in bookshelves on both sides of our fireplace are white, made for an overwhelming amount of white on that one wall. I thought about painting the mantle, but only briefly. I really wanted the warmth and contrast of bricks to set off all the white in our living room.
I stumbled across a few websites showing painted brick here and here. Then I thought, “If someone can do it, then there is a 95% chance that I can do it too!”
I wasn’t sure how it would turn out, but in the end I am amazed by how real it looks. And, how easy it was to do! The true test came when I fooled the builder of our house (he has lived on our street for over 30 years) into thinking I had stripped the paint off the bricks! Sweet success.
This is a relatively easy project. It took several hours, but can be done in sections.
Painting Brick Fireplace Materials Needed:
TSP cleaner
Scrub brush for use with TSP cleaner
Drop cloth
Newspapers
Painters Tape
Paint Roller and Tray
Stiff 2″ paint brush
Car wash sponge or large 6″ x 3″ sized sponge
Spray bottle with water
7 paper plates
Rags for clean Up
Acrylic Paint (see below for colors)
Before you do anything, buy some TSP (tri-sodium phosphate) cleaner at the hardware store and follow the directions to clean your brick. Be forewarned that you may actually like the color of your bricks once they are clean and dry! If you still hate the color, proceed…
After working up a test board by playing with several color combinations, I chose a warm brown brick color. I also tweaked my mortar color before painting it on my fireplace.

I covered the mantle and bookcases by taping newspapers to them. Then, covered the floor with a drop cloth.
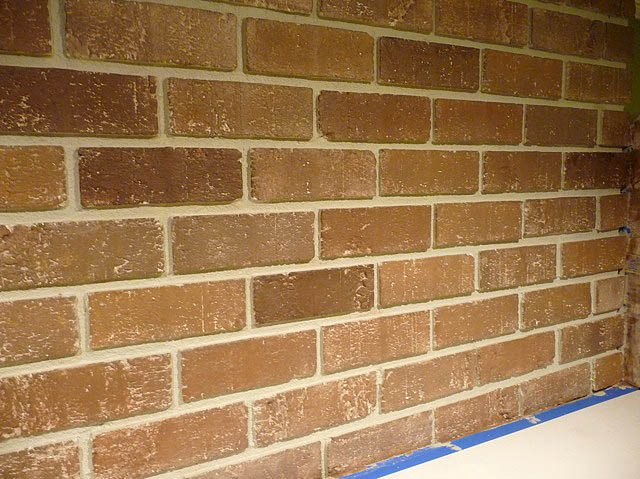
I mixed up a small container of my mortar color. I used some leftover latex satin taupe paint from our other house and added some black and a little dark brown to achieve the perfect mortar color.
My color looks like this warm gray cement color:

I painted all the mortar areas between the bricks with a 2″ paint brush.

As the mortar color dried, I mixed up a bucket of my base color for the bricks. Then poured it into a paint tray.

Then, I laid out my seven paper plates and filled the first one with a deep chocolate oops paint (Valspar Latex Eggshell Chestnut).
And poured a half dollar size of the following colors onto the other plates (one color per plate).

I used a paint roller to roll the base color onto small 3′ x 3′ sections of my fireplace. (Don’t worry if the paint doesn’t soak into all the grooves. Some of the white showing through made my bricks look old and rustic.)
While the base color was still wet, I covered my sponge with the Chestnut color. Then dipped the sponge into one or two of the brick tint colors. I sponged one brick at a time using the same color tints sporadically around the wall. Keeping the brick colors varied and random make them look real!
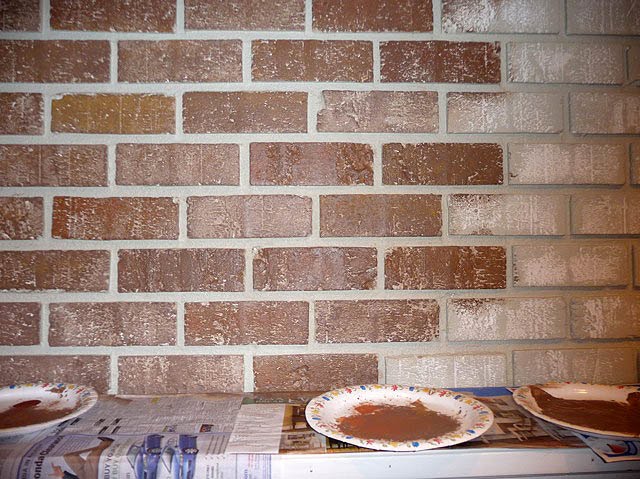
When the sponge needed to be reloaded with paint, I began with the chestnut color first, then added one or two new color tints to the sponge. You will have to refill the paper plates as you use up the paint.
I kept working in small sections, to be able to work while the base color was still wet (use the spray bottle of water to lightly wet the bricks if it dries too quick).

The best part was that if I didn’t like a color, I could go back over it and try a different tint. Notice how I randomly dispersed the darker brown bricks. This is key to having a realistic look.
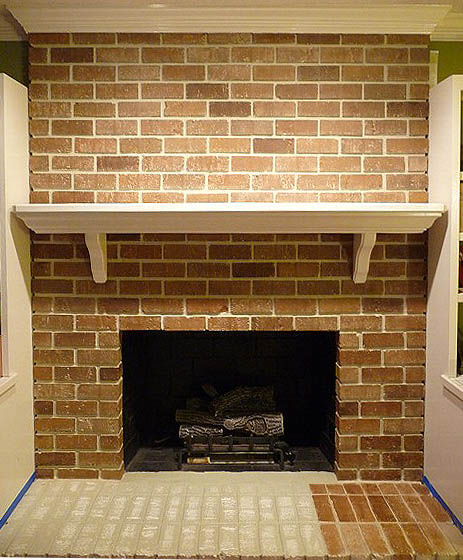
On the hearth I had to press more gently with the sponge since the mortar lines on our hearth were almost level with the bricks. I kept a wet rag near by to wipe up any wandering brick paint.

Notice how the white specks showing through really make the bricks
look like they are re-claimed and rustic.


And for those wondering how long this took. Including the prep work (cleaning, taping, mixing colors) it took about 5 hours total. Not too bad since I’m a night owl and could watch DIY network while painting!
Next up in the series: 5 Ways to Lighten up a Dark Room.
Followed by: Painting Decorative Graphics on Your Wall.
And I saved the best for last (coming soon): Installing Antique Reclaimed Heart Pine Flooring
Beautiful and I’m going to try it. My fireplace was painted gray by the previous owner. Did you use anything to “set” the paint after it dried? Thank you!
No, just used latex paint and acrylic paint. Still looks perfect after 10+ years.
I’m going to try this – just so I can white wash the brick!! I recently saw the most perfect fireplace on Home Town white washing old brick. My fireplace is all white, and I really like the rustic whitewash look, so instead of trying to remove the paint, I’m going to paint the bricks using your method, and then white wash it and see how it turns out. Can’t wait!
What a wonderful teacher, artist & craftswomen you are! With your detailed instructions complete with pictures, colors and all tools needed we were able to paint a huge fireplace and one large wall of white painted brick which has transformed our home. (over 1000 bricks) They look spectacular! Thanks so much!!
Was there any reason you used the acrylic craft paint? I’m planning to do this to my fireplace (large area with brick above the mantle and along the whole lower part of the wall) plus the same thing to the brick I have surrounding my oven/stovetop area. Due to the size of my area, I was thinking of getting regular interior latex paint in the colors I want from somewhere like Lowe’s rather than so many small craft paint bottles. Any reason regular interior latex paint wouldn’t work?
Thanks,
Kevin
You can definitely use latex paint. Both acrylic and latex paint are basically the same (plastic base.) I used acrylic paints because it’s what I had.
Brittany,
Thanks so much for your wonderful instructions. It was tedious with over 500 bricks but easy with your method. Love that you supplied materials & colors. You are a talented artist, teacher and handywoman. We love the new cozy warmth of the repainted brick.
I’m thrilled to have found this blog because you’ve done exactly what I’ve been contemplating for months. We are restoring our 1947 ranch which unfortunately the previous owner painted the (narrow, horizontal) brick fireplace white many years ago. I couldn’t see a way to strip the paint (most people say it’s a no-win) but I can’t leave it this awful white.
I have no qualms about this project (I’m an artist by profession) and it’s good to hear you’ve had good luck with the ‘craft’ type paints you used. Thank you SO much Brittany!
Evan
I have a question, did you dip the sponge in the chestnut color and 2 or 3 other colors before using the sponge? Or did you press the darker color first then add the other colors?
I used random colors and switched it up to get a variety of “brick” colors. I recommend using a practice board to see what you like.
Thanks so much! This is what I’ve been looking for!
When I moved into my house, the fireplace looked as if it had been painted with Wite-Out.
Yuck! We painted it a pale yellow, but after seven years I am really tired of it. I’m going to give this my best shot and see if I can make mine look as good as yours. Fingers crossed!
Good luck Laura. I know you can do this. I’d love to see a picture when you are finished.
I love the end result! It looks amazing!
Brittany,
Awesome job with the fireplace and built-ins. I want to do something similar in our living room. I couldn’t tell from the photos but did you paint the entire inside of the built-ins green/slate or just the back of them, leaving the individual shelves white? In other words, is the interior left, right, top and bottom of the bookshelves green/slate or just the back of them? Thanks for the help and clarification. Feel free to reply to my personal email address if you wish. Also, would you mind including a panned out photo of the entire wall so my wife and I can see what the entire finished job looks like? Great job!!!
Hi Brittany,
We tried this out on our ugly painted over brick fireplace over the weekend and it came out great! It didn’t even take as much time as I thought it would to paint over each brick. Thanks so much for the tutorial. Our living room looks cosy and warm and we love it!
So happy you found the tutorial helpful.
I have an ugly white fireplace, but after seeing what you’ve done, it won’t be white much longer! This is amazing! I never thought I could recreate a natural brick look, but thanks to your directions and pictures, I can do this!
Wow! You did such an amazing job! You give me hope for improvement on my hideous white brick fireplace. My brick has a lot more texture than yours, with deep grooves in the bricks themselves. Any good advice for working with highly textured brick?
Use a sea sponge instead of a car wash sponge? Honestly, some white showing through can be beautiful and make it look like reclaimed brick.
Just followed your directions to paint some stucco faux brick on the front of our house, and it came out amazing. Thank you for posting such a great helpful tutorial! Yours was the only one I found that created the look I was going for. . . .
Whoa!! I am amazed! When I first saw the after pic, I thought, how did she scrape off all that white paint? My jaw is still on the ground. 🙂 It looks so, so real. Great job!
Hello there! I could have sworn I’ve been tto this wweb site
before bbut after going through a few of the posts
I realized it’s new to me. Anyhow, I’m certainly delighted I stumbled upon it annd I’ll
be book-marking it and checking back often!
Thanks so much for this tutorial! Can’t wait to try it on my brick accents on my house. Currently bright barn red which doesn’t go with anything! I’ll have to use exterior paint, of course, though.
I wanted to ask you, though – what sheen of paint did you use?
Alyssa, I used a variety of paints, but most were craft paints. I’m not sure what the craft paint sheen is. I’d say they were eggshell to satin sheen.
Your method of telling all iin this article is truly
good, all can easily be aware of it, Thanks a lot.
Thank you, thank you, thank you! We are buying an investment property and I was wondering what to do with the painted brick fireplace…….Great work!
This is so impressive. Absolutely beautiful painting technique. My fireplace is very similar to yours but is covered in bricks that are various shades of gray. I love them, but so many people think they should be painted white……I have no idea why, especially since I have white built-ins on either side and a white mantel. If the brick color is beautiful, why cover it up in such a glaring, unnatural way?
The fire place looks beautiful. I have a similar looking fireplace and want to paint he surrounding walls. May be green tone or some other color. What is the green color on your wall? Do you recommend any other color?
Regards,
Reshma.
Reshma, it is called Wasabi Powder. Maybe by Behr?
Sorry if you covered this question, but I was wondering why you didn’t remove the white paint? Could you tell what color the origional brick was? It looks like a lot of work to get back to what may be underneath the white paint?
Thanks for a great project. I just completed the fireplace makeover and it looks wonderful! It took me a little longer than you said but it was well worth it. It truly does look like real brick and made my fireplace less of a sore thumb. I purchased two containers of each of the colors and really didn’t need that much material. Thanks for great instructions.
Awesome!!! Definitely original!!! Tanks for the info!!! Let’s work!!! 🙂
Beautiful! It looks authentic!
Yes! This is exactly what I was looking for! And I love the fact that I can pick whatever color brick I want—definitely going to try this soon. Thanks for posting!
Done! The project came out really nice. See before and after photos here:
http://flic.kr/p/duQBjk
I recently decided to paint NOT my bricks they are beautiful, but I have four white like stone to hold pics on the fire place. I didn’t like the white at all….so my husband and I decided to go black, I like it, but the floor where the old fashion stoves sits was an awful peach colour and in ruff shape. I decided to go a dark grey……..the stove it’s self is black and of course the pipes leading out. I am unsure weather I should just paint the floor black too, before sitting the stove on it…..or stenciling some nice old fashion black design on and leave the grey! It might just be that I’m not use of it just yet, not sure if the different colours will just simply not look right! UGH…….any suggestions anyone????
Janet, can you email me a picture? I think I’d understand better if I saw it. PrettyHandyGirl(at)gmail.com
Hi Brittany – this is fantastic and just what I was looking for!! I’m looking to do more red and blues in my brick coloring… do you have any recommendations for paint colors in that family? I see on your sample board you had a blue section… do you remember that color? Thanks so much for your help and for your blog!!
Abby, that purplish brick was just a mixture of other paints. If you like a bluer tone, buy brick red colors and maybe a violet? Steer away from the burnt colors. I think you’ll just have to experiment to get the colors you like.
I’d like to paint my brick fireplace, but have no idea where to begin. The brick is this funny, pale pink color. Could I use these colors to make it similar to the color you created with yours? Would I have to paint it white first? The pink bricks don’t go at all with the paint colors of the room, and it’s the elephant in the room.
Lauren, if your’s isn’t painted yet, I’d paint primer on the bricks and then follow my tutorial. It would be great if you can get the paint store to tint your primer to be the same color as the grout (to save you that step.)
So….. here we go! I just scrubbed my fireplace. Mine is not typical…… has some bigger sized stone, but in the shape of regular brick… only bigger. Waiting for it to dry so I can put on my first coat. Tried to match the colors listed here, but no luck. So I made up my own color scheme. Wish me luck!
Tonya, you’ll do fine! Just remember it is paint, you can always paint over it and tweak bricks you don’t like. Enjoy and be sure to send me a picture!!! ;-D
Thank you so much for posting this. I’ve been looking for inspiration for three years and now finally had the ways and means to paint over my stark white hearth. It came out fantastic and looks just like brick again!
wow i really love how that turned out! love the before and after comparison. it’s funny, i normally would thinking changing to a lighter brick fireplace would look better, but actually – it looks better as the brownstone. 😀 great job! would it be ok to link to your post from my site? i love to share what awesome work diy folks have done.
I found your page yesterday and today my white painted brick fireplace is back to brick. Thanks for posting this info, I was only thinking of the work it would be to strip it…A day later it’s back to brick and no stripper!
I’m a new homeowner and have a white painted brick fireplace that we were trying to figure out what to do with when I stumbled across this page. You are my new hero. So cool. We are excited to try it out.
Matthew, glad I could help! I hope you send me a picture when you are done ;-). BTW, we are going on 3 years now and it is still holding up beautifully. A few nicks in the paint on the hearth where I dropped things, but you really have to look hard to see them, especially because it chipped down to the brick itself.
Getting ready to get started on this project. I didn’t look closely enough at your materials list and bought a “natural sea sponge” from the paint section of my local hardware store. It is about the right size, but the sponge holes are more sporadic and a little deeper. Will this work, or should I take it back?
The square sponge just made it easier because it matches the shape of the brick better and has the corners on it. But, you can make do with the sea sponge.
That is absolutely awesome and exactly what I was looking for! Thank you for sharing this! Beautiful!
I purchased a small “project home” and ranch a few months ago. It has a double sided fireplace, and a half brick wall that seperates the library and kitchen. All the bricks were painted white. I first painted it brick red, what a mess – it looked like a cartoon. Than, I saw your website, followed your directions, painted it. It is beautiful! And I had alot of fun doing it. My contractor even asked if I stripped the paint to the original brick! Thank you so much for your guidance, pictures, and colors.
Awesome! I just started painting my fireplace then I found this post! I thought I was the only one who thought of this Lol! Everyone paints their fireplace white and I hate it!! Mine is white too but it won’t be for long!!
Thanks for posting this it gave me more ideas and directions!!
This is EXACTLY what I was looking for, especially the colors that you use (no one else seems to list the colors!) I’m hopefully going to start this project this weekend… I’m so excited, though I think I”ll need to tape off the mortar after I paint it, because my brick and mortar are even 🙁 But your tutorial is EXACTLY what I’ve been looking for, and I’ve been looking for about a month!
One question, though: Why does the sponge need to be so big if you’re doing one brick at a time?
Thanks for this great post! I used it as a reference for my own fireplace remodel, which you can see on my blog here:
http://foodwineandhome.blogspot.com/2011/09/how-to-update-ugly-fireplace-on-budget.html
You are very talented and this is a great blog!
Ok, one last question…the same brick that is on the fireplace is on the other side, and visible in the entryway/foyer…if you stained it on one side, would you worry about it on the other side? (It goes ALL the way up to the 2nd floor ceiling…lots of work there…). Thanks for your wisdom!!
Thank you for the excellent tutorial, and the great idea! I’m going to try it this weekend. Wish me luck, please!
I like to consider myself a pretty handy girl, too. Your website really gives me a lot of inspiration and confidence! Painting bricks really is a “wow”! I’ve been wondering about painting bricks on a concrete retaining wall next to our driveway; it is about 4 feet high and 20 feet long! I’m so happy that you posted this tutorial because now I feel like I have an even better idea of how to start. Thank you so much for sharing all of your handy experiences!
Dianna, thanks for your comment. Always nice to meet other pretty handy girls!
I’m not sure how well paint will hold up on exterior brick, but I’m sure you already thought of that and can consult with some paint experts for some strong exterior paint ;-).
Brittany
Hello! I came across your entry on painting the fireplace during one late night search. This was following a few weeks of staring down my poor choice of painting over our brick with a horrid color. I followed the steps and it looks so much better. Thank you for sharing, I never would have thought of that. I’ve impressed myself with your help!
Meg Van Horn, Washington
You are hired! I have a horrid white painted brick fireplace and no time or patience to complete this. Yours looks WONDERFUL!
I have read this post before, but it is funny how just NOW do I need this info. I may be doing this one my back splash. It has brick that is painted white. The chimney of our old farm house comes through the kitchen and we put faux bricks on it and whitewashed them. I now want to white wash our white bricks. So the first step is turning them back into colored bricks. Thanks to you….I can do it!
I love it!! My fireplace is similar, where it is set in to the bookshelves. I wanted to ask, how deep is your mantle? Is it flush to your shelving, or does it stick out? Our shelves stick out about 7″, making for a shallow mantle (we need to put one up). Thanks for your reply!!
I just came across your blog when I saw this featured somewhere! I am so impressed with how this turned out! You definitely have a new follower!
You're a very talented faux painter, although I much prefer the white. Red/brown fireplaces from floor to ceiling seems so 1970's to me, just needs dark wood paneling and shag carpet. I'm glad to see you do this, though, nice to know you can go the opposite way from a solid color fireplace if you don't like what you've got.
I totally agree. The white is clean and and you can do so much more as far as decorating. the brick is drab and so 70’s!
Love this! You make me want a brick fireplace! 🙂
That turned out awesome. Great job. Love your blog.
This is seriously amazing! Wow! Stunning!
I have never seen this done and I can say…it looks outstanding!!! Hop over and enter my GIVEAWAY…I think you will like it!
Blessings,
Linda
SUPER! Don't you hate it when people paint brick or stone fireplaces?! I always wondered what I would do if stuck with that situation… Great job!
Awesome – that warmed up your fireplace so much
http://moemade.blogspot.com/
Wow! Fantastic job on those bricks! I never would have attempted such a project…but yours is stunning! Thank you for visiting me on my blog!
WOW!!!! What a totally amazing transformation. It looks beautiful.
That looks so beautiful and natural. Your work paid off.
That is fabulous! I can not believe that you painted that! You truly have a talent! Fantastic Job!!!
Amazing! Never in my wildest dreams would I imagine you can paint bricks like that! They look wonderful and I agree, it looks much warmer now:)
Wonderful! I have an unpainted brick fireplace and whenever I see someone paint one white, it makes me shake my head a little. I love the natural look and I love that yours totally looks like it was never painted. Awesome!
Wow! This looks GREAT!! You did a fab job! Thank you for sharing how you did it – this might be a "bookmark it" page, should we ever have a similar problem for a future home! Great instructions!!
OMG you are a true artist, that is amazing!! Man that took guts to even try, what a great job!! I am visiting from Debbiedoos.
Carol
Oh wow! Lookin' good! Gonna do that in home I'm staging!
xo – jami
i m a g i n e
Your fireplace looks great! Your were smart to paint it. Ours was red brick and we did the same thing.
-Rene
wow! That is amazing! I can't believe how nice it looks! Just goes to show you that not everyone has the same tastes. Just because it's trendy doesn't mean everyone wants their house to look the same.
Wow, that is skill! It looks like brand new bricks!
You have made my week! We have a brick fireplace with the brick hearth, too, and Fred was feeling like we needed to do something with it – paint it, replace it with stone (!!! $$$$ !!!)… but now that YOU have turned your white one BACK to the brick we already have, he's listening to my "leave it alone!"s.
So thank you. So. Very. Much.
I can't believe you even attempted this. So cool it looks so much better. Love this! You have to link this to my Upcycled Awesome Linky party at http://tinyurl.com/Upcycled10
Dang, Brittany! I worked for several years as a decorative painter and I gotta' give you props- you did a great job:) I agree, as much as I'm loving the white trend lately, the real brick look sets off the rest of the room much better. You are awesomesauce.
Wow! You really did a great job on that. I can only imagine the amount of patience it takes to do that. I would be going back over my work so many times! LOL! I can see painting over ugly brick, but I always cringe when I see people painting over perfectly nice looking bricks. Wonderful restoration!
That is amazing and beautiful! I would never have know it wasn't originally a brownstone fireplace!
A LOT of work I see…but so well worth it….it looks awesome…so much like the real deal who would know? Just you is all!!~ Thanks for joining in the party, really great inspiration here. Debbie
Looks great!!! I am your newest follower!
Bonnie 🙂
Seriously??? You painted that? That looks amazing!
Thanks for popping in over at TOTEally Posh and your sweet comment!
That is truly amazing, I can't believe the difference! love it! 😉
Wow, you did a great job. The bricks just look like natural bricks.
This is fantastic!!! I love it, so much better than the stark white!!
lifeofperks.blogspot.com
Your fireplace looks great! You must be very patient as this must have taken quite a while to accomplish. La
O my heck, that's awesome! You did so great!! Thanks so much for sharing your fireplace makeover with us at Anything Related!
{Rebekah}
That's gorgeous! I love brick colored fireplaces! Thanks so much for the details, I'll be linking.
I LOVE that you went FROM white and not TO white. Whe have a white painted chimney in our house too and I really dislike it!
That's amazing! It looks SO real!!!
It looks great! And so realistic. What a great idea and tutorial.
You really are a Genius!! Another amazing project!!!
Wow! Your bricks look great. I have this love hate relationship with faux painting. Love when others do it, hate the results when I try it.
Thank you for posting this! We moved into our home late last year and the previous owners had painted our entire living room yellow (fireplace included)! I've been looking for a cost effective way to get it more natural looking. I had thought about paint the brick like you did, but was worried that it wouldn't come out right. Now that I've seen how good your's looks, I'm so excited to get started!!
We purchased a home with a purple fire place and trying to cover it up.. so I understand where you’re coming from!!
While I prefer the white fireplace, I LOVE this tutorial because it would allow me to paint a fireplace if I showed hubby that I could "paint it back". This is GENIUS!
bernadette
http://www.b3homedesigns.blogspot.com
Amazing. You are really good at painting and choosing colors. It looks so much better. You rock.
all the time that took is totaly worth it! looks great!
That is awesome! Almost makes me want to paint my fireplace white so I can create my own bricks out of the exact colors I want… Almost…
are you kidding me?! DANG. i am a little speechless over your mad skills.
Wow, it looks fantastic. I like it so much better than the white. You did an unreal job. Gorgeous. Hugs, Marty
You did a fantastic job…looks great.
What a great job!!! I can see how you fooled the builder! Good for you and thanks for sharing!!!
I'm amazed that you took real brick that had been painted white and made them look real again, with more paint! So cool. It looks great!
That really does look real. Amazing.
Brooke
Wow, what a difference. This is great. You must have a lot of patience to do that on every single brick! 😉 Great job!
Love the "back to the original". I looks so cozy!! Great work.
That is amazing! You do awesome stuff. 🙂
Beautiful!
Love this new look! The solid white was to stark for the room. I live in a brick home. Many areas of brick I whitewashed, but the walkout level is part of an office. The brick makes that area more masculine, which love!
Wow! I am normally a big fan of painting bricks to take away the "brick" look. But since you were able to get exactly the color you wanted, this looks wonderful! I am amazed. Lisa~
Wow! That is amazing! It looks so warm and "homey" now. A time consuming process, yes, but the end result is definitely worth it.
Thanks for sharing 🙂