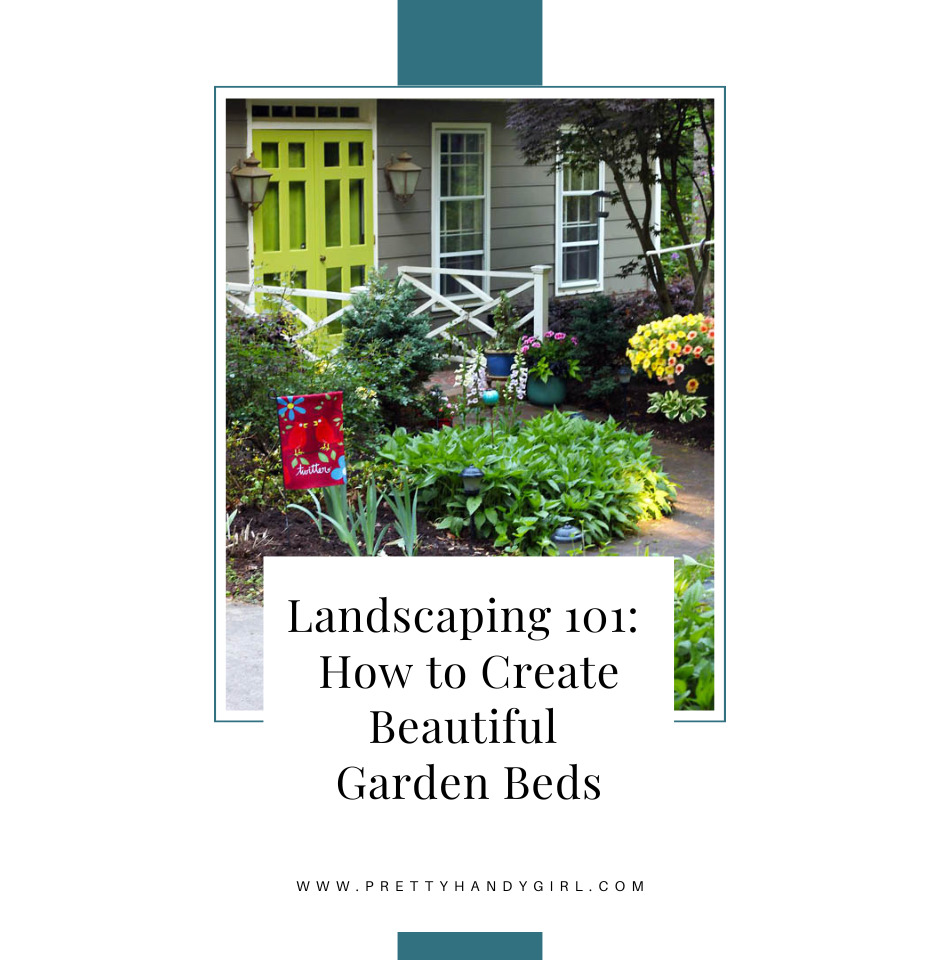
Turning a Craig’s List Bed Frame into a Garden Bench
 How to Turn a Craig’s List Bed Frame into a Garden Bench
While visiting one of Raleigh’s local shabby chic boutiques, I fell in love with a sweet bench made from an old bed frame. But, the $350 price tag meant that our relationship was not meant to be. I began scouring Craig’s List for the perfect bed frame to make into a bench in our front yard. Finally, I found a full sized cannonball bed frame that looked very similar to this one:

The bed was in good shape. It was made from real wood and it had wooden side rails. Best of all, the price was $40 (and I didn’t have to drive more than 3 miles to buy it!)
After researching the web for ideas on how I wanted my bench to look, I found this site: https://www.robomargo.com/bench.html which has many photos of bed frames turned into benches.
Then I stumbled across Karla’s bed over at: https://itsthelittlethingsthatmakeahouseahome.blogspot.com
Her husband had declared the bed frame a piece of junk when she asked him to turn it into a bench. I can’t help giggling now that I’ve seen the finished project:

Here is my best effort at directing you through the transformation from a bed to bench (I neglected to photograph the process on this project since it was a pre-blog project.)
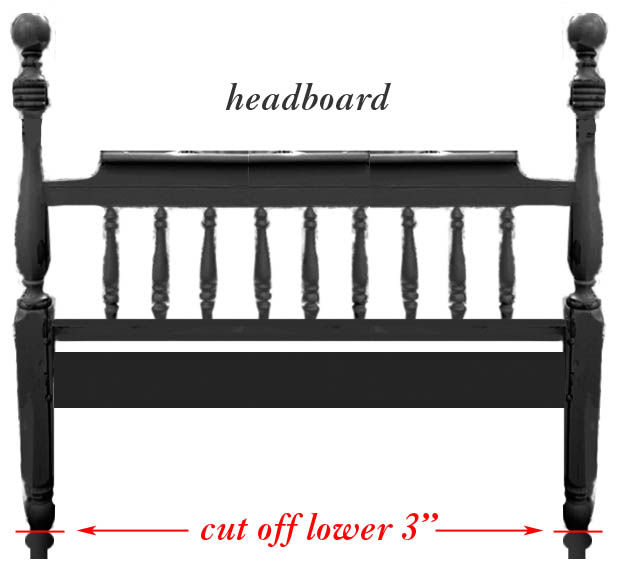
Begin with the headboard and footboard, and set the side rails aside for now.


I pre-measured another bench and determined that I preferred a 18″ seat height. Luckily the footboard worked perfectly in my plans. But, I needed to trim 3″ off the bottom of my headboard legs.
Then determine the depth of your bench. I wanted mine to be 18″. (This is a little deeper than a chair (15 – 16″), but it allowed for pillows behind our backs and a more substantial size.
Your footboard needs to be cut in half so it can become your arm rests. You might have to trim more from the center as I did to achieve your desired bed depth.

What you are left with is two sides for your bench:

Now you need to grab one of your side rails and cut it down to size for the front skirt of your bench. Simply measure the distance of your headboard from post to post:
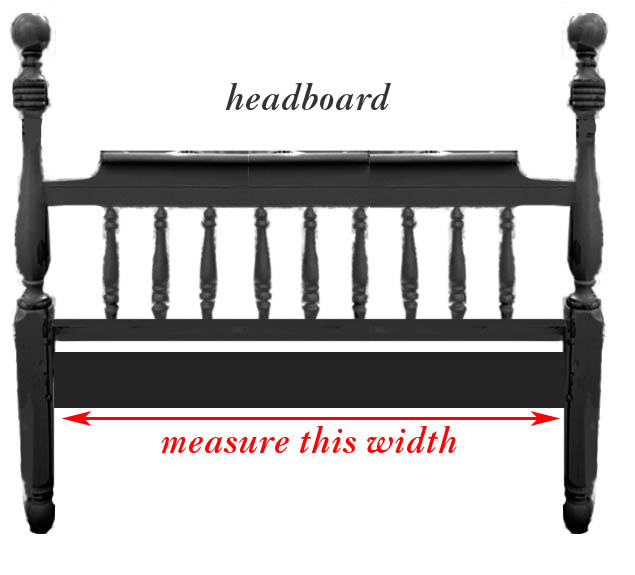
Then cut your side rail to this exact width. (Or if your bed frame came with metal sides, you can use a 1″ x 6″ x 8′ pine board instead.)

Now you will need to build a frame of 2″ x 4″ boards for stability. This frame needs to be able to fit between the front skirt piece (side rail cut to size) and the back of your bench (the headboard).
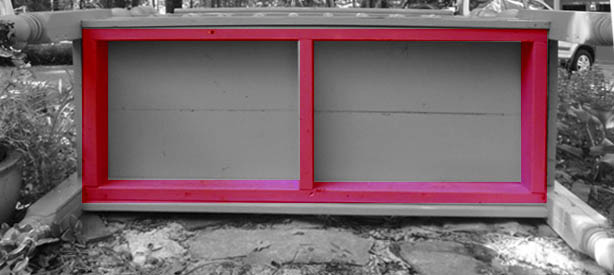
This is a picture of my bench tipped over so you can see the base support structure built of 2 x 4’s (in red).
Now you have all the components to construct your bench frame.

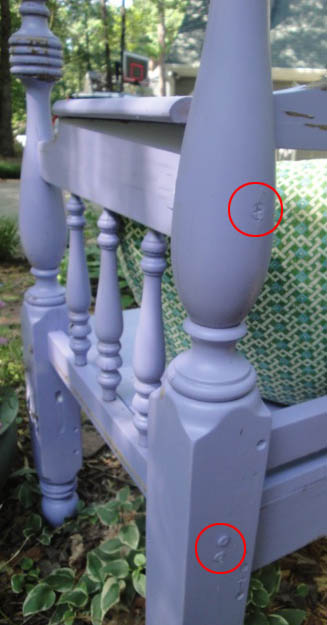
Attach the arm rest to the back of your bench (used to be the headboard) by pre-drilling holes through the bedposts and then screwing in 3″ long wood screws through the post and into the arm rest. Be sure that the arm rests are securely attached.
Here is a picture showing the screws from the back of my bench. and how the arm rest looks when attached.

Next you will attach your 2″ x 4″ frame to the back and sides of your bench. You can use screws, nails, and/or L-brackets to attach it.
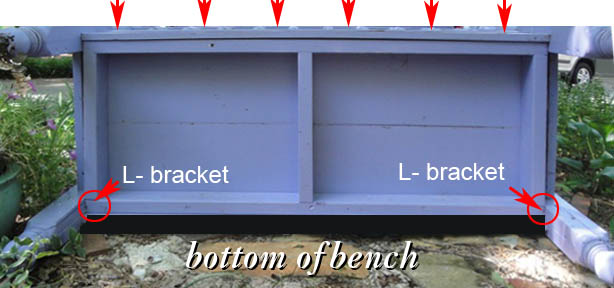
Then, you can attach the front skirt piece (cut down side rail of bed) to the 2″ x 4″ support base using small nails or brads.

You are almost done with the construction! Time to cut some wood for the seat of your bench. I used two 1″ x 10″ boards cut down to size. Then cut out notches to fit around the corners of the bed posts.

Then use small nails or brads to nail your seat to the bench 2″ x 4″ frame.
After assembling my bench, I added wood putty to fill my nail holes and then caulked all the seams to keep water out of them.
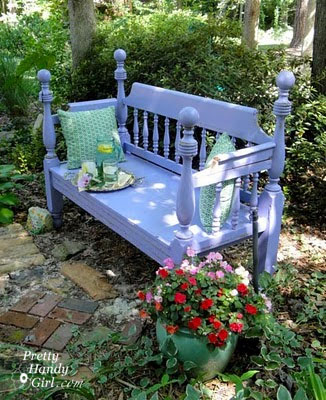
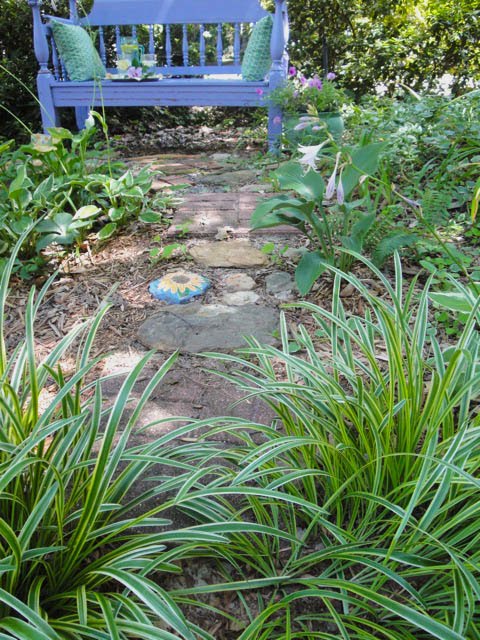
I finished off my bench with one coat of spray primer and 2 coats of Rustoleum French Lilac spray paint (the color my boys picked out!)
Unfortunately, I neglected to coat my bench with polyurethane, so you will notice that the paint has chipped in places. After a few rain storms, I realized that my bed frame was made from several layers of wood that was glued together. So, you will also see some gaps in the wood.

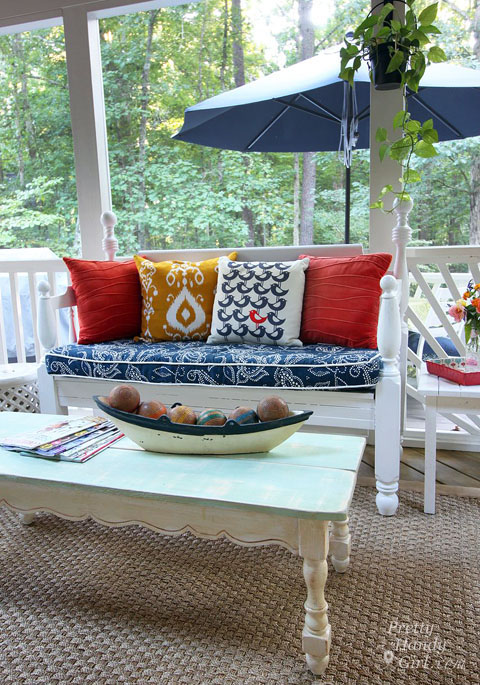
After some time, I repaired and re-painted the bench. To prevent further splitting, my bench spends its days on our screen porch.
If you want to learn how to make a custom piped bench cushion, head on over to this tutorial:
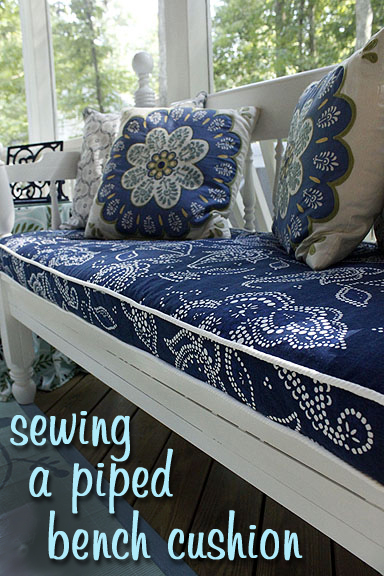
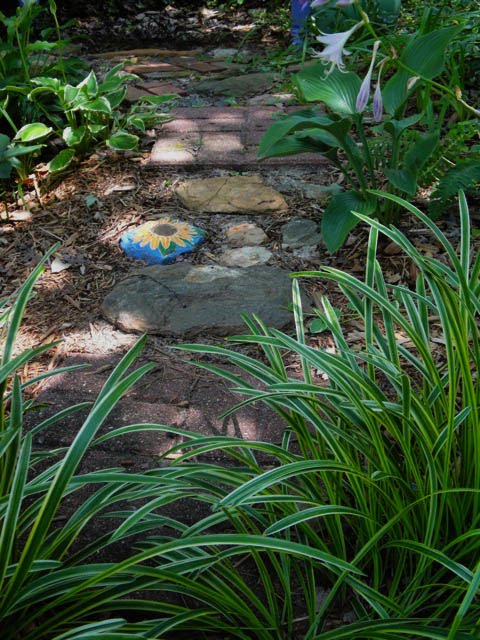
But, in the meantime, won’t you come join me for some cool lemonade in the shade?


Did you put your bed bench out of doors? How well did it hold up? I have never had anything made of wood last very long when put outdoors. I live near Greensboro NC. The rain and the humidity kills wood. I have a love/hate relationship for bed benches. I love the way they look but hate to see these beautiful old beds (especially ones in good shape) be turned into art projects. There are lots of people who still use these old bed frames especially immigrants who come here with nothing but a few clothes on their backs.
Yes, and in direct weather, it started to swell. I since repainted it and moved it onto a covered porch and it’s been fine. FYI, I’m in Raleigh, so yes, I know humidity.
This is a great, clear tutorial. I have the all-maple double bed I used as a kid, and have wanted to convert it to a bench for ages. Thanks for the tutorial and follow-up! You’ve renewed my hopes for success!
I love your bench,would you know of anybody that
makes swing beds out of bed frames, I seen it
once, but for the life of me I can’t remember where.
Have a nice day, Judy
Thia project is so brilliant! I will keep this in mind when I grow up, something my husband and I can do together. 🙂
Love your bench too…the color is great & FUN!
Great project!
I'm officially addicted – such a perfect idea! We are turning our back deck into a screened in porch and some of these benches would be perfect! yea!!
I love love love this idea! I have been scouring the thrift stores in search of the perfect bed so that I can make one for my porch!
Love the bench! I've been wanting to try this for awhile..I gotta find the headboard first!
I'm a new follower!
This project intimidates me but I want to try it with a head/footboard I got for a $1 at the Habitat for Humanity ReStore. Thanks for the great tutorial. I saved it for my future to do's. How do you keep it outside in the elements without the wood warping?
Thanks for joining us for Anything Related #14! ~Bridgette
This is wonderful! I will be featuring it on my blog this week 🙂
LOVE this.
Love your bench and garden… especially the color.
WOW!! SO cute! I have seen some of these around and just LOVE them! You may have inspired me to get my husband busy on one of these! Now just to find the bed frame will be part of the fun! Like your name too! 🙂
Wow! This is so ingenious. Nice floral pattern on your blog too.
I love, LOVE how your bench turned out!! The style and the color are absolutely perfect! Love it! 🙂
~Karla @ It's The Little Things…
What an awesome bench! Now I'll be on the lookout for a good bed frame!
I love it and your tutorial is perfect! Could you stop by my blog linking party and link up? That would be great, my readers would just love to meet you! all the best and hope to see you there!
That is BRILLIANT!! 😀 I am always seeing forlorn headboards or frames, and wish I knew what to do with them..now I know! :p (The other idea I just got recently…a friend of mine is doing square foot gardening, in raised beds, and used a toddler bed frame as the bed, with a bottom added!!! It is SO CUTE! lol)
i'm LOVING the end result! great job!!
-Jackie
http://jaclyndesigns.blogspot.com/
LOVE the purple!! I would never have been that daring, but I LOVE it! Thanks for sharing … I've posted a link.
super tute! I love these, have made many.
Yours turned out very cute! great job.
gail
I've seen others like this and yours is my favorite! I'm not normally a purple-y person, but this is adorable and the color is perfect!
Thanks for the great tutorial and links!! This is just what I needed for the courage to start my own. Thanks sooooo much!! It is soooo cute and I love the color. And your garden looks amazing!! Great work!
Wow… beautifully done & great directions too. I need to keep my eyes open for some headboard/footboards. Thanks for sharing at the PoPP.
I am so going to make one for myself! I loooove this bench!~I love the color too. Thanks for showing the step by step on how to do this. It was great. Pat yourself on the back for this project. It looks so professional! I am going to follow you..keep inspiring me!
Congrats making the top 10!!
Have a fabulous weekend!
Londen
Whoa… that looks amazing! I want to make one! I'll have to add bed frame to my thrifting/ yard sale wish list. Thanks so much for the how-to, I'll be linking.
~ Love it!! You ARE a pretty handy girl :)) Awesome tutorial, very concise and easy to follow!! I bookmarked your page and will be trying this myself :)) Thank you so much for sharing!! Come and visit if you have a chance!!
http://michellamarie.blogspot.com/
Have a wonderful day!!
~ Michella ~
~ ~ xo ~ ~
Amazing bench and I have three sets of head and footboards. I want to make a bench in the worst way but just a little afraid. Now with this tutorial I can try it. Thanks!
I saw this on the CSI Project and had to visit. What a great project… the piece is gorgeous. Thanks for the tutorial, too.
I love your bench. Thanks so much for the detailed instructions, too.
What an awesome idea and good use of old furniture!
I absolutely love this idea! I am searching Craigslist now for the perfect bed! Yours looks so pretty and inviting!!
I love yours too!! Great color, and the posts really make it. Thanks for stopping by my blog.
What a lovely bench! I love that you made it from a bed.. Great tutorial too, especially considering you didn't have photos of the whole process!
It is simply gorgeous..I'll take a tall lemonade with my visit to your bench please.
tammy
I have one of these and I love it. I added a skirt and cushion to mine and put it in the house. Great job! Lisa~
Love your bench! We have a large Australian Shepherd that prefers to lay on the couch or in our bed. I’m going to expand the seat by one board, add the skirt and make a washable cushion for her added comfort – and wa la! The perfect “girly” dog bed! Thanks for the awesome tutorial and feedback has given me tons ideas! Thanks, everyone!
Bizzie, sounds like a great idea. Hugs to your sweet Aussie. We miss our girl who passed away 5+ years ago.
This is so awesome!! I love how it turned out, now I want to make something like this. 🙂 Found you at Blue Cricket Design! Have a lovely day.
amazing! some day I'll be handy with something other than material. for now, I'll drool over what you make.
You MADE this? I love it!!!
This cheerful bench certainly makes me want to grab a glass of lemonade and my favorite Diane Chamberlain book so I can spend a few quiet moments to myself in your little getaway spot. What about adding a Sunbrella bench cushion?
KatrinkaJane – I used Rustoleum satin spray paint in French Lilac.
I only clicked on this project so I could find out the shade of paint you used! LOL Pretty pretty please tell me the brand and shade. 🙂 ((fellow CSI crafter))
So unique and the color is just wonderful!
I really like this! And the color you used is amazing! Thanks for the step by step instructions! I'm stopping by from the CSI project:)
It looks awesome!! Love the color you chose. 🙂 Good tutorial! I'm visiting from The CSI Project today. 🙂
Very nice and I love the color! Job well done!
that is sooo cute! i love the color you chose for it. it's perfect!
What a cute bench! I love that you could see it in a bed frame – you are SO creative! 🙂
Thanks so much for stopping by and your really sweet comments!
She's very cute! Love that your boys picked purple!
I am loving the color your boys picked out! It really pops in the garden. Great job, it looks great!
so adorable and looks so cute in your garden! I love this idea! great tutorial, thanks for sharing!!!
I've seen this idea before, but I love that you've included so much how-to detail! I'm definitely going to keep my eyes open for a headboard and footboard to use for a similar project!
I love it so much!
{Rebekah}
This is so great! I love the whimsy to it!
This is such a fabulous project. Seriously gorgeous! I've seen these before and thought they looked pretty difficult to make, so I appreciate your tutorial so much!
Thanks also for stopping by my blog today and leaving such a sweet comment! Your kind words meant so much!
Love it! You have inspired me to find a bed and replace the bench on my porch (that is on it's way out anyway) :)! Rebecca
I used an old garden gate as the back for my garden bench and a wooden picket fence for my neighbor's. For the seat, I cut 1×4 slats to match the pickets and built the frame out of 4×4's to mimic fence posts. http://www.alanamous.com/v/Projects_001/GardenAccessories
Mom – the website isn't a Facebook page, anybody can see it. 🙂
Thanks Mom!
You can send them an email with the blog address for this post (copy from the address window above). Then simply email them and paste the address into your email. If they like the blog, they can subscribe to it via email (see the enter your email box on the right side bar.)
I love the projects you have chosen. This bench does look inviting and the colors bring cool into a very hot July. I would like my non Facebook friends to see your projects. How do I direct them?