Pottery Barn Inspired Lantern from $5 ReStore Light Fixture
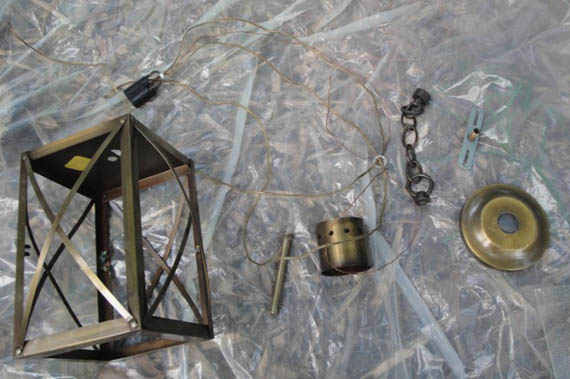
If you have been following my blog, you may remember this light fixture that I rescued bought at our local Habitat for Humanity ReStore. Read below for a Pottery Barn Inspired Lantern.

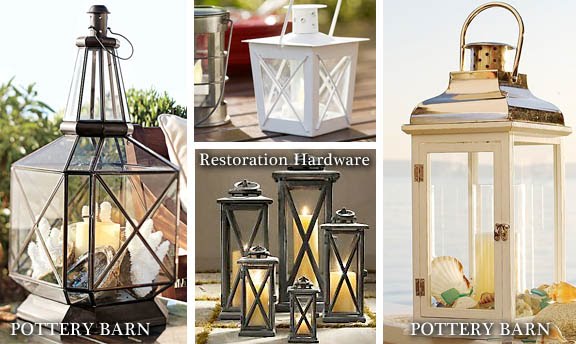
Originally I thought about using it as a light in our foyer, but that plan changed after I found myself drooling over these lanterns at Pottery Barn and Restoration Hardware. I love going into PB & RH, but rarely have the nerve to plunk down the money they want to steal
claim from my wallet.
Instead, I decided to transform my dated light fixture from the ReStore into a stylish lantern.
This is a relatively easy project that anyone can do! Yes, that means you.
Begin by removing the glass from the light fixture. (A note of caution: You should wear gloves. In other words, do as I say, not as I do!)
My light fixture had little metal prongs that easily bent to release the glass.

Next take apart your light fixture. Just start trying to unscrew parts. If they resist, grab your pliers.

I decided to save the wires, ceiling canopy and other wiring parts. Who knows, perhaps I will want to use it as our foyer light some day.
Okay, okay, also because I am a bit of a pack rat. I’m admitting one of my faults here: not being able to throw anything away. Don’t get me wrong, the producers of Hoarders are not knocking down my door, but I would prefer to Craig’s List, FreeCycle, reuse, or recycle anything I can’t use.

When all the parts were separated from the lamp, I needed to break the chain to the top of the light fixture. Here is an easy way to open up links in a chain that is not soldered together.
Place two screwdrivers inside the link you want to break. Lean one to the left and one to the right and apply pressure in opposite directions. The link should separate enough for you to remove the chain.

While the lantern is in pieces, you can rough up all the metal surfaces with sand paper. I actually did this to all the parts so I could paint them and potentially use them in the future. Wipe off the metal with a damp rag to remove any particles.

Now, you can re-assemble your light fixture (using only the parts you need to make your decorative lantern.)
I used brown Rustoleum spray primer. I like using a darker primer when my top coat color will be dark.

Be sure to rotate the parts and the lantern so you get all the sides coated with primer.
Now the most gratifying step, spray your lantern with your finished color. I coated the lantern with 3 light coats of a satin black spray paint to allow the lantern to look less new and more like old rustic iron.
And here is my new (old) Pottery Barn inspired lantern! $5 for the lantern + $6 for spray paint = $11

What do you think of that, Mr. Pottery Barn merchandiser who wants to charge me $59 for the same size lantern?
Update: I received several emails and comments on this lantern and a few of you have been inspired to create your own! If you post it in your blog, I’d love to share your results.
Amanda at The Hand Me Down House, shows how she painted hers. She made the glass look like colored glass with Modge Podge and food coloring! Yes, you read that right. See her tutorial here.

I did the same thing a year ago! I found matching outdoor lights at Habitat for Humanity Restore- .50¢ each. I painted mine in ivory bisque and added cute number tags! Check them out on my Instagram “driftwoodanddandelions”.
Eeeeeeeee. In deep deep love with this project.
Wonderful job!
Your ideas are wonderful. I’ve viewed a lot of blogs but girl… you have great ideas and a knack for doing them. As for your ladder bookshelf, I too frowned at the high prices. But when I lived on the gulf coast (Alabama) consignment shops, and ‘dent/scratch’ thrift stores were abundant. I found a Pottery Barn ladder bookshelf for $49, and yes I grabbed it. Love your screen porch ideas and will be copying them since we live on a lake now. Keep up the great work – you are an inspiration to all of us.
You are an inspiration! I am another who would not have thought to take out the electrical and make such beautiful use of the best part of the object!
Oh, I'd never have thought to take the electrical out! Clever girl you are…
Looks amazing! We're so glad you joined us for another great Anything Related party!
{Rebekah}
Great deal – $5!!! I love your makeover on it!
Absolutlely beautiful! need to check out the local Restore that was a great find!!
In from Gina's party have a terrific day!
I Love this project!! Great job!!
Oh what a coat of paint will do for an object. Love it!
Yours is definitely a lantern and looks so great! I love how the edges bow away from the glass. Very awesome, I would like to find a light fixture like yours.
Nice work, you must be thrilled with the result! Yours has the added touch of the glass panels having that cool mottled effect going on.
Looks amazing! I love it!
Oh my gosh – how cute!!! LOVE this! I have a light fixture lying around that I've been wanting to try and turn into a lantern – so THANK YOU! 🙂
I love being able to recycle thrift finds into something beautiful. Great job!
WOW! This looks AMAZING! I just started a link party and I would LOVE it if you'd consider adding your crafts to it! I'm having flower headband giveaway as part of our first party too! http://imtopsyturvy.com/index.php/2010/07/topsy-turvy-tuesdays-1/
I love it! What a great Pottery Barn knockoff!
love this – came out great!
Dang girlfriend you did a fine job on that one! It looks just like Pottery Barn. I was just there admiring them last weekend!
Awesome!
And for some extra fun, you could swap out the glass for single pieces of stained glass. 😉
that looks amazing!
I'm with you….spray paint makes everything nicer! Love your idea!
LOVE IT!!! cant beat that for $6! I cant wait to restore some vintage/thrift store finds! But alas, I must wait until I close on my townhouse :/
-Jackie
http://jaclyndesigns.blogspot.com/
I am laughing in victory for you! That is too cool.
I think it's gorgeous!!! I never would have thought to do that!