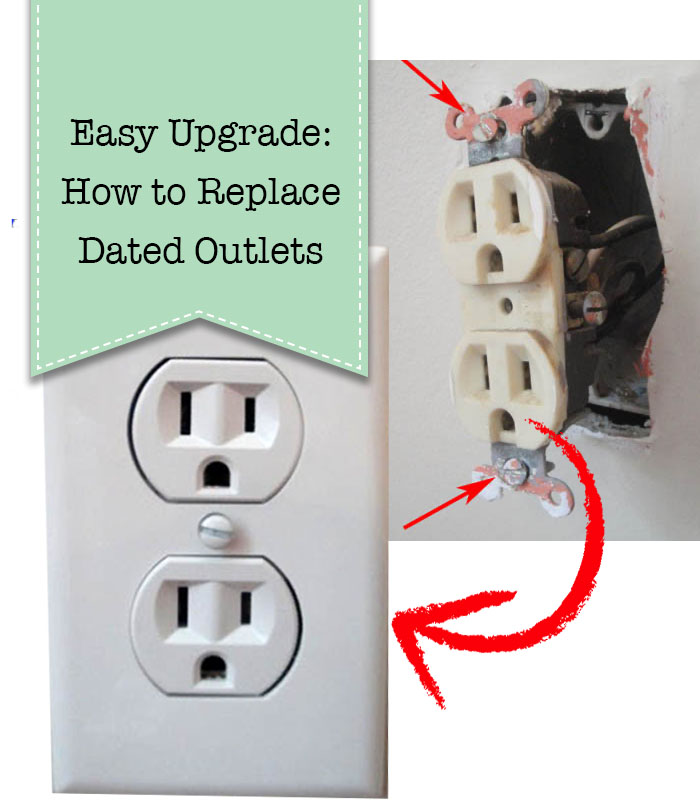
Changing Out an Old Outlet
So, this is one of those not so pretty posts, but I promise it is Oh So Handy! Learn how to easily change out an old outlet.
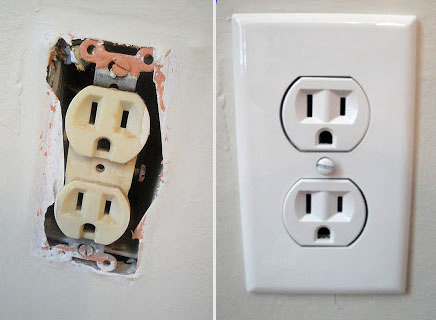
Changing Out an Old (UGLY) Outlet
Our home was built in 1978 and most of our outlets are almond colored and many are so worn that they won’t hold a plug anymore. I used to get annoyed EVERY TIME I vacuumed downstairs and turned the corner only to have the vacuum plug slip from the outlet. Not only is this frustrating, but it is also a fire hazard. Old outlets should be replaced for safety reasons (but, hey, I’m okay if you just want to change them to a pretty white outlet.). Changing Out an Old Outlet is easy!
I distinctly remember my father showing me how to wire an outlet when I was about eight years old. I didn’t remember exactly what he taught me, but I do remember the feeling that – yes, I can do this myself! Being the father of three girls, Dad taught us all the things he would have taught a son. This is a picture of my Dad, my sisters and me teaching him all we knew about bows, barrettes and bobby pins.

I know several of you would never think of taking apart your outlet. You might say electricity scares you. Well, that is a good thing! A healthy fear of electricity will make you more cautious, so don’t lose that fear. It is a good thing to double and triple check your safety when working with electricity. Now, are you ready to update your outlets? Changing Out an Old Outlet is a relatively easy task to do. And, I promise I will show you step-by-step instructions.
I highly recommend performing outlet replacements during daylight hours (or have a lamp that you can plug into an extension cord from another room.) Also, don’t let your little ones watch you, we don’t want them to stick a screwdriver in the outlet when you aren’t looking. Therefore, it is best to handle this fix during nap times.
Materials needed:
(I’ve included affiliate links for your convenience. I earn a small percentage from a purchase using these links. There is no additional cost to you. You can read more about affiliate links here.)

- Needle-nosed pliers with rubber or plastic handles*
- Flat head screwdriver*
- Phillips head screwdriver*
- Wire Strippers*
- Wire cutter*
- Voltage tester
- Night light
- 15 amp/ 125 volt or 20 amp/ 120 volt duplex outlet
- outlet cover
* It is safest to work with tools that have rubber or plastic handles that won’t conduct electricity.

Optional tools:
- vacuum to clean out the receptacle box (there will be dirt and dust in there and this may be the only opportunity you will have to clean it!)
- cushion to sit on
- power drill with screwdriver bits to speed up the process
Required Safety Instruction:
Turn off the power to the outlet you are working on. I highly recommend putting a night light or light in the outlet and turn it on. Then shut off the circuit at your circuit breaker and check to see that the light has gone out.
Also note that just because two outlets are in the same room, it doesn’t necessarily mean that they are on the same circuit. Plus, it is possible for the top and bottom of one outlet to be on separate circuits. Always check both the top and bottom of an outlet before you work on it.
Instructions:
Okay, let’s begin. Take a deep breath and realize that if an 8 yr. old can do it, so can you!
1. First, turn off your power, double check both outlets with your light to make sure the power is out to both top and bottom outlets.
2. Then take out your voltage tester. Insert a probe into each of the top two holes. If the tester lights up, you need to back up and turn off the power to the outlet! If it doesn’t light up, then check the bottom outlet as well. Still no light? Perfect, the power is off to your outlet.

3. If you haven’t done so already, remove the face plate from your outlet by unscrewing the middle screw.
4. Unscrew the two mounting screws as shown below.

5. Gently pull the outlet out of the receptacle box. Inspect the outlet and see if you have the same amp replacement outlet. (Usually there are marking denoting 15A 125V or 20A 120V on the silver tabs, on the back or near the screw hole in the middle of the outlet.)
6. Note which wires are attached to the outlet and where. Then make a drawing if you need to of their position. Or work by transferring one wire at a time.

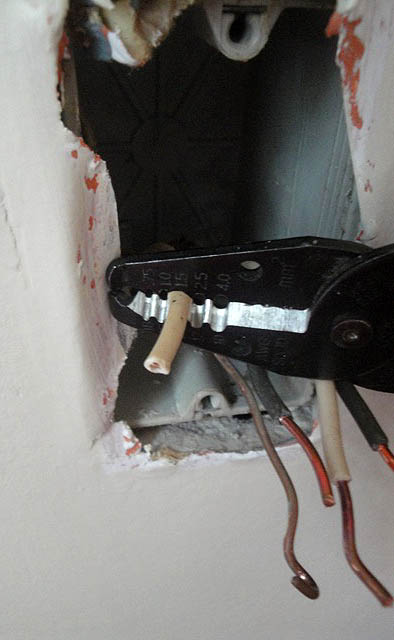
7. If the wires are wrapped around screws (lucky you), unscrew your wires and skip to step 10. If your wires are poked into holes in the back of the outlet, you may choose to try to release them by poking a flat head screwdriver into the slot next to the wire, or you will need to cut the wires as close to the outlet as possible.

8. Now strip about 1/4 inch of the insulation from the end of your wire.Then gently use your wire strippers to clamp down on the wire being sure it is scoring the insulation. If you need to, rotate your wire strippers 90 degrees and cut through the insulation again. then while the strippers are still around the wire, pull gently towards the end of the wire to remove the cut insulation.
9. Next take your needle nosed pliers and grasp the end of your wire and twist the end to make a shepherds hook shape. Do this for all your remaining wires.

10. Looking at the back of your new outlet, you will see that one side has silver screws and/or markings on the back that says white wire. The other side of the outlet should have gold screws and/or markings indicating hot wires (the black wires). And one screw towards the bottom that is green, this screw is for your bare or ground wire.

11. Hook each of your wires around the appropriate screw (Gold Screws = Black wires; Silver screws = White wires; Green screw = bare or green wire).

12. Further, using your needle nosed pliers, pinch your wires tightly around the screws attempting to close the loop.

13. After that tighten each screw being sure that the wire stays tightly wrapped around the screw.

14. If all your wires have been screwed tightly onto the outlet you can gently push your outlet back into the receptacle box. Try to rock the outlet in by alternately pushing on the top and then the bottom. If your outlet doesn’t go in, pull it out and rearrange the wires so they fold neatly behind the outlet and try again.

15. Screw in the mounting screws.
16. Finally, replace the faceplate.

Now you can turn the power back on and use a nightlight or lamp to make sure your outlet works!
Hey, you are done! Congratulations, you did it. Reach up and pat yourself on the back because I’m proud of you! Now that you know Changing Out an Old Outlet is easy as can be, I have a next level swap for you! You can use the same tutorial to install a USB Charging outlet!
Let me know how you did. Changing Out an Old Outlet was easy, wasn’t it?!


Just the information I need! Thank you for sharing this.
Please ensure to update the voltage tester with a new picture to make sure other people seeing your blog don’t make the same mistake and end up getting severely shocked. The black tester always goes in first, and it’s always on the left hand side or the outlet, then the red tester goes in the smaller opening on the right hand side. You did it backwards and that’s dangerous!
Thank you for your tutorial. I appreciate being able to read all of the information. I especially liked the instruction to put the wires on in a clockwise direction so that they do not loosen when tightening the screws. But I am finding it very difficult to get the wires wrapped around the screws on my new receptacles. If the hook is small and tight, it won’t fit into the area and around the screw. If it is larger, I can get it around the screw (with a lot more effort than I think it should take) but then I can’t seem to grasp it and tighten it up. And pushing all the wires back into the wall has been very difficult because the wires are so stiff.
All good advice. Perhaps one more thing: Occasionally it is hard to tell on older plugs which screw is silver and which is gold. In such case, just remember that the neutral wire screw(s) are always on the same side as the ground wire screw (and the black hot wire is always opposite from the ground screw side).
wow, thank you for this post. It can at an appropriate time for me. I am so afraid of gas and electric, This post is exactly what I need. Thank you!
Please note some important cautions
1. The device is not intended to create a connection for the incoming and outgoing circuit. Connect the two wires by twisting them together with a third jumper wire and securing them with a wire nut. Connect the jumper to the device.
2. Make sure that wires that are looped to go under a device screw are placed so that tightening the screw is pulling the wire around the screw. Putting the loop backwards can create a loose connection.
3. Avoid using push in connections unless the are secured pay tightening the device screw. Connecting wires without this feature are damaged by the device.
4. Mount the device with the ground connection on top. This helps keep you safe if from something metal touching a life plug that has sagged loose.
Glad to see help online.
My husband was a contractor who died last year. Now I get to do these chores. Thank you for the boost of confidence.
We have lived in this house for 20 years. All outlets except 3 were new when we moved in. I’ve asked at least 3 times a year if he would replace those 3 and it’s never happened. Guess who’s going to work now ? I’m not telling him either. Thank you for the great tutorial. I’ll keep it beside me for step by step instructions.
Why did you use the screw and not just push the wires in?
Sometimes I find it easier to use the screws, but you could push into the back too.
Thank you so much for the easy way of changing a outlet, IAM 1of 4 girls my father was a electrical engineer but IAM the one that’s too scared to try on my own .IAM single so IAM on my on so I will try with your confidence. Thank you so much from Texas
You are the only one who addressed *how* to remove wires from those OLD receptacles, thank you!!
Great article for the woman who wants to do the good and idealistic way of putting their home good one and unique in styles and decor. Thank you for sharing your tips and knowledge to be part of this real world.
Should one be concerned if the bare wires are touching the plastic side as they extend from the screw? Or should you try to make sure the bare wire is only touching the screws and not long enough to make contact with the plastic on each side? Thanks for a great tutorial.
Thank you so much for this tutorial – was able to upgrade a couple of outlets today 🙂
Love this write up! Very clear and easy to understand with visuals, thank you! I can’t wait to browse the rest of you blog, but gotta go and change the outlets for my grandmother’s home.
I can definitely understand being nervous when changing an electrical outlet. I have done it a few times and managed to shock myself once or twice. So, I would double check that the power to the outlet is turned off. I do think that it is a good skill to learn though. Then you only need to call the electrician for the big jobs.
Keep the great tips coming. There are many electrical issues that those at home can handle on their own. With electricity, if you ever feel over your head, call a professional. With great steps like you have laid out, anyone can do this job.
WOW Thank you! I have the new outlets and covers, and have been waiting for many months (lol, almost a year) for my son to switch them out for me! I painted and well not only do my current sockets look bad, but my plugs are also very loose. No more waiting, I will be doing them myself! Thank you! Thank you! Thank you! Thank you!
A really great step by step guide to installing new outlets. Always make sure you know what you are doing when dealing with electricity. Professionals are always happy to help!
In step 15, just before you finish tightening the mounting screws, that’s the time to wiggle the outlet left or right so it’s nicely vertical. And sometimes you want to move the whole outlet a little bit to one side so the switch plate will hide a poorly cut hole.
When changing out plugs or switches, I put a strip of masking tape on each side of the opening to make a diagram of where the wires go, and make note of which screws they go on, you could also use bits of tape on the wires, and mark A, B, C, etc to correspond to your diagram, until you get comfortable changing these.
Always, always make sure that ground wire is put back on your plugs.
I use an old radio on full blast, plug it in and check your breakers, and yes test those wires for life, you can get a tester that beeps at any hardware place.
If you run into multiple wires, or red, black and white wires, best leave that to a professional.
Leave as much wire as possible, short wires are a nightmare to work with.
I am wondering in step ten (picture ten really) I see a square piece with a hole in the middle near bottom of picture through which the screw enters. What is this piece and what does it do?
This was a very easy to follow tutorial. Nice job! I too am a Daddy’s girl. I wish I remembered more of his instructions for everything from pipe fittings to games of pitch.
Let me preface this comment with the fact that I am a second generation Master Electrician. My mother, and my father are Masters. I want my son to be able to do things traditionally set aside for women, and my daughter to be able to do maintenance items herself, for this is how I was raised. Now, for the glaring problem in the post, that, to be honest, most “professional electricians” get wrong, because they lack understanding of the National Electrical Code, and it’s purposes. The neutral wires cannot be connected to each of the two silver screws per the code. This means that the grounded conductor (neutral) is dependent upon the device (receptacle) to complete the circuit (little jumper between the screws. If that tab breaks, and someone measures voltage black to white (hot to neutral) at the next receptacle, without checking to ground (bare), they will assume there is no power, and could kill themselves (obvious perfect storm of conditions, but possible nonetheless). Other than that, very well written how to article.
Bryon, wow, thanks for that information. I found an entire post arguing both ways. But, after contemplating your comment, I side with you. http://diy.stackexchange.com/questions/15466/when-wiring-outlets-should-i-use-pigtails-or-both-sets-of-outlet-screws
thanks so much for the tutorial on changing out electic boxes. i recently paid $50 to have 10 done…which I thought was very fair price. now i know how easy it is! hardest part will be getting up and down from the floor 🙂
Kathy, yeah!!! so glad you found my tutorial for next time. Yes, the sitting on the floor and getting up afterwards is the hardest part 😉
I want to replace an outlet that has 3 wires going into it on each side. The outlet I bought has only 2 places to attach the wires. Can I put 2 wires on one screw? Thanks
Don, if you buy an outlet that also has the holes in the back, you can connect two via the screws on the side and one in the back (or two in the back and one via the screw.)
i have a house now with very few of the wall outlets looking like yours (the three-pronged “face” ones). most are the two-pronged ones with one prong larger than the other, but i also (it’s a 1959 house) have some of the two-pronged ones that are the same size (the old-old type). replacing these, particularly the old-old ones, has now surfaced up on the to-do list. is this something i can try to tackle if i have your instructions and have done that particular replacement that’s in your instructions? i have not ever tried to replace a two-pronged outlet with a “face” outlet, however. or is this better left to an electrician? i’m just looking for your opinion. if you say i shouldn’t, i won’t, otherwise i will look into it further. thanks.
Betty, first can I give you a high five for wanting to tackle this project yourself! I haven’t had to replace 2-prong outlets myself, but according to This Old House (http://www.thisoldhouse.com/toh/article/0,,20065922,00.html), you can do it yourself IF your outlet boxes are grounded. Follow their instructions for more information.
This is my problem exactly. I live in a 70 year old apartment bldg and the ‘electrician’ that replaced an old fuse box for a more modern style one, looked at that plug outlet and left it alone because he didn’t have a junction box. I am terrified of electricity, having once been zapped as a teen and thrown across the room….and have lived to tell about it, lol !! Can I install the junction box myself and if so, how difficult is it to do? I found you on Pinterest and have added you everywhere. Love it, that you’re dad too, taught you the ‘manly’ tasks. Great, Great web site and teachings.
Danica, yes, please install a junction box for your outlet and wiring to be installed inside. This will contain any sparks or shorts and will ultimately protect from a house fire. Installing a junction ox isn’t too hard, although you will need to purchase an old work box that has wings that will hold the box against the drywall. You can see part of the process here, Matt just left off inserting the box into the wall and turning the screws until the box is tightly secured. https://prettyhandygirl.com/2013/09/diy-cable-installation.html
Would it be the same process to change a two pronged outlet to a three pronged outlet? 🙂
You must have a ground wire present in your home’s wiring. My guess is that it doesn’t since you only have the two pronged outlets.
Where did you get the outlet kit?
Leigh Anne, you can buy a new outlet at any hardware or home improvement store.
SO helpful!!! I think I can do this. Thank you.
Brittany – Thank you for posting this. Also, I have to commend you on how patient and gracious you are with all of us readers. In your article you mention how to release the wires with a flat head screwdriver – then when many people post that information, you graciously say thank you – instead of most that would type back in all capitals that you posted that in the article. ha ha.
Thanks. I totally understand speed reading through posts because I’m guilty of it! ;-D
Would this work for the ugly light switches too?
Have been waiting 25 yrs for my electrician husband to fix the one in the master bedroom that looks like the one in your picture … actually, the one in your picture looks sturdier. With your easy to follow instructions, I can finally do it myself. Bless you!
It’s even easier to strip the wires and then simply push the wires into the holes in the back of the receptacle… It takes a lot less time to do then hooking pinching and screwing them with the screws on the side , it also looks more professional and you get a better connection.
Back punching is a fire hazard. I had an electrician tell me to never back punch or use modular home recepricals. I wish I could post a pic of the scorched outlet that he replaced from a back punched installation. Saving time is not worth the risk. Pros don’t back punch.
I don’t know if anyone has mentioned this but you skipped the final step. Wrap the sides of the base of the outlet with electrical tape making sure to cover the screws & Wires. This will prevent the outlet from shorting out on you. It is standard practice in Chicago
Kathy, this isn’t standard practice in NC. But, that’s not a bad idea. Thanks for the tip.
Hello;
I have an outlet in my dining room that decided to just go dead on me one day. I checked it with a meter and there’s no power at all. There is no switch that controls that outlet nor is there an outlet in the kitchen that has been tripped. I turned off the circuit breaker and upon pulling the plug away from the wall I noticed there are only 4 wires. All of which are black and there is no ground? S.O.S.
Thank you in advance.
Julie
Julie, oh my! I wish I could help you, but it sounds like you really need a licensed electrician to do some sleuthing for you and fix your outlet. No ground is a serious safety issue.
I figured as much… THANK YOU for the speedy response!
Best,
Julie
THANK YOU!!!! I’m a single woman and a homeowner.I had an electrician come to my home for a quote to install a dedicated circuit, and was going to have my outlets replaced,at a cost of $299 for 15 outlets. The electrician was FLAKY,had to contact them for my estimate when I didn’t receive it after 3 days,and the list goes on. I’m actually EXCITED now to have the outlets changed,because it will be cheaper,more convenient for me, and most important, I’ll have a sense of accomplishment/satisfaction from doing it. Thanks again, and I’ve bookmarked your site. So thankful/happy to have found it,and your dad ROCKS! Very smart man!
Wow! Thank you so much for this! 🙂
That’s nice, but you should instruct people to tighten the post screw that holds the wires with a flat head screw driver. Also instruct them to loop the wire around the post clockwise, so when they tighten the post the wire is secured as opposed to being pushed out of the way. Also know that in many municipalities this sort of simple repair REQUIRES a permit pulled by a master electrician. Not to say you can’t do it but if your code compliance guy is a dick, when you sell your house it could bite you in the ass with double permit fees and paying an electrician to come out and check it.
You could also include a switch/breaker replacing guide, and proper wire nut technique. Many people are capable of these sorts of money saving techniques. CALL AN ELECTRICIAN if you encounter anything unexpected or dangerous.
Just a thought. Last house had aluminum wiring. Even my dad the former contractor/inspector wouldn’t touch it. Make sure you’re only dealing with copper. Messing incorrectly with aluminum can cause safety issues and resale problems with inspections. Luckily ours was done by electrician with documentation by previous owner or it would have cost us. Even then it was a close thing.
Just wanted to say that I LOVE your blog! I’m a single mom and a homeowner, and I’m gradually educating myself on these kinds of things. (Drilling holes in walls is a lot less scary when you know how to patch the mistakes, for example! 😉 My dad is super handy — he built most of his house on his own — but not so big on the teaching part, and he’s really busy.
So again, thank you!
Jen, thank you so much for taking the time to comment. As a single mom, I know your free time is precious ;-). Your comment makes all the time I take to write tutorials worth it. So glad I empowered you. Keep it up Jen Handy Girl ;-).
That is ONE stinkin-cute photo of King Daddy and his beautiful Princesses! Thanks for the excellent Tut! Do you perhaps know how to determine if the wiring will support moving from a current amp outlet to one that would support greater amps? And do you know how to rewire a GFCI protected outlet? These are the challenges that I am facing at the moment… and not moving forward on, since I am not SURE of myself.
Thanks Bumpkin. I don’t have a lot of experience with GFCIs, I’ve only installed one but am no expert. And I think you have to map out everything on that circuit to see if you can add a greater amp outlet. Check out Home Depot’s Wiring 1-2-3 book or try googling the information.
Thank you, I will do exactly that! 🙂 Your blog rocks!
Great post, what if your outlets don’t have boxes? Are those difficult to install?
Holly, oh goodness! Girl you need to get junction boxes installed ASAP! They are crucial for fire prevention. If there is a short or spark it would keep your drywall and wood house framing from igniting. Plus, it protects the outlet wires from being touched by anything. There are outlet boxes that are post-construction types. Check with your local hardware store.
I absolutely love your site. I am about to move in to our first home & am so goint to make the undercounter bathroom storage. AWESOME
You may want to add that your shepards hooks should be placed on screws so that they tighten as you tighten the screw. If you place them on the wrong direction the shepards hooks will become larger as the screws are tightened. Please remember if you are replacing an outlet in an old house the bathroom outlets may not be GFCI (ground fault circuit intrupters). A great easy way to know if an outlet is GFCI grounded is to go find the outlets in your house that are gfci’s (the ones with the test and reset buttons) and press the test button. Once you have found them all you can use your voltage meter and see if electricity is still running to the outlets located near your sinks and tubs. If you have an outlet located near a water source that is still recieving electical current then you should consider replacing it with a GCIF outlet. One GCIF per electical circuit protects an entire circuit. If you flip the circuit breaker and all outlet in a room stop working then they are all on one circuit.
A GFCI doesn’t protect all outlets on a circuit, just the ones that are beyond it. If you are installing a GFCI on a multi-outlet circuit, it should be the first one in the chain, the one that is electrically closest to the main panel.
Found this at the perfect time! Really need to change out some old outlets. thanks
RE: https://prettyhandygirl.com/2010/07/changing-out-old-ugly-outlet.html
The voltage tester you suggest is better than nothing, but a non-contact voltage tester which buzzes or beeps if any live wires are nearby is better and safer. This all-plastic device is available at your local hardware store. Basically, it detects live 60 cycle AC, whether or not any current is flowing, no matter if the wire is insulated or bare. Before you send in your finger or any metal tool, send in the non-contact voltage tester probe first. Pay particular attention to wires with black insulation, but probe them all. Sometimes a live wire from an unrelated circuit will be “just passing by” the component you are working on, in which case your plan will leave people fishing around in live outlet boxes.
Thanks for the inspiration, along with help from my local Home Depot. I replaced an outlet today. I only got zapped once!
Melissa, Oh no! How did that happen? I hope you are okay. But, also glad you replaced the outlet.
-Brittany
Wow. I wasn’t expecting a reply–especially one so quick! I grabbed the darn thing when I was using the “tester”. One outlet down and many more to go. At least this outlet is fixed. Every time I plugged something in, it would fall out.
Nice work. I also wrap my outlets in electrical tape around the screws. It prevents them from accidental grounding.
Fantastic job! It looks wonderful!
This blog is RAD! Thanks for sharing!
Make your loops on your wire with the wire strippers. They have a hole for that. It has been my experience as a 10 year electrician to just wiggle the wires out of an old receptacle if they are stabbed in.!
Wow. Thanks. This is easily the best guide on changing (or installing) outlets I have ever seen. Just one note, while not necessary, a cordless screwdriver, if you have one will speed up the process.
SUPER awesome post!
Thank you for linking it up. Tons of folks are gonna find this really helpful!
🙂
Good to see they are NOT using the "back stab" connections but using the screw connections. Good to see using the "old" style outlet rather than that stupid new flat face thing that does not help align the plug.
No need to either cut the wires or wiggle them out of the old socket. Stick a small screwdriver or another wire into the hole next to the wire to release it.
No need for any screwing on most outlets I've seen. Just stick the wire in the holes provided (one can be seen just touching the top of the red circle on this picture:
http://3.bp.blogspot.com/_g5zUd7bijOw/TET_pPEEZvI/AAAAAAAABBI/pwTMdgywQs0/s400/ScrewIdentify.jpg
You take the wires out by sticking a thin screwdriver or another wire in the rectangular holes.
Be sure to check both outlets as one may be a switched outlet and the other hot all the time.
Don't cut the wires if possible. Grasp outlet pulling firmly and rotating the outlet back and forth, the wires normally work their way out intact.
I liked this. I've done this kind of repair successfully, but I've also gotten unpleasantly surprised when I found that the upper socket was on a different circuit than the lower one.
If I could add one step — when using the voltage tester, use it once when the power is still on. That will tell you if you're doing it right, and if the tester works.
Anonymous, you have some great tips and ideas! Thanks so much for sharing! I love the radio trick.
Another tip for when you are at the electric panel trying to find the right circuit to cut power to the outlet…instead of a nightlight, plug a radio into the outlet (with the volume up so you can hear it at the panel). when the music goes off, can assume you've turned off the correct circuit. This radio option may not work if you're doing the project while kids are napping, but otherwise it's easier than getting up after each circuit flip to see if the nightlight is still on or off.
Next to the hole that the wires were pressed into is a release hole. If you press a small screwdriver into that hole it will make the retention device relax, allowing you to remove the wire with minimal effort. That failing, the wire can usually be gently pulled out with a pair of pliers, twisting back and forth.
Nice post. As an FYI: You do not have to cut the wires. You can insert a small flat-head screwdriver into the squarish opening, above where the wire connects to the outlet. This will release the teeth that are clamping on the wire.
THANKS!! Can't wait to get to work on this!! BTW – just found your blog via hand me down house and I love everything so far…keep up the great work!
Thanks so much for sharing this great tutorial with us at Anything Related!
{Rebekah}
Thanks for the post
I learned by closely observing what I removed (and studiously inspecting that little booklet that comes with the new outlet).
Don't get discouraged if you have a hard time getting the outlet back in the wall. Sometimes the spaces are tight and the wires difficult to bend. But a little bit of patience and Faith after following Brittany's directions to rearrange the wiring will have you wiggling the new box right back into place.
Brittany – you may want to add a short addenda to cover GFCI's.
So that's how a voltage tester works!!!
Excellent. I'm so happy to know this. Between you and me — hubby always acted like this was a big and dangerous "job" that he would have to tackle. HAHAHA. I love the man dearly, but some of the things that he thinks are hard end up being pretty darn easy when a competent woman explains it to another competent woman. BOOKMARK AND A NEW FOLLOWER!!! I invite you to visit my place and do the same!
That voltage tester is going on my shopping list. Your cousin got zapped after her darling fiance assured her – twice – that the electricity had been cut (I was installing a new light switch). Oddly, that was the second time in a week I got zapped – the other time was with a dog bark collar. Now convinced they are a form of animal abuse.
Brittany – I think we are like twins or something! 🙂 My dad showed me how to rewire an outlet too — and we too have a wonderful picture of dad with barretts and bows in his hair! 🙂
Wonderful tutorial – thank you!! 🙂
This is a very helpful post… I know how to do this.. but it's always good to have a little confidence booster when you haven't done it for a while..
good pictures too.
Great timing. I just spent my entire Sunday afternoon doing just this. The scramble was to get it done before my daughter woke from her nap and wanted the TV. Spoiled child but much better looking house.
Here from between naps on the porch.
I love your blog wallpaper, btw!
Thanks for linking up to the Mad Skills party!
I have ivory outlets in my I wish they were white home…hmmm, trick is now jumping in and switching them out. Thanks for this!
Your instructions are so detailed! It really makes it look easy! I am going to save this one for my new son-n-law. Him and my daughter are in the process of buying their first house, and he could use these "how to" tutorials you post. I just love each and everyone one of them you do. You again, are amazing, but I think your dad was more amazing by having the sense to teach his girls the way he did!
Nice! I'm going to refer people to you when I get asked how to do this. I refused to take responsibility if someone zaps themself. :o) You did a really fabulous job of explaining everything. I think an 8 year old could do it with you as their guide!
DANGER!!!!
By all means girls should know how to change a tire/tyre, use powertools etc (I taught woodshop in the US & my Dad taught me how to change a plug as a child too), but I am a bit concerned that this is encouraging something very dangerous. I changed plugs before when I was young and stupid, but there is no way I would do it anymore or encourage others, especially if I couldn’t supervise or be sure of their ability level.
I know the voltage/current varies in different countries, but in many countries (including where I live) it is now illegal to install a power point yourself because it could be fatal if handled incorrectly. People living in flats where someone else might suddenly turn on the power or people with different types of plugs might be in danger of electrocution or fire at a later point.
At the very least I think your instructions should suggest that their be someone else on ‘speaker’ phone who lives close by. If the person on the other end doesn’t talk them out of it, at least they will be listening so if anything goes wrong they can alert medics in case of emergency and can come and supervise any potentially traumatised children before they endanger themselves too. All it takes is for the bulb/connections in the lamp you THOUGHT you turned off to be temporarily faulty and the wire would actually be live.
….and please mention in your instructions it is illegal to do this in some countries.
Dani, I’m not sure what countries you are talking about. But, if the reader follows instructions, changing an outlet will not kill them. Especially if their home is grounded. I respectfully disagree with your fear-inducing comment.
Women can do anything you or daddy can. By all means what century are you from.
Your instructions don’t mention anything about installing a ground. People need to research proper codes for their area. Changing a 2 prong outlet to a 3 prong without a ground can be dangerous. When in doubt consult an experienced licensed electrician. According to the 2014 NEC 406.4 (2)a you can install a GFCI outlet in the place of a 2 prong outlet when there is no ground. Just have to label the outlet “No equipment ground.” A GFCI electrical receptacle will protect against a hot to neutral short or a hot to ground short at the receptacle but its internal test circuit cannot be used.
JB, I don’t mention installing a new ground wire because this tutorial is for replacing an old outlet that has a ground wire with a new outlet in the same box and using the existing ground wire. People looking for a tutorial for installing a three prong outlet in a box without a ground will need to Google another tutorial.
Hi AliRza, In response to ‘dani’ cautioning those who may wish to change out their powerpoint, you said ‘Women can do anything you or daddy can’ and ‘What century are you from?’ I assume that is because you wanted to stand up for women and assumed dani was talking from a sexist, stereotyped and possibly traditional chauvinistic perspective.
Well, I am dani and I am Mum of two who taught woodshop in the US and The UK and I have also designed and made a lightfittings myself. My husband isn’t the ‘handyman’ in our house, I am. So who is doing the sterotyping?
After I wrote my response above in 2013, I spoke to professional electricians in Australia and they confirmed that it is illegal and dangerous to rewire powerpoints here. It is not a matter of being sexist or having a mindset from another century. It’s just a fact that the voltage is much higher in some countries outside the USA which is why I have had to buy a transformer (on top of an adapter) for electrical goods I bought in the States as the voltage in Australia is too strong for them.
I draw your attention to James Bergman and Danica’s experiences of electrical shocks above & I stand behind my original comment that those in SOME COUNTRIES OUTSIDE the U.S.A. need to be aware of the voltage differences as these directions will not be safe for everyone to follow.
If you are ‘not sure which countries’ have electrical voltages different to those in your country, don’t assume I am wrong and inducing fear for the sake of it. As a teacher in a field where females are under-represented, I can assure you I am in the business of encouraging women to break through gender barriers as well as actively being a role model, but I also want them to survive to tell the tale.
AliRza, In response to ‘dani’ cautioning those who may wish to change out their power point, you said ‘Women can do anything you or daddy can’ and ‘What century are you from?’ I assume that is because you wanted to stand up for women and assumed dani was talking from a sexist, stereotyped and possibly traditional chauvinistic perspective.
Well, I am dani and I am Mum of two who taught woodshop in the US and The UK and I have also designed and made a light-fitting myself (I didn’t install it). My husband isn’t the ‘handyman’ in our house, I am. So who is doing the stereotyping?
After I wrote my response above in 2013, I spoke to professional electricians in Australia and they confirmed that it is illegal and dangerous to rewire power points here. It is not a matter of being sexist or having a mindset from another century. It’s just a fact that the voltage is much higher in some countries outside the USA which is why I have had to buy a transformer (on top of an adapter) for electrical goods I bought in the States as the voltage in Australia is too strong for them.
Brittany, I draw your attention to James Bergman, Melisssa M and Danica’s experiences of electrical shocks described above which indicate that even your fellow country’men’ will need to be very careful. I stand behind my original comment that those in SOME COUNTRIES OUTSIDE the U.S.A. need to be aware of the voltage differences as these directions will not be safe for everyone to follow.
If you are ‘not sure which countries’ have electrical voltages different to those in your country, don’t assume I am wrong and inducing fear for the sake of it. Having been a teacher in a field where females are under-represented, I can assure you I am in the business of encouraging women to break through gender barriers, but I also want them to survive to tell the tale.
Thanks for clarifying your intent. I agree, it would be a good idea to check what your local codes are, especially in countries that have voltage higher than 120.
Meh. Seems obvious this tutorial is for U.S outlets but if you’d like a disclaimer, sure. It isn’t a how to run a circuit. It’s a replace old with new exactly as you see it. Whether the u.s. or not you have a responsibility to find specific information for your region. I still don’t see why girls are a higher risk factor but I’d say it’s a generational difference. If this scares you get a professional not a speaker phone.