When is a Closet not a Closet? Reading Nook Transformation!
Come see this Closet Reading Nook Transformation! Learn how I turned this closet into a Reading Nook in a weekend. This area could also become a built-in desk area at a later date.

When is a Closet not a Closet? Reading Nook Transformation!
Have you seen all those cute closets on Pinterest? The ones that were closets but are now a new space like a reading nook or a home office? Well, today I’ll show you how you can give your closet a makeover by turning it into a reading nook!
The Back Story:
My husband took the boys camping! Translation: A free weekend – by myself – peace and quiet!
{insert sound of hammers, jigsaw, table saw, and more hammering}
Well, forget the quiet part, I decided to tackle another DIY project I have been thinking about for almost two years. My son’s closet!
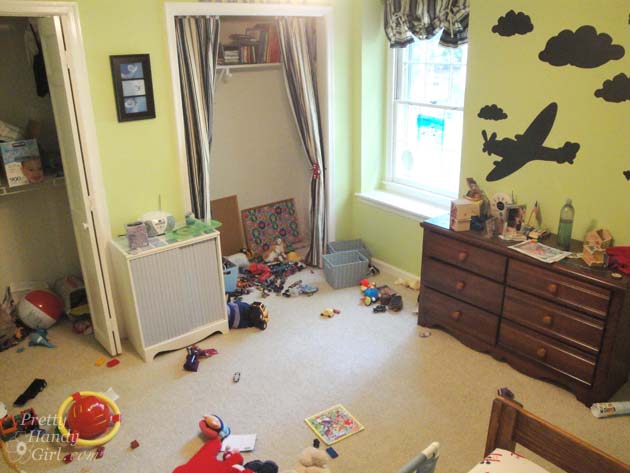
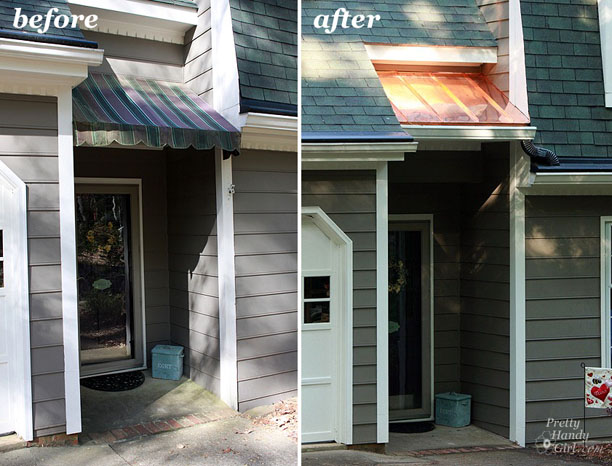
My three year old has two full-size closets in his room. And, yet, his toys were always strewn around the room. Here is the “keeping it real” BEFORE picture:
Last year I took the doors off one of the closets and put up some curtains so he could have a little hideaway. That was an easy task, but I wanted to give him more storage and a fun spot to sit and read books during quiet time. When I saw this picture in a magazine, I knew I had the perfect solution.
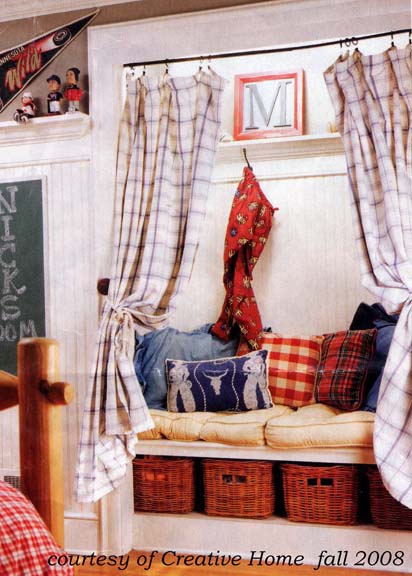
Kym, the homeowner, turned her son’s closet into a private nook. I thought, no problem, I’d complete this project in an easy 2 days. After all, how long can it take to renovate one 6′ x 2′ closet? During stopping points I could squeeze in a pedicure, swim some laps and possibly have a friend over for wine and some chat one evening. Truth be told, it ended up taking a full 3 days (and nights). If I had a helper, I probably could have knocked it out in a day and a half.
Before and After:
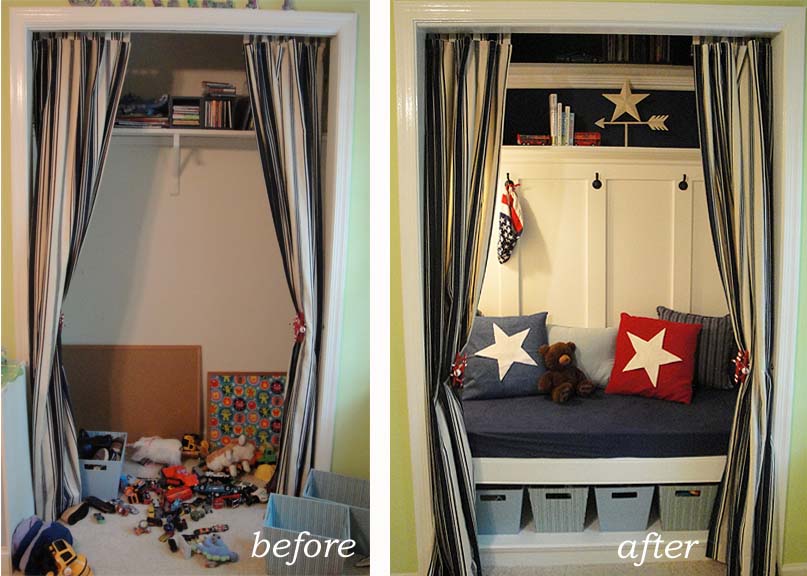
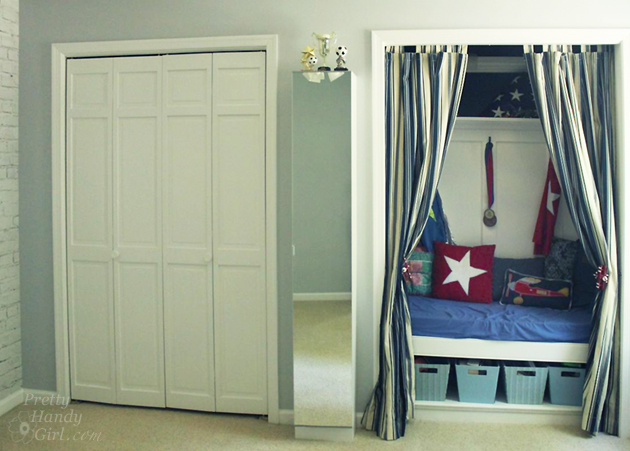
Ready to see how I transformed a standard 2′ x 6′ closet into a multi-functioning reading nook, toy storage, sleepover bed, and creative play space?
How to Turn a Closet Into a Reading Nook:
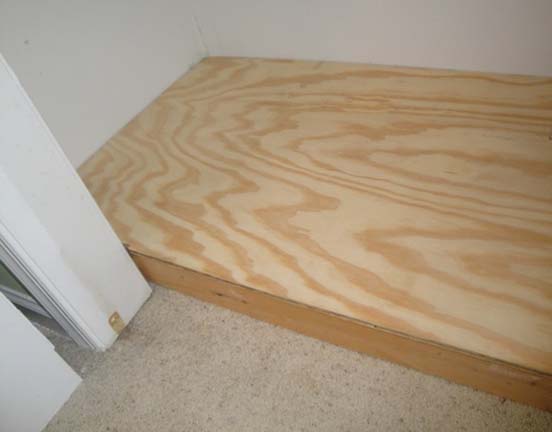
First (after cleaning up all those toys, of course), is removing hardware, base molding, and patching holes. (This is where I found I didn’t know my own strength and ended up having to patch a larger drywall hole after trying to remove the closet cleats.)
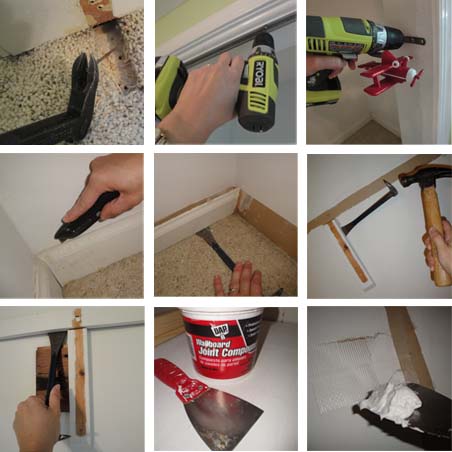
Once the closet is empty it’s time to build!
Materials:
(I’ve included affiliate links for your convenience. I earn a small percentage from a purchase using these links. There is no additional cost to you. You can read more about affiliate links here.)
- 4 – 2x4x8 studs
- 1 – 3/4″ x 4″ x 8″ sheet of finish grade plywood
- Tape measure
- Drill
- Hammer
- 3″ screws
- Level (and/or laser level)
- Drafting compass (or tool for scribing)
- Pencil
- Jigsaw
- Miter Saw
- 3″ foam cushion (cut to size or use electric carving knife)
- Caulk
- Primer
- Paint
- Paintbrush
- Roller
- Paint Tray
Optional: trim molding & shelving
Home Office Desk Option:
If you want a home office in your closest, skip the base and only build the framing for the bench, but install it at 29 inches (standard desk height).
Measure and Cut Lumber:
Measure the floor of your closet to determine the size for your base and bench.
Cut all your lumber to size, then build two frames. One for the base and one for the bench.
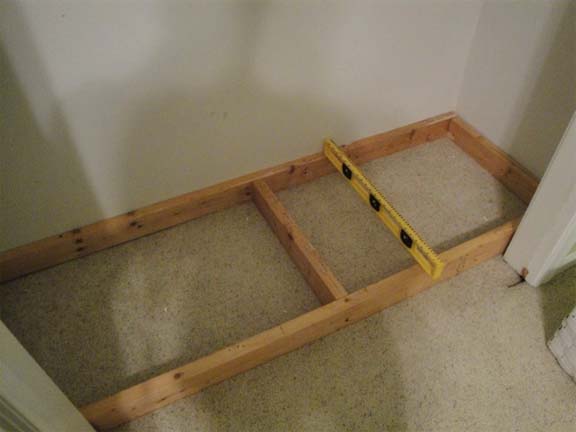
Your base frame only has to have one center support because it doesn’t have to hold much weight. The bench seat frame needs two center supports at 2′ intervals.
Find and mark the studs in the wall. (Here are 5 different ways to locate studs without a stud finder.) Then secure the base frame to the studs using a few screws.
Cut your finish grade plywood to top the base and bench frames.
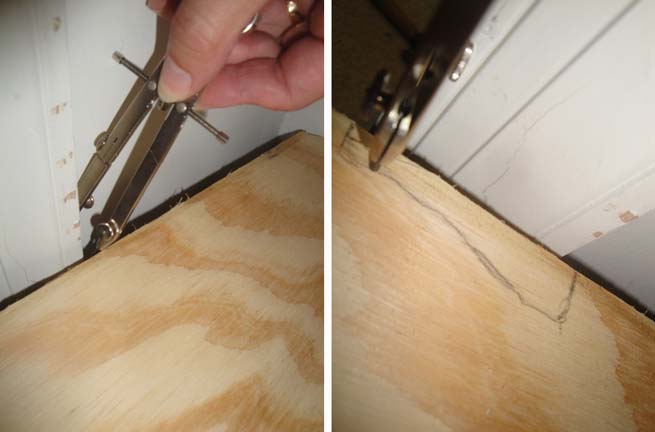
Scribing Around Molding:
Here is a little trick for scribing the profile of trim or other obstacles onto your board. Use a compass and set the width to the same distance from the wall to the outside of my door casing. Then draw a line around the casing being careful to keep the compass perpendicular to the casing. Then you can cut out the profile with a jigsaw.
Set the plywood on top of the base. Secure the plywood to the base with a few screws (or wood glue and trim nails.)
Next build the second frame the same way (but add two center supports for the bench.)
To simplify things, you may want to prime as much of the framing as you can before nailing it into place. It is easier to prime wood on sawhorses.
Installing the Bench:
If you have a helper, this process will go easier. If not, you need to temporarily hold the framing before securing it. Cut some scrap blocks to hold the bench or temporarily drive in a few screws.
Measure up 18″ from the floor. This is standard bench height.
Use a level (both a carpenter’s level and laser level if you have them) and level the bench platform before screwing it into the studs. Use at least two screws on each side and several into the back and one on either side of the door frame to secure the bench in place. Set the plywood on top of the bench framing. Secure it with a few screws or wood glue and trim nails.
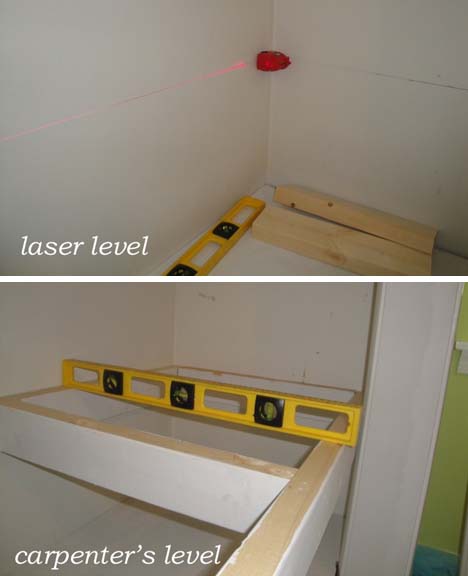
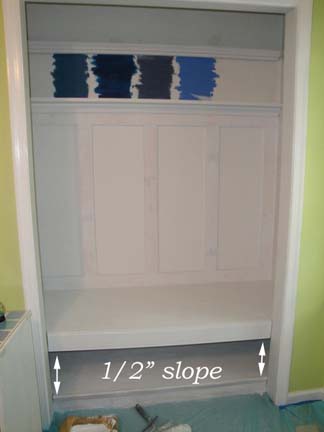
Remeber that note about having a helper? I wish I had one because at some point the right hand side of my bench shifted while I was securing it, which resulted in a slight slope. Seriously, I really did level it! I even have the pictures to prove it! Shhhh, don’t tell anyone! My lesson learned is that next time I will either screw the frame in place to hold it or put a brace underneath to keep it from slipping.
Bench Cushion:
Cut the foam cushion for the bench seat. If you haven’t heard, the best way to cut foam is with an electric carving knife! (Huge thank you to my friend and neighbor Karen for the use of her 1970’s electric carving knife.)

You can sew a bench cushion later to cover it. Here’s how to sew a simple bench cushion with piping.
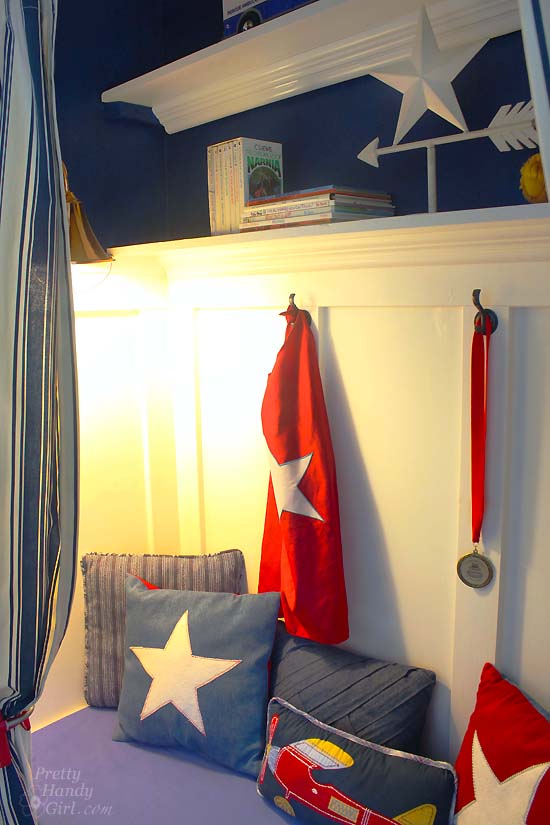
Decorative Molding:
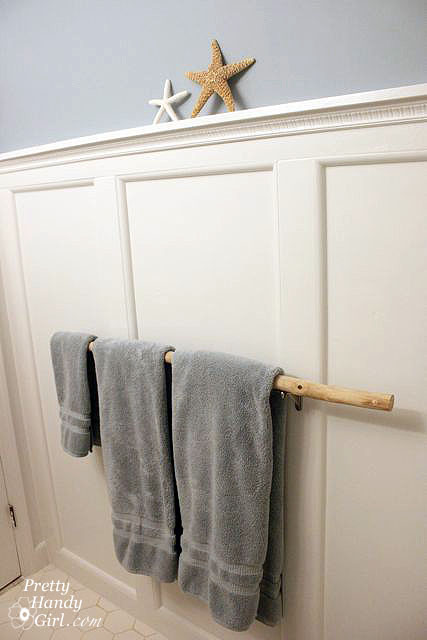
Sewing will have to wait, for now we’re going to finish off this closet reading nook with some decorative molding. This is a personal preference, but I chose to install board and batten molding for the back like I did in this bathroom.
But, if you don’t want to use board and batten, you may like the DIY shiplap look instead.
Then I added decorative molding under the shelves. Did you know that some of the molding in your home, especially crown molding, is made up of several different molding profiles? You can make molding more decorative by using several different pieces and then caulk seams to hide the edges?
Painting Prep:
Before priming all your wood, caulk all the seams and let it dry.
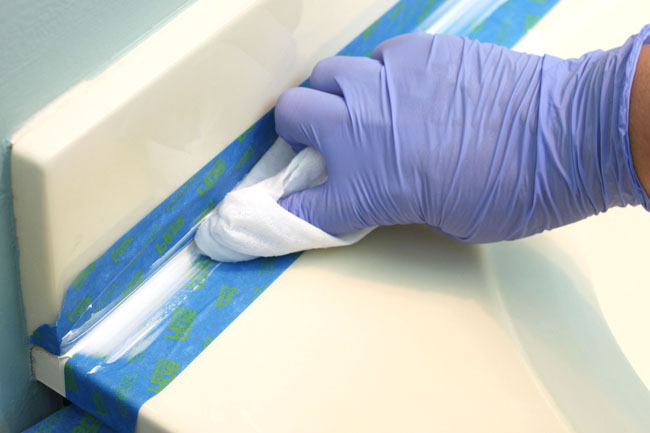
This is the Pretty Handy Girl’s tried-and-true caulking method:
- Squeeze out your bead of caulk with a caulk gun.
- Keep your finger at the front of the tip of the caulk and use a baby wipe smooth the caulk as it’s dispensed.
- Follow up with a clean baby wipe if necessary to smooth any spots.
It’s easy to caulk like a pro if you follow my tutorial.
Once the caulk dries, prime all the wood and trim. Let it dry.
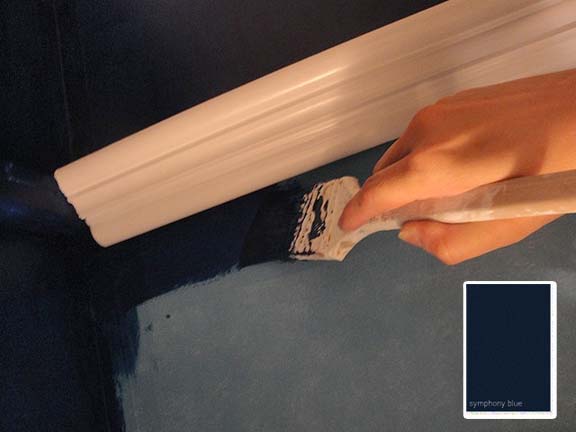
How to Tint Primer:
After trying some Benjamin Moore paint swatches, I settled on a deep navy blue called “Symphony Blue”. I knew I’d need to use some tinted primer before trying to paint such a dark color on the light walls. You can save money by tinting your primer. Simply add 1 part paint to 3 parts primer.

Isn’t the marble effect pretty! Mix well.
Painting:
Always use at least two coats of paint. This makes it easier to clean the walls and eliminates any missed spots.
Paint the trim first. Then cut in around trim with a good quality angled brush.
Use a paint roller to paint in between your cut in lines.
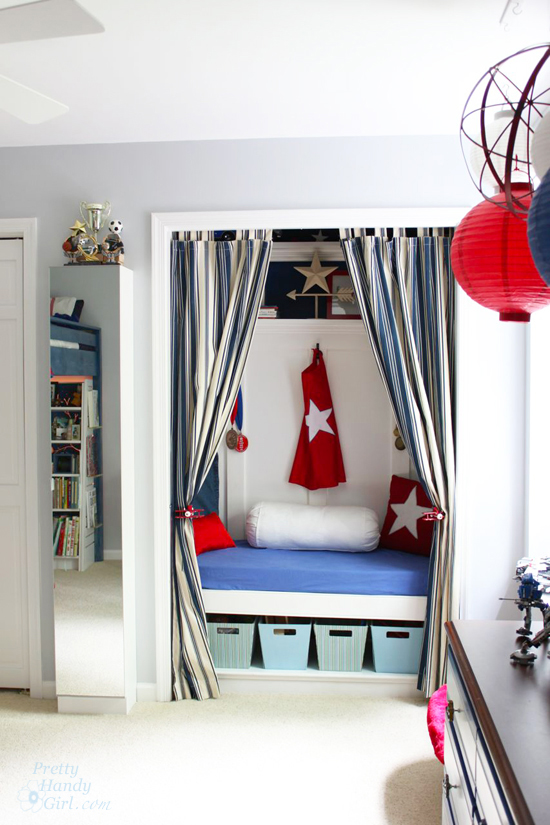
So, are you ready to see this Closet Turned Reading Nook?? The drumroll please…
Can’t you hear the Symphonic Chords playing?

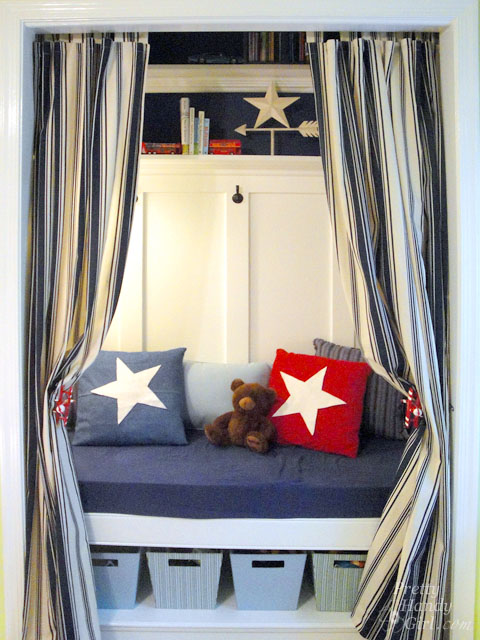
The copper wall sconce was also from the Habitat for Humanity ReStore. I scored that gem for only $5! It has a cord that I snaked around the molding and then plugged into the outlet just outside the closet. Click Here to Learn How to Add a switch to a Hard-Wire Light.

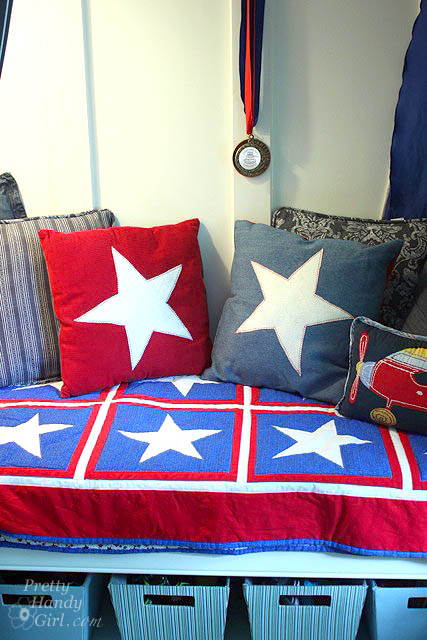
Plenty of storage bins for all the toys a three-year-old can hoard.
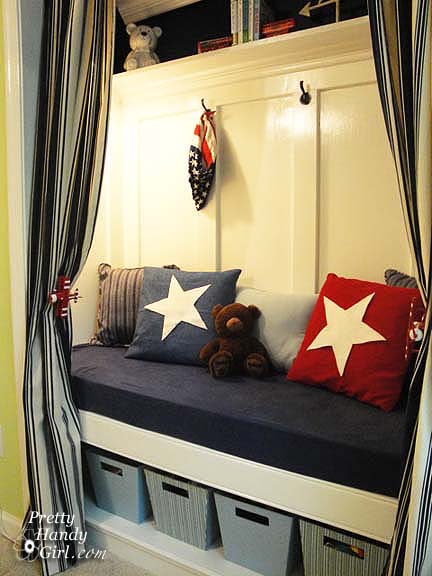
Star pillows were super easy to make with cloth napkins and fabric I had on hand.
Finally, a nook built for reading, sleepovers…
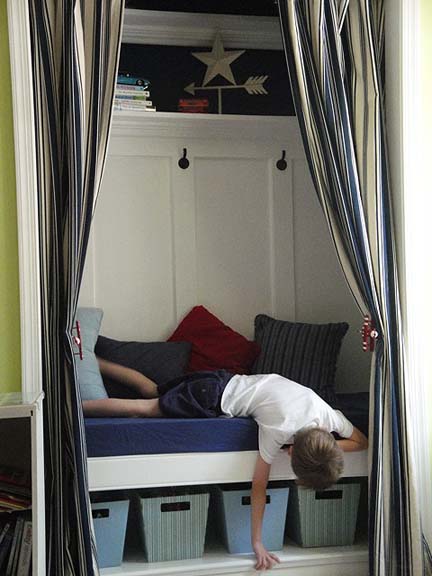
…or just hanging with big brother.


That’s all folks! Bye-bye!

![]()
Did you like this transformation? If so, you’ll love more custom spaces in my home!


Thus diy is so beautiful, until you have left me speechless!
Such a great idea! I am sharing this on Pinterest.
This looks exactly, EXACTLYYY, spittin’ image like Mrs. B’s Hive and Thrifty Decor Chick’s spaces had a baby. Nice work!!
Darlene, LOL. Well, except my son’s closet is older. So maybe it had younger siblings?
Electric knife for foam…..nice idea!
I love the paint color……thanks for sharing the name of it.
I’m always jealous of people who have so much closet space in their home that they can afford to lose an entire closet for an office or something like this. Nice job!
It looks really great. Do you by any chance have an itemized list of the materials?
If only I had an un-needed cupboard! Love it; the colour scheme and wood panelling are perfect. Thanks for agreeing to the use of the images, it’s now up on our blog at http://www.gingerandmay.co.uk/a-perfect-nook-revamped-cupboard-2.php. Kind regards, Sue.
this is completely amazing! too bad i have too many clothes in my closet to build one of these 🙁
OMG! I love this… I love the curtains too, most of these nooks I see don’t have the option of hiding everything if you don’t have time to tidy.
Love it!
Love! Especially the color scheme and board & batten!
Love this idea. Can I ask where you bought the foam for the bench?
I got it at JoAnn’s on clearance. I think it is 4″ thick ;-).
This is GENIUS! Thanks for the thorough tutorial!
I love this and was just thinking about awesome nooks and spaces. I hope you’ll come link up with me on Oct. 3rd at Roomspiration. You can also link up other rooms as well starting on Monday! Come check it out!
Eureka, this gives me such a good idea and I can’t wait to get started. Love your projects and sense of adventure. Isn’t it great to be an artist?
My crafty husband us going to ‘kill’ me!! Love it. Just the thing I plan to do in my daughters closet that was once our master bedroom!! Thanks so much for sharing.
Thanks for sharing this! We are now going to do this for my daughter’s room.
Why do you need caulk? I always thought it was for bathrooms and windows. What am I missing?
We’re moving into a new house in July, and my 9 year old daughter’s room was designed with two closets. I’d been thinking of asking the builders to leave the doors off one of the closets to make a vanity area out of it for her, and you’ve convinced me to do it (and given me some great ideas too). Thanks for sharing, what a beautiful space!
I love this. I showed it on my blog today and provided at link to here. Love your site.
WOW!!! I love yours better than the original inspiration picture!!!! LOVE!!!
Wow, completely clever and gorgeous. What a cool transformation. I would love to climb up in there with a book and pull the curtain shut!
2 thumbs up and a circle snap!! LOL! That is fabulous!!
I am SO jealous!! WOW! Great job!! Love the colors and the stars!
Please come over and enter my giveaway!!
Thanks!
Amy
Oooh! I can't wait to get in a home with an extra closet so I can do this!! Very awesome and love all the pictures! So glad I'm not the only one that's handier with tools
I love this! I have the same magazine pages ripped out of that magazine. That house is amazing and if I didn't know it I'd think your house was the magazine. Fab job!
d e n i s e
OMG….love it…first time visitor to your site, love it, I will pass your site on at my site.
my site is…
http://lifeatfirelakecamp.blogspot.com
Absolutely gorgeous. I admire you for your carpentry skills!
Well done you! I wish my little girls room had a closet!! 🙂
I wish I had an extra closet so I could make a nook like this for my daughter. She would love it! Great job.
I love this! It's simply an amazing transformation and you must smile everytime you go in there!
Becky B.
http://www.organizingmadefun.blogspot.com
Organizing Made Fun
Love this transformation! Gorgeous!
very impressive!
Wow! I absolutely love this idea! What a fantastic little space! Thanks for sharing the step-by-step process!
that totally awesome beautiful
This is a fantastic remodel! You make it look so easy & the results seem professional!
This is such an amazing project! Love it! So sorry for the confusion but my linky on my blog was just a way for me to organize my year in review. I didn't mean to leave it open. Rhoda is having a top projects of 2010 party starting tomorrow morning so feel free to link up then!
Wonderful!!!!!! I'm so inspired to find your blog as I'm a do it girl too…. have popped you in my favourite blogs!!!
WOW! I am so impressed. Your transformed closet is awesome! I bet your son was tickled to see this wonderful space of his own. I love it! You are quite the handy girl aren't you! I bet your husband is jealous of your skills. lol This has inspired me to think of adding a guest bed in the closet with the closet being the headboard and using the sides as shelves for books and a couple of sconces. Kinda cozy. Have to wait until we get our house though. Apartment mgrs might not like the idea. 😉
A+, girl! This is amazing! I love to tackle stuff like this. You have inspired me for sure.
Wow – that is amazing!!!
We're in the thinking of changing our front closet into a "mini-mudroom." I'm going to be bookmarking this and referencing it often.
I popped over from Remodelaholic just to get another peek. This is one of the most amazing DIY projects I've seen in blogland. amazing job!!!!!
You are amazing!! You have handy man skills, decorating skills and the vision to put it all together! You are truly an amazing woman! You should have your own business doing these kinds of projects for people…you are sooo talented!
Wow!
Amazing. You're a genius.
so cute! you did a fabulous job!
Amazing, amazing job – I have seen this in mags, too – and I want one for myself – never mind the kids. 😉 Thanks for posting!!
i am amazed! i never would have thought to do this with a closet. you did such a wonderful job.
Wow, fantastic! I often see these types of nooks and want to build one. Thank you so much for showing how it is done. It looks completely professional and worthy of any good decorating magazine. I do hope you rewarded yourself with that pedicure when all was said and done!
Following you over from Tatortots ans Jello! You did such an amazing job! So inspirational! Thanks for sharing! :0)
This is amazing….and the tutorial is excellent!!! Visiting you from Tatertots and Jello….
WOW! You outdid yourself, what an awesome nook! I thought about it while on vacation and couldn't wait to see what you'd done. I'm impressed!
man, this is so fabulous! I love it!!
Okay so you make this look sooo simple! I'm floor girl! Just stunning and equally impressive. This really is just awesome.
Oh WOW! That is awesome! I wish I had an extra closet in my home so I could do this!
Love it! A girl after my own heart, and I make those kinds of mistakes when I'm building stuff too. It's hard to avoid really. I'm convinced that the "pros" also make mistakes all the time too but they just don't announce it like we do. I say, let others learn from our mistakes though so I commend you for pointing out that your work was not perfect. Pretty darn close though. It looks fab and functional.
I'm definitely following cause you're a woman who has power tools and knows how to use them.
That is so so cute! Seriously, it looks like it came right out of a Pottery Barn catalog!
That is gorgeous! You did such a great job on it! LOVE the blue and white – I'm going to follow so I can see how you did the star pillows. 🙂
You are definitely a handy girl. I reminds me of the day I built an entire closet (with sliding doors) in my 5 yr old son's room…he is still using it 15 yrs later! I loved your reading nook, it is so cute and professional looking. Congrats on being the #1 project!
This is really neat…I love all the organized cubbies and just the homey-ness of this. I'm sure your boys love this little nook!
I gave you a shout out on my blog today!
http://leeanderin.blogspot.com/2010/07/america-you-are-very-beautiful.html
Wow!!! I agree with April, looks like it's straight out of a magazine. Very inspiring. Just found your blog and I will definitely be back!
WOW!!!! This is AMAZING!!!!!!!! It looks like it's straight out of a magazine….FANTASTIC job!
Wow! I wish I wasn't renting! I'd totally do this in my boy's room! Boys don't have a lot of clothes anyways (hee hee)
http://www.nuestrasaventurasentexas.com
Hi Brittany! Imagine my surprise when I clicked on the link from Centsational Girl to say "Hey I know her!". This is a fantastic project – great job!
Holy cannoli this is fabulous! I want one for me, so I can get 5 minutes peace from my kiddos, lol! You did an amazing job and I am so going to follow you from now on!
WOW! You are so talented! I LOVE IT!
you are not just a "pretty handy girl" you are a truly amazing, fantastically talented woman! Please keep the inspiring posts coming!
I was surprised you didn't have http://www.knock-offwood.com/ on your blog role – you'd really like it!
Absolutely an amazing transformation! I think I want one for me and I am an old lady. Hehe.
~jan @thepaisleycupcake.blogspot.com
Bookmarking for future use!
((fellow CSI crafter))
Jealous of your talent and of the nook itself. I'm bookmarking this post for sure…..granted, I'm not sure I'll be tackling it in this lifetime, but a girl can dream, right?
I love how your nook turned out! And the star pillows too. I would love to do this, except we live in a very old house that only has two closets in it!
Happy 4th!
Carol~~Old Glory Cottage
p.s. If this is any indication of the sort of thing that you normally do, I'm going to love looking through your blog some more!
I adore your patriotic spirit. It is red, white and bluetiful!
I hope you will stop by for a bbq on a white tablecloth. 🙂
Great space re-do. Sooooo useful now!!
Hugs, Lana
FANTABULOUS!!! You are a ROCKIN Handy Girl!!!
Great job! I love it!!!!!
This is so gorgeous and inspirational. Ill be filing this away for a project once we move. I'm just finishing up a laundry room redo (so I totally get how time on a project can runaway from you!) and I'm a little burned out now.
Boy oh boy, the reading teacher in me thinks this is the most terrific idea I've seen for a child's room in a long time. Kudos to you, mom! Love this idea, but your attention to details has made this little reading nook very attractive and inviting. You are definitely a Handy Girl. This need to be in a magazine! It's more attractive than the one you show in your photo.
Happy 4th of July! ~ Sarah
Wow! That is AMAZING! Definitely scoring some awesome mommy points on that one. 🙂 Happy 4th!
That turned out so sweet! I am so impressed that you did all that on your own! Hopefully my next house has a little space I can turn into a cute nook like yours. 🙂
Wow! I am soooo impressed! I like yours better than the one that inspired you! It came out awesome! That's so cool that it can be used for so many purposes! You rocked it, Mom!
That's awesome – I wish my kids had 2 closets too so i could transform one of them!
OMG! I'm emailing this to my husband now that has been trying to figure it out on his own for our own house!!!
and i love love love it's a how to from a FEMALE! =) HAHA you go girl!
Absolutely stunning! What a fine piece of workwomanship! You should be proud! Maybe sneak in there and savor a cup of coffee some afternoon.:)
It's fabulous!!!! I'll bet your boy was so excited to have this hideout, I mean nook. I know I would be excited. Thanks for sharing. And I'm so impressed. I could never do this. But my hubby could.
That is an amazing transformation! I only wish my projects like that would take 30 minutes to an hours like they do on TV.
This is so cute! What a great idea. It looks like something from a Pottery Barn catalog! 🙂
It's truly sensational. Lotta work! Thanks for the great pics!
Would love for you to stop by tonite (9 pm PST) and link up to Fab Finds for the 4th!
(would actually love for you to stop by in person & do this in one of my closets! 🙂
Wow, this was the first time to your blog from Centsational Girl… I am so impressed as a fellow woman to see what you did! Even if it took you three days and three nights, you are amazing! Your Dad did a great job raising you and teaching how to do all that stuff. The closet looks fantastic! You deserve a mani and pedi after that!
Gorgeous! You did a fabulous job. If only I had a closet to make over…
Absolutely stunning….luv this!!!!!
Wow, I love this!! Beautiful job. I am going to be a follower. Your instructions are really helpful.
Simply fabulous! When the boys are away mom will play! I just adore the color scheme – beautiful. You have done an amazing job! Hope you have a wonderful holiday! ~ Stephanie Lynn
WOW! What a fantastic job! The detail you've put in this: outstanding! I would love to have a nook like this!
GREAT JOB! I love when people think "outside the box" in terms of space planning. Great idea and the finished product looks excellent!
Lindsay @ A Design Story
What a great project – absolutely beautiful!
I SOOOO need a visit from my sister so we can work on a project together and bond! I have a few in mind. Love you!
WOW!!! You did such a great job. 🙂 I love DIY storage options. I love that you have hooks and cubbies. Very cool! I'm visiting from The CSI Project today. 🙂
This is darling! Great find with the sconce. (looking forward to hearing how-to) Very striking. Good job!
OHHH It's FABULOUS! I'm so glad you told me about it! WOW, you rock the tools! I bet BOTH boys love it. 😉
Fabulous! I am knocked off my feet. I want one, even if I have to throw out all my clothes. Or my husband's clothes, maybe.
Congrats on a great idea, beautifully executed.
MJ
Closet Confidential: a Charlotte Adams mystery
This is a beautiful project. Turned out amazing!
That is an absolutely awesome transformation, and a great use of space!
This is such an amazing transformation! I love the color scheme, the bins, the board and batten along the back….everything about it! Your son is so lucky to have such a neat spot for reading. Also, thanks for sharing your "real life" befores….it's so nice to know that I'm not the only one w/ toys all over the place. 🙂
Your closet kinda made me emotional! I am so impressed Brittany! Shelley D
Beautiful, Britt! Having just seen the closet in its "before" glory, I am doubly impressed.
This is AMAZING! Wonderful job! I just love the transformation — what a perfect little spot you have now!
Incredible! I am going to try to convince the hubs that our guest room NEEDS this! Love it!
WOW will you come and do mine!! I LUV IT!!!I have become a follower and I hope you’ll do the same. Swing on by to join our BUZZ on by Thursday blog hop and Giveaway!! We also have a Party Link up to show off your party side every Wednesday. You can link up any parties, party decor, party printables, party paper items, party ideas, gift ideas, anything PARTY related!! I’d love to feature you and show off your fabulous parties so make sure you linkup!
Nicole @ TheTwoSavvySisters.blogspot.com
Smiles,
Nicole
Oh my goodness. This is just too fabulous for words!!
This turned out awesome!! Love the colors too.
beautiful amazing I LOVE IT!
What a great idea! Hmmm…I wonder if my daughter could go without her one and only closet. 😉 Visiting from CSI!
FABULOUS!!!! you did a fantastic job! I LOVE it!!
Wow! What a transformation. All your hard work really paid off…and thanks for taking pictures along the way.
WOW!!! I love this! I would so do this if I had an extra closet. I enjoy finding other handy mom's out there in blog land as I'm one who is better with the power tools than my hubby ;)You did a fabulous job.
Amber